

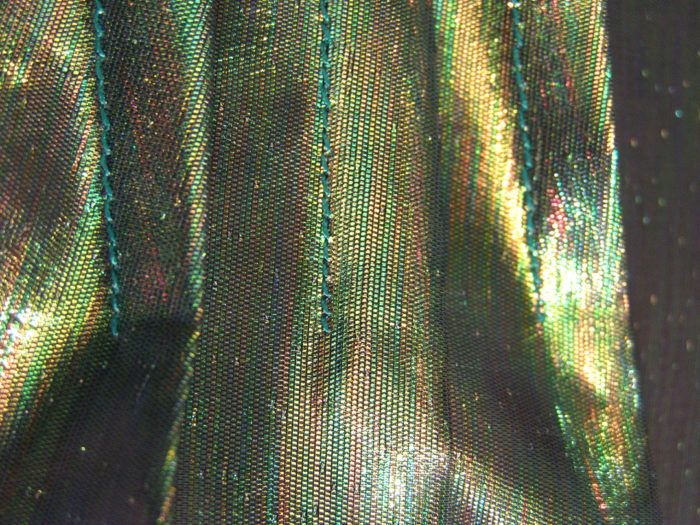
Tucks or darts in transparent fabrics:
The desired effect when sewing tucks or darts in transparent fabrics, is making the end of the stitching clean, pucker-free, with no tail-ends of thread waving about. This is done by sewing with the bobbin thread.
When sewing with the bobbin thread, you are essentially folding the thread onto itself before sewing. That way, at the end of the tuck, the stitching line just-ends.
You need to think backwards when sewing this way. Generally when sewing a tuck or dart, you sew in the direction that it will end, and at the end, you back tack.
For this technique to work, turn your thinking upsode down–this means, you will begin the stitching line where you want it to end, and stitch from that point.
In this demonstration, the upper thread is yellow, the lower thread is red, for clarity.
To begin, mark your tuck stitching line with the chalk wheel or clay chalk.
Then, drop the feed dogs on the machine. Place the work under the machine and lower the presser foot.
Dropping the feed dogs will keep the machine from walking the fabric before you start sewing. If the feed dogs are up, the first stitch will come out crooked.
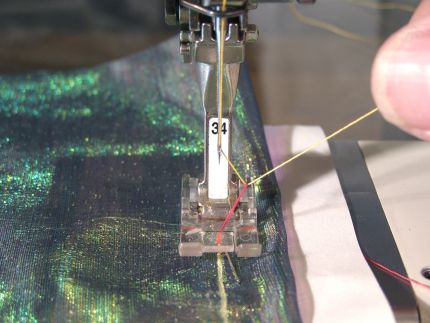
Holding the end of the upper thread, walk the machine one stitch, so the bobbin (red) thread pops up through the fabric.
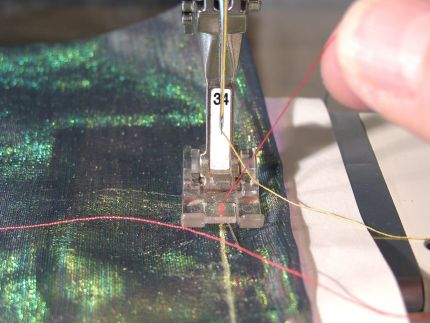
Pull up on the bobbin thread, bringing up at least one yard of thread. Make sure you have enough thread–you will need to sew the tuck, or dart, as well as using the extra to prepare for the next tuck or dart.
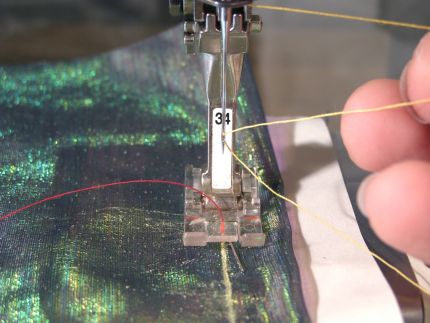
Remove the upper (yellow) thread from the needle.
Start your 14-day FREE trial to access this story.
Start your FREE trial today and get instant access to this article plus access to all Threads Insider content.
Start Your Free TrialAlready an Insider? Log in


Kenneth King is just the most clever guy - this is great! Can't wait to try it!
I've have been wondering how to do something like this ... the instructions and photos are so clear. I think I can! Thank you!
very clear and easy to understand instructions - thank you so much. Using the cloured threads helps too.... cheers.
Wow, this is fantastic! Thanks so much for explaining it so well, and with so many photos. I'll be linking.
Once again, marvelous clear instructions and illustrations from a master. THIS is why I read the magazine and the website. Can't wait to try it. And, love UNDERSTANDING it.
More,more,more please Kenneth King. Fabulous technique, instructions and photos.
This is a trick that is sooooooo cool! Cannot wait to adapt it to quilting! Keep these ideas coming
That brought back memories. I was taught to use this trick for darts. I had/still have a Singer Touch and Sew Model 645. It has the wind-in-machine bobbin. I would wind the bobbin thread, not cut the thread and then start the point of the dart against the thread. This is fun because you don't have to start on a fold.
WOW!!! Clear as a bell; the colored threads made it even more so. Thank you for helping me work out something that had me stumped!! Keep up this fabulous tips!! Many thanks, RSB in Tucson, AZ
I too forgot about this little trick I learned as a teenage sewer. Thanks for reminding me!!
I did this technique "about" 40 years ago! Thank you, Kenneth King for refreshing my memory!
Wow! That is awesome... Thank you Kenneth! I never knew how to do that!
Fantastic tip. Been sewing for 50 years and never have seen it before. Can't wait to try it.
So simple but so clever!! how did I never hear of this?
Awsome!!!!!!!!!! I will try this technique and please keep on giving us new sewing and designing techniques. Thanks...Paws
I am so excited to try this!!! Thank you. this is an amazing concept to me... I've never heard of it before but it makes a beautiful finish. Thank you!! Great step by step photo's and instructions!
Oh for pittys sake! That is awesome! Gotta try this!
One of the best tips I have read in almost 40 years, thank you
Thank you, thank you for the clear and concise directions. I can't wait to use this tip..
I've never done this but am tucking (no pun intended) it away to use someday. Really great, clear photos and instructions.
Something fantastic! excellent technique! I am so happy, but if I give advice as sewing, but you have to try, thank you Kenneth.
Thank you, thank you, thank you. This is absolutely fantastic.
I too had forgotten about this and Kenneth has explained it better than I've ever seen....BUT, has anyone tried doing this with one of the new Bernina 880 series machines (I recently bought one) that doesn't thread conventionally? I would love to know. thank you