

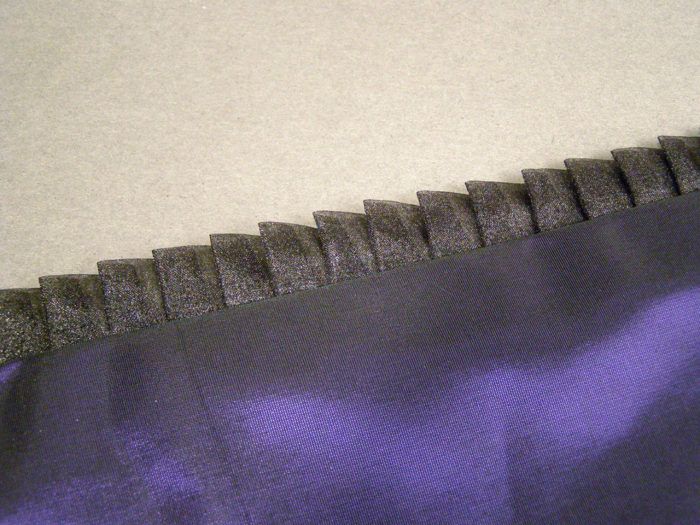
Recently I needed a small amount of black polyester organza pleated edging to trim the lining of a fur coat I was working on. Usually, I cut strips and send them out to the pleater’s, but this was such a small job that it was more cost-effective to do it in-house. So, I dug my “perfect pleater” (a device made from fabric that is stiffened, and features slots to form knife pleats. It looks like those Levelor Mini-Blinds one sees still in windows all across the country) out of the drawer and set to work.
The success of a pleated edge is uniformity. When I began, I was having a problem with that, because of the polyester-natural fibers work so much better in the perfect pleater.
For those who have worked with polyester organza, it can be quite lively-it has a lot of spring. Once pressed, it will take a pleat, but wrangling it into the pleater, and keeping it in place until I could press it was tricky. Thus, I developed the following technique to solve this problem.
1. Draw a line with permanent marker on the pleater, so you have a guide to work from.
2. The pleats I decided on were 1/2″ apart, which meant that I would be using every other slot on the pleater-the slots being spaced at ¼” apart. The finished height of the pleats will also be 1/2″. Cut strips from posterboard, 3/4″ wide. I’m using two different colors here, so you can see how this process works-in your workroom, you can use any color you have at hand.
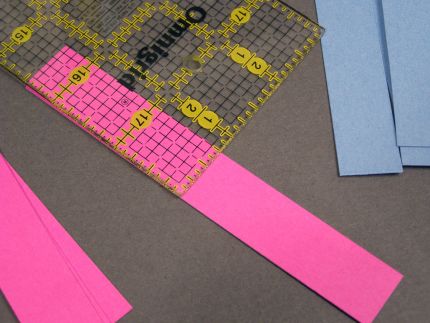
The reason the strips are 3/4″ wide, is that when they set into every other slot in the pleater, you can still see your guideline.
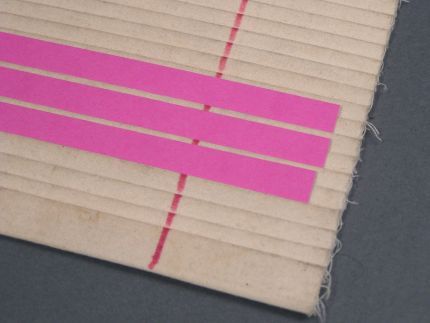
3. Tear the polyester organza into 2 ½” wide strips and press them in…
Start your 14-day FREE trial to access this story.
Start your FREE trial today and get instant access to this article plus access to all Threads Insider content.
Start Your Free TrialAlready an Insider? Log in


As usual, Kenneth figures a way to achieve the goal. He has always been one of my favorite instructors!
Thankyou for this.
Kenneth, this is both logical and practical - thanks so much for sharing this tip!
I can't wait to experiment with this on my 'perfect pleater' Good job!!!!
Amazing! I love this technique and Kenneth's wonderful instructions.
Who am I to add to what Kenneth has to say but it might be helpful to know. I use iron on stablizer instead of the register tape. Roll the width of the stablizer, cut it the width you need and this will give you a long strip. Fuse it to the pleats, roll the board off the pleats, stitch the edge and tear away the stablizer. It works well for me!
Another way to pleat fabric without special equipment is to use freezer paper - the kind from the grocery store or the pre-cut size that will go though your printer.(Available from Dharma Trading Co http://www.dharmatrading.com/html/eng/500944-AA.shtml)
For the grocery store freezer paper, draw lines on the dull side of the paper where you want the pleat folds. For the printer sized freezer paper, make a lined template in your word processing or graphic program and print it out on the dull side freezer paper.
Cut & piece the freezer paper to the length and width you need, then iron the fabric onto the shiny side of the paper. Fold back and forth along the drawn or printed lines, press well and let cool. Then you can either sew along an edge and tear the paper off (sometimes a bit tricky to get it all off) or you can just pull the fabric and paper apart. If you've pressed well you will have pleated fabric and you can use the same freezer paper to pleat another piece. There is no adhesive residue left on the fabric.
This method can also be used to fold origami inspired fabric shapes with precision.
Kenneth, you are so good at thinking outside the box! And I loved the comments from your fan club too. I'm so inspired, I want to go pleat something! Maybe I can use this method for my granddaughter's Valentine dress. Since I don't have a perfect pleater, I'm going to try the freezer paper method. Thanks you for the ideas!
Any idea of supplier of the perfect pleater in the UK, please? great technique...
Most welcome application. I have been looking for a method to pleat tulle to embellish a petticoat I wish to make to complete a purchased party dress.
Thank you, thank you, Kenneth!
Would you use a ruffler attachment for poly organza? I've never tried but i've used the ruffler attachment many times to make small pleats in home dec fabric and in garment construction.
I love this , It is a must try.
What a wonderful tutorial! Thanks for sharing & taking the time to write & photograph all the steps!
Dear Mr King:
Thank you for this tutorial; I have been doing some work with nylon organza, and had been thinking about doing some pleated trim just like this so this info will come in handy. I also want to say that I REALLY REALLY enjoy all the articles you write for Threads; f'r instance I just LOVED the idea of the brocade lining in that green tweed jacket you made; I am inspired to make something similar! One of these days I am determined to attend one of your workshops at the Craft Show in Toronto!
I hve also used fusible thread to keep gathers from shifting; that would probably work here, too. One would probably need a thin strip of cloth to cover the exposed thread and keep it from sticking to the iron. Just stitch a line of fusible thread along one edge of the strip before pleating, then after pleating, slip it part way out of the pleater and iron it to fuse everything together.
this is nice,love to see it on video
I am a little unclear as to how the pleats move from the Perfect Pleater to the 10-key tape. do you pull them out and lay them back down, or pin them somehow while still in the pleater? Thanks!
These instructions are useful; however, I really hope you weren't sewing with real fur, Kenneth. Animals on fur farms are horribly mistreated and sometimes even skinned alive. Please use fake fur!
This is a response to Kuf, who asks how the pleating gets to the tape--you pull it out of the pleater, after it cools, then lay it onto the tape, and pin. ake sure to let the fabric cool off first, so the pleats are set properly.
Kenny would you please show us the garment? I would love to see the inside how it looked once finnished
Hi there Kenneth,
Loved the tutorial and have found where to buy the perfect pleater from............so thanks for that to.
Love your contributions to Threads Magazine, which I eagerly read when I receive it.............and just as your books, your instructions and clear diagrams/pictures help so much. Inspirational to those of us that dont have classes available, or the stores to buy from.
I would love to know, where do you source the jewellery findings you used on your buttonholes in your book,Home Sewing Couture Techniques( as I want to make a jacket and use the technique - takes buttonholes up a level doesn't it. I am visiting NY for a special anniversary and want to stock up on all the goodies I cant buy here at home.
Thanks again, I really love the fact that the way you explain things does actually always makes sense to me and builds my confidence to try new techniques. Thanks Kenneth.
Hi can anyone advise me?
I sourced the perfect pleater...........but sadly the company in the USA will only "ship" within the US and not to me.
I am an avid follower of all things Kenneth D King.............would it be possible for threads to sometimes help those of us outside the USA and Canada to find alternative suppliers of products recommended.
Sadly, the company just suggests " If you have a friend in the USA get them to send it to you" Friends do help, but I dont feel comfortable regularly asking for assistance in buying products.
Amazing! I love Kenneth King and his use of embellishments!
Inflecting pleats deconstructed http://lulushion.blogspot.com/2011/08/alexander-mcqueen-bosch-silk-jacquard.html
Excellent tool and technique. I will be passing this post on to a friend who will either be happy to see it or upset because her pleating project is already finished.