

Draft Your Own Pattern for Pants that Fit
Nothing flatters like a good fit. And you can take the guesswork out of fitting pants by custom drafting your own pattern from the start. It sounds complicated, but with a few simple measurements, a ruler, pattern paper, a pencil, and my map, it’s as easy as working a crossword puzzle. It doesn’t take artistic or sewing skills to make a perfect pattern. You just draw a line, and along with it, mark points that correspond to your body measurements; then square the lines. (Squaring means drawing a line at 90 degrees to the line containing a referenced point.) Just follow these steps until you have the pattern you’ve been looking for. It all starts with good measurements.
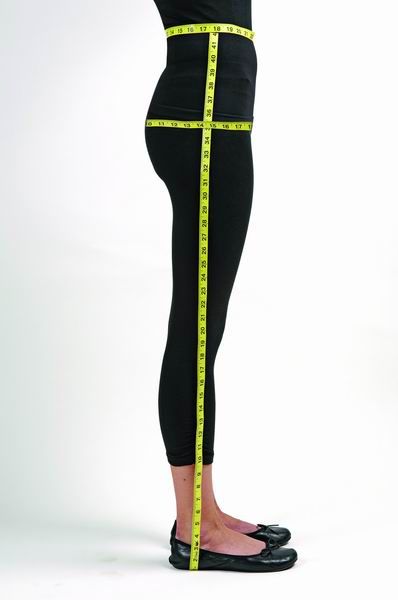
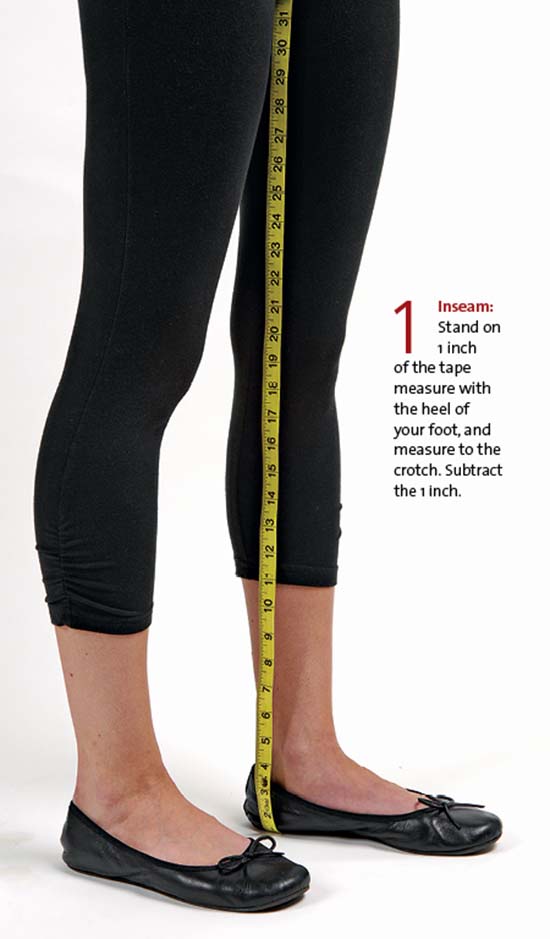
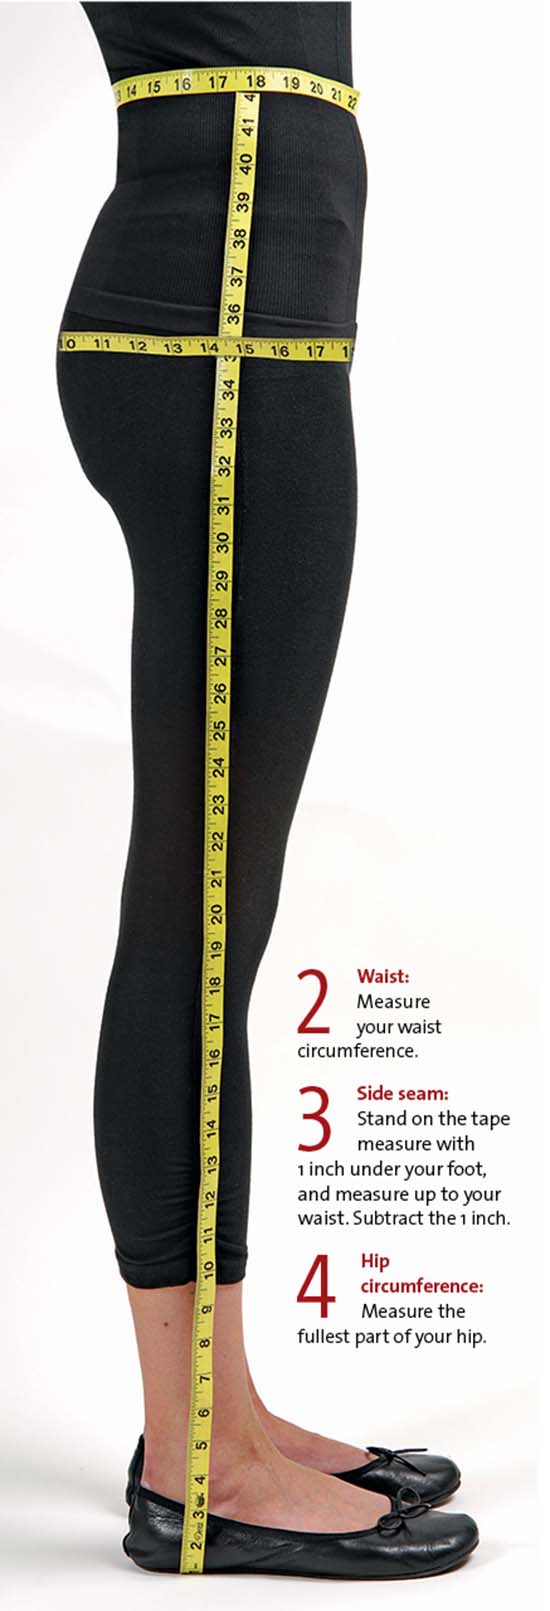
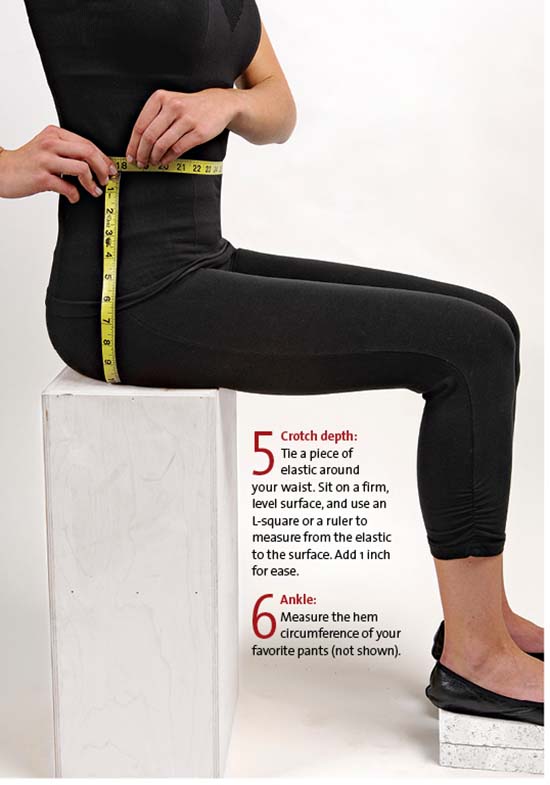
Measure up
Exact measurements are the building blocks for your pattern. Just wear undergarments or a leotard when you take your own. Here’s a way to take them without a sewing buddy’s help:
Draft the front
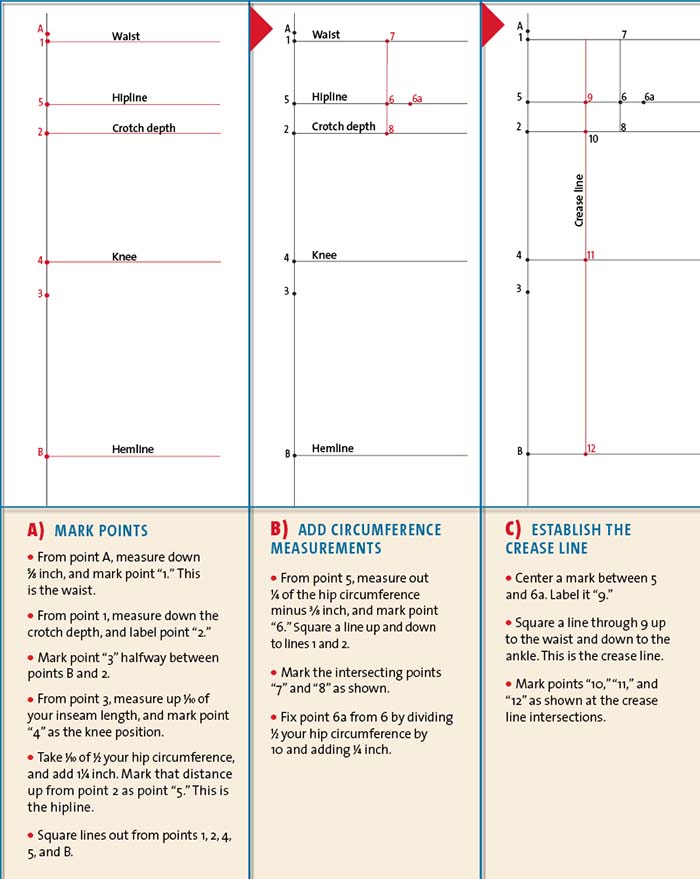
Start with a vertical line drawn at least 4 inches from the left edge of the paper and several inches longer than the side-seam length. Label a point at the top of the line as “A.” Measure down the seam length plus 5⁄8 inch, and mark a second point labeled “B.” (This is the hemline.)
Draft the back
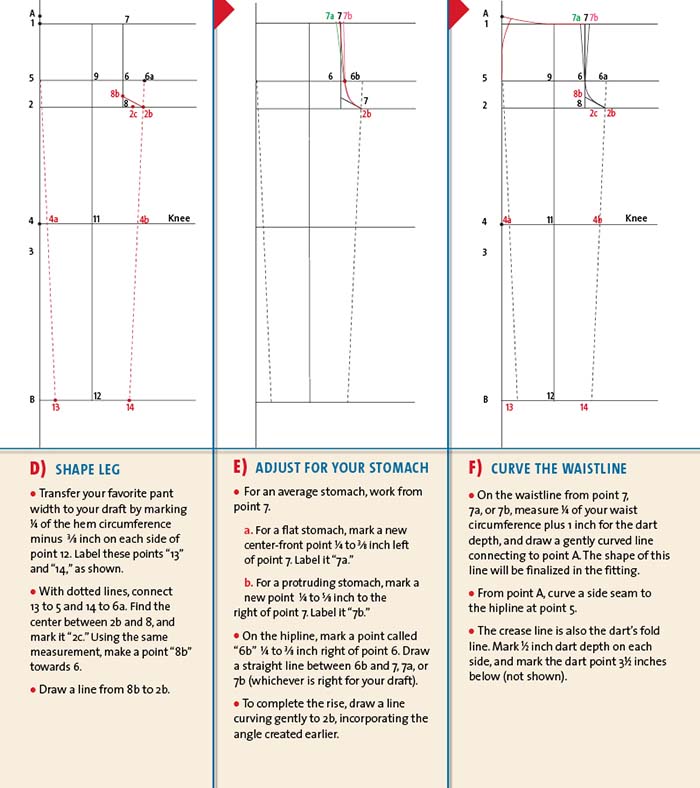
Draft the pant back over the pant front. You can draw right on the front in a different color and trace copies later to use as patterns, or you could tape paper you can see through over the front draft.
Test fit with a muslin
Trace your draft to make your first pattern to test your fit. Add seam allowances and a hem allowance. Cut an inexpensive, stable fabric to test, and perfect the pattern on your body. Correct your pattern from…
Start your 14-day FREE trial to access this story.
Start your FREE trial today and get instant access to this article plus access to all Threads Insider content.
Start Your Free TrialAlready an Insider? Log in


I'm loving this Threads insider!!!
I'm loving the threads insider, I am a visual person and I can see how thing go together, instead of reading about it, and wondering where or how they got it together.... Thanks!!!!!
Wow! I loved geometry in school, and now I know why. I've struggled to get perfect-fitting pants for years. I can't wait to try this. I own the Threads archive on CD, but this is a fresher, more exciting way to revisit the articles. Thank you!
Does this have any ease?
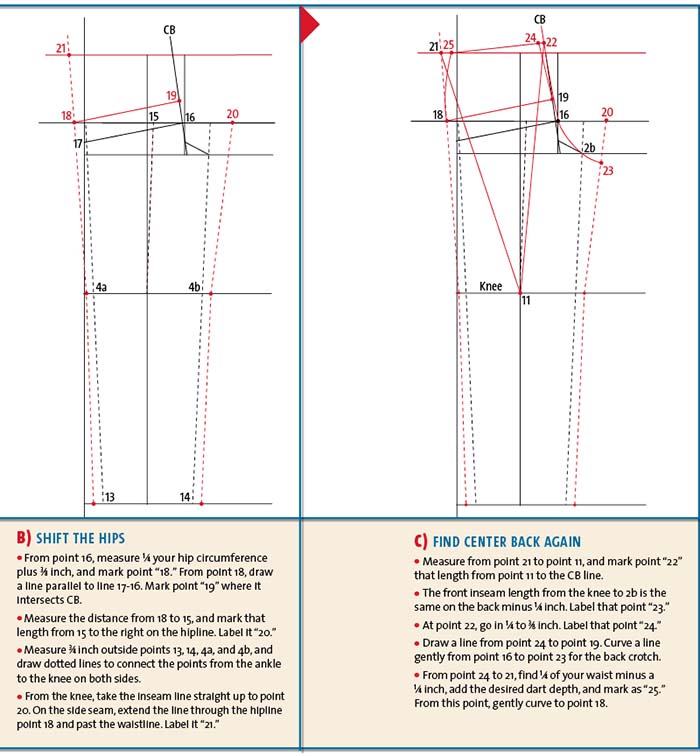
Okay, I saw this and fired up Adobe Illustrator to follow along. When I arrived at section D and it mentions point 2b - yet it isn't defined anywhere in the article before this point.
I thought I may have overlooked it in the text, so I used the search feature in Acrobat and the first instance is in section D and it reads: "Find the center point between 2b and 8, and mark it 2C." Yet, I have no 2b point on my drawing.
Am I missing something?
I also found the same issue with the article in the Best Fitting Magazine, which I bought for this article alone.
Can somebody at Threads Magaine please address this issue?
An update on my comment below.
I spoke with Claudette and she was very sweet and helpful.
2b is simply a 45 degree right-angle that joins point 8b to line 2 - this becomes 2b.
She teaches using tape measurements in her classes. It isn't easy to translate this technique to an article for the masses.
I know it's been more than a year since this tutorial was posted, but I too -- would like to know about ease. Where do we find help on where and how much to add?
I sure wish someone would answer the ease questions!
There is some wearing ease, but this draft is for creating a master pattern that you can add your desired amount of ease to, along with other design changes. After drafting this pair, make a muslin and try it on to correct any potential fit issues. These may occur due to slight inaccuracies in measuring the body or in the drafting, as well as asymmetry of the body. Once you're satisfied with how the master pattern fits, you can add any design elements you like, from pleats to pockets, yokes, and more.
Carol Fresia, Threads Senior Technical Editor
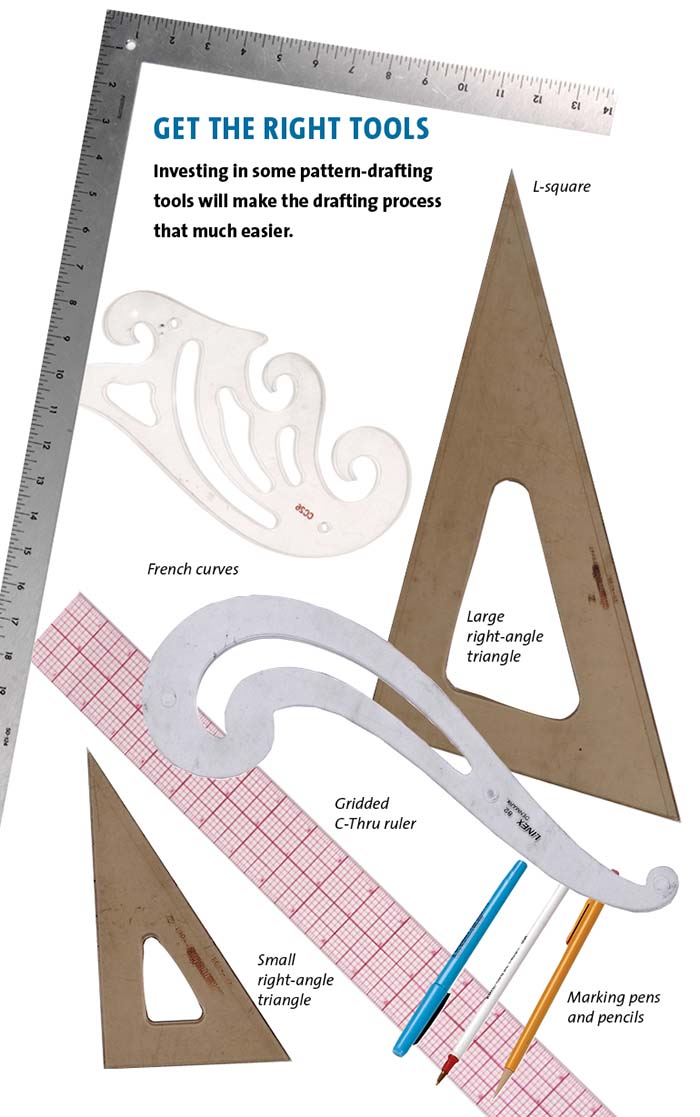
What size large and small right angle triangle rulers do you use? Also, where is a good place to buy them from?
Right-angle triangle rulers come in varying sizes, and you may be more comfortable with one or another based on personal preference. They are many online sources for plastic drafting triangles, and some even sell them in two-piece sets, which include a large and small version. You may find these online by simply typing "plastic drafting triangles" into your favorite search engine. Two reputable suppliers of half- and quarter-square rulers are Omnigrid (https://www.omnigrid.com/product-search/?search=triangle&item=&upc=) and Fons & Porter (https://www.amazon.com/Fons-Porter-R7843-Quarter-Ruler/dp/B000YZ8S3W). Several online, and brick-and-mortar retailers carry these products.
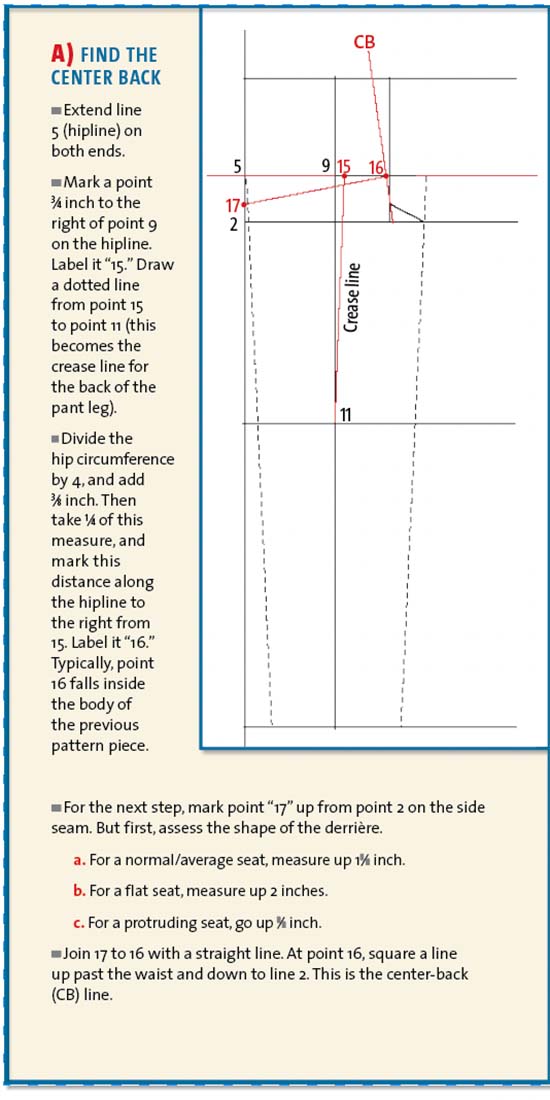
Hello Threads, I was very pleased to come across Claudette's draft as it addresses seat angles for various sizes of bottom - very helpful! There's a point I'm confused about that I hope you or Claudette can clarify. The side seam of the Front is raised above the waist (at point A), but the side seam of the Back is not - resulting in a Back side seam length that's considerably shorter than the Front side seam length. Have I misunderstood the directions? This could also impact the CB height so I'm very keen to clarify.
Thanks, Adrienne
I have been reading this article with a lot of interest since I'm in need of a new wardrobe to fit my post-cancer shape until I can hopefully fit back into my previous wardrobe. In the coverage for drafting the back (A) Find The Center Back - go to "For the next step" - under both the small a and small c the fractions are so blurry, it's almost impossible to read them. Is it possible to get some direction? Would appreciate it. Thank you!
Hi, it's a. for normal/av seat, up 1 5/8in and c. for protruding seat up 7/8in.
Thanks so very much for that clarification!