

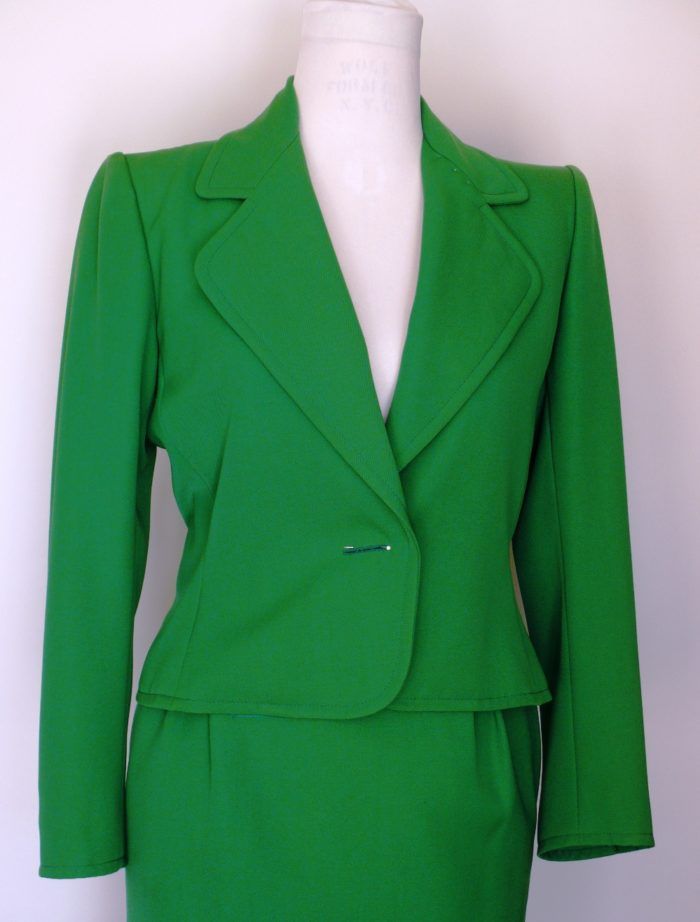
Wool gabardine jacket from the 1980s.
The interfacing techniques for Yves Saint Laurent are my favorite for tailored jackets because they hold their shape and maintain their pristine appearance for decades. More importantly, the interfacings are cut on the bias and sewn in so they move with the body and don’t have the rigid, boardy look of fusibles.
I have several YSL couture suits in my vintage collection and, even though there are some small differences in the way they are interfaced, the basics are the same.

This wool gabardine jacket from the 1980s is a good example. (I’ve removed the button so I can show you the interfacing on the inside.)
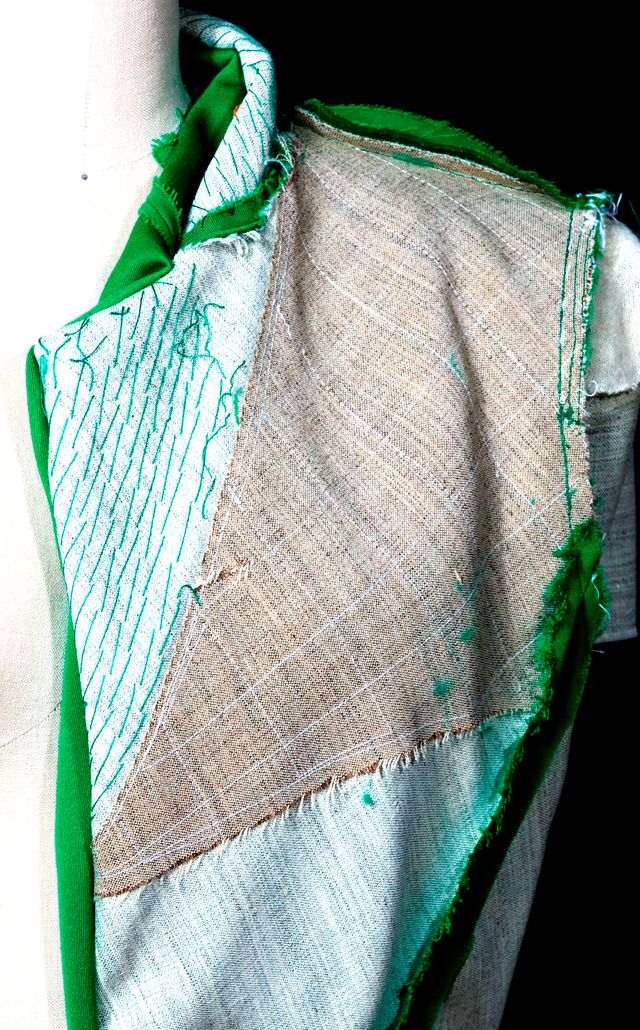
The front interfacing (lightweight hair canvas) is the same size as the jacket front and cut on the bias. The chest piece – a second piece of interfacing – extends from the roll line and shoulder to the top of the bust so the jacket will have a smooth line above the bust. It is slightly heavier, cut on the bias, and machine quilted with one-inch squares to the front interfacing. I have another jacket that is hand-quilted instead.
The interfacing is pad-stitched by hand at the lapel. This jacket does not have a bridle on the roll line, but some YSL jackets do.

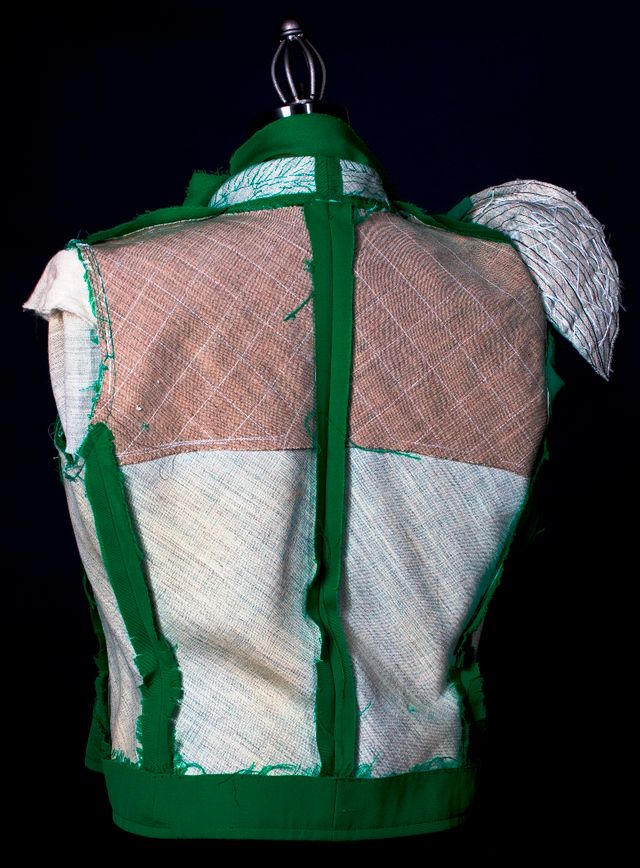
The back interfacings are similar to the front.
They are cut on the bias with a slightly heavier interfacing for the upper back and one-inch quilting. The undercollar is pad-stitched by hand.
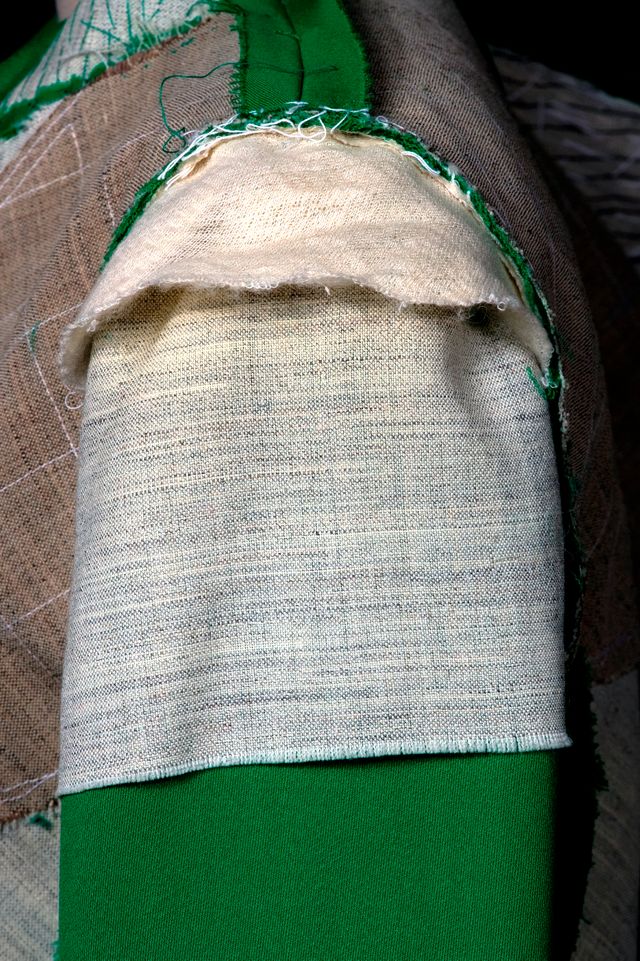
The sleeve cap interfacing is cut on the straight grain and extends almost to the bottom of the armscye. On some jackets, it extends about one-inch below the armscye and on other, stops at the middle of the cap. I prefer to cut the interfacing on the bias because it is sewn into the armscye seam and the bias is easier to ease. The sleeve also has a header made of lamb’s wool.

The shoulder pad was made by hand using many layers of cotton batting.
Have you tried any of these interfacing techniques on your tailored jackets?


I always use the two part on the jacket front, but haven't seen the back done the same way. Once you use a sleeve header, you will never go without one again!
I have used most of these methods in the past. But they seem to be to heavy for the more relaxed look today. I agree with Ln2, once you use a sleeve head you won't go back. I have made many shoulder pads but still have trouble getting the right amt. of fleece without over doing it. Thanks for the article I enjoy reading Threads and always learn some new tips.
There was a period when I made myself many jackets, but haven't in a long time. I would interface as you suggested, but usually with fusibles. I do see the value of using a non-fusible, especially with the fabric used here. I was making jackets from wool or a heavier fabric. I agree that once you've used a sleeve header, you'll be inclined to use them for future jackets. A header makes the sleeve hang and fit so much better. Pad stitching the collar makes a big difference in the way the jacket looks, too, and you can coax it to lay the way you want when you pad stitch it.
To create a softer look I have used silk organza instead of the hair canvas throughout the main body then use the light weight hair canvas for the upper chest and back pieces. Love how the quilted canvas smooths out the hollow areas and provides structure for the rest of the jacket to hang from.
I love the look of a sleeve header, but have never been able to get one right. How's it done?
Thanks so much. I will be using these techniques on my next jacket.
Also, I must tell you that I've started a collecting your
Claire Shaeffer's Custom Couture Vogue Patterns. I was inspired to use your patterns as reference material, and as a wonderful treasury of sewing techniques, and the sheer joy of having them. I have acquired 14 patterns so far, and I'm searching for more.
Thanks for all of the teaching and sharing through the years!
I've been sewing for 50 years, but I still consider myself a novice in so many things. Interfacing, especially the hair interfacing, is part of my learning curve. Can you explain the differences and how to tell which is heavier and which is lighter weight (is it the color of the edging or what?). I only have one size, and I've assumed that's all there was. Apparently not. Help!
you asked if we had used these techniques when interfacing a jacket before and my answer is a resounding yes! Several yesrs ago I purchased Kenneth Kings book Cool Techniques. Every one of these techniques are well described including many pictures. He made it very easy to follow all these steps and so have you. In addition King also had details on how to make shoulder pads and sleeve heads. You are both very talented!
I do wonder if these techniques might be quite hot and not suitable for some climates?
As for the correct sleeve head. I tried using a purchased sleeve head but found that using a 1" doubled over (sleeve head fabric) and sewn directly onto the whole arm sye gives the sleeve more stability and eliminates the wrinkles sometimes found in the sleeve at the shoulder.
It is always so interesting to see inside of this couture jackets. I can learn so much from it. Thanks Claire for sharig this knowledge.
usetobeahippie writes that she has been unable to get the sleeve header to look right, so try this way---cut your header fabric as long as the top of the armscye, and about three inches wide, on the bias. Turn your completed sleeve inside out, and place the right side of the fabric face down on the machine bed.
Starting at the front edge, and just above the matching notch, lay the header material down on the seamline, with the widest part towards the hem of the sleeve.
Holding the header firmly, stretch as much as you can while you stitch along just outside the seamline, towards the cut edge.
When you get to the back notch, stop stitching, and cut off any excess header. Turn the sleeve right side out, and gently steam over a ham. The header will relax, easing the sleeve and filling in the cap for you!
Experiment with remnants to see just how much you need to stretch the header fabric, it varies with different fabrics.
Good luck.
Thanks so much for sharing your knowledge with us. I do love your books, patterns and have been a fan for years!