
Learn an Easy Way to Piece a Quilt Top
Mindful cutting reveals the potential in a single fabric.
I love quilts, but I don’t have the time to meticulously plan, cut, and sew tiny pieces together to get the wonderful look and feel that make a quilt a favorite handmade treasure.
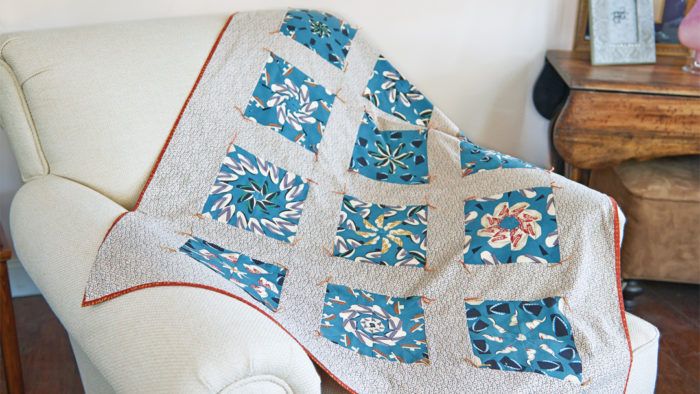
Then I learned a simple way to piece a quilt top without having to make all kinds of calculations or learn fancy piecing techniques. In this quilt, all the blocks are made from one fabric. The way you cut the blocks determines how the fabric is rendered in each one, and you won’t really know how they’ll look until the quilt is cut and pieced together.
This technique produces an easy, yet great-looking, quilt. What really makes it fun is how the blocks bloom before your eyes as the piecing comes together.
Supplies
• Cotton quilt block fabric
• Cotton quilt backing fabric
• Cotton quilt band fabric
• Batting or flannel
• Size 8 pearl cotton for ties
Choose the Fabric
Select the quilt top fabric and a coordinating band fabric for the border around and between the blocks and a backing fabric that’s the same size as the finished quilt top. Calculate these amounts based on the size of the finished quilt blocks. The quilt shown measures 37 inches by 47 inches. The finished quilt blocks are 7 inches square and were made from a 13-inch pattern repeat.
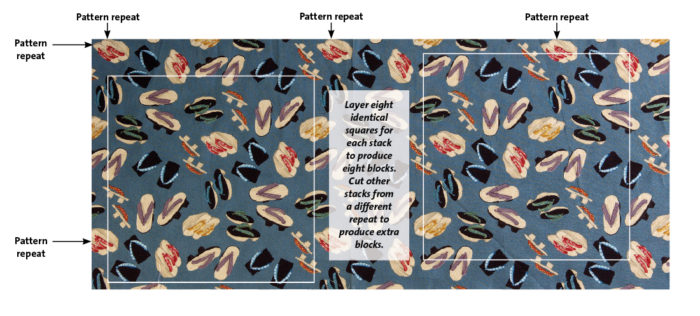
1. Consider the print. Find an all-over print with a pattern repeat that’s at least 12 inches square—15 inches to 20 inches is better. The print I used is of Japanese shoes called geta. Note: For best results, avoid tiny prints, such as calicos, that repeat in less than 12 inches.
2. Calculate the fabric amount. Study the print to find the repeat. The process described creates two sets of eight identical squares, or sixteen blocks. This project is a twelve-block quilt top, which gives you four extras for mistakes. Buy enough fabric to cut and stack the pieces eight layers deep. The yardage depends on the size of the pattern repeat. To make the quilt, you need to buy eight times the repeat length. This will make at least two sets of eight identical squares.
Cut and Assemble the Quilt Blocks
The fabric is cut into squares, then wedges, and finally fanned into pinwheel shapes and trimmed to squares.
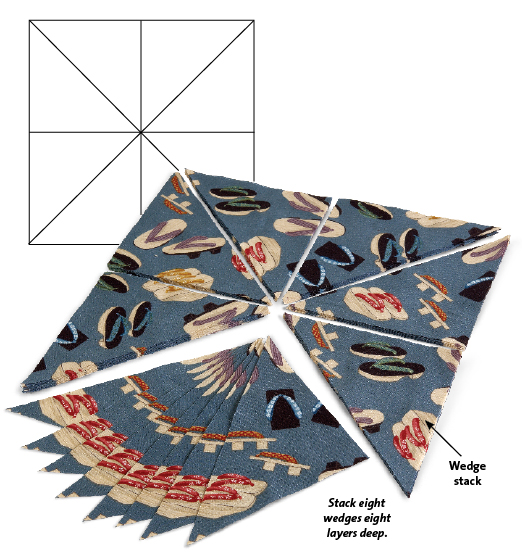
1. Pile it on. Cut the yardage into eight identical squares. Stack the squares, matching the print exactly on all layers. Properly aligning the layers now ensures easy, perfect pattern-matching in later cutting steps.
2. Cut wedges. Make four cuts through each square stack—cutting it in halves, fourths, and eighths. These cuts produce eight stacks of eight identical wedge-shaped pieces from each square.
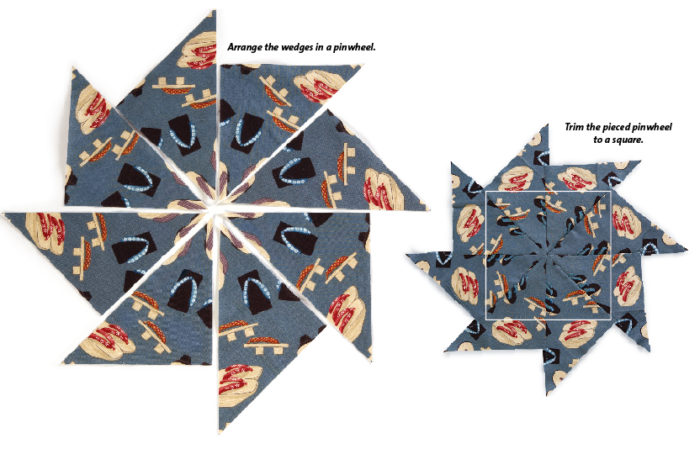
3. Assemble the wedges. Working with one wedge stack at a time, spread out the wedge layers, with the center points together, to form what looks like the pinwheel, as shown at below left. Sew the wedges with the right sides together, using a 1⁄4-inch seam allowance. Press the seam allowances to one side. Repeat with each wedge stack until you have eight pinwheels for each square stack you cut.
4. Trim your pinwheels into squares. Cut them into the largest possible square, making all the squares the same size.
5. Repeat to make eight more squares. Cut the eight starting squares from a different section of the fabric’s repeat, if desired, to get a new set of blocks.
Finish the Quilt
Assemble the quilt top, add the batting and a backing, quilt the layers, and then bind the edges. Use a 1⁄4-inch seam allowance throughout.
Assemble the quilt top
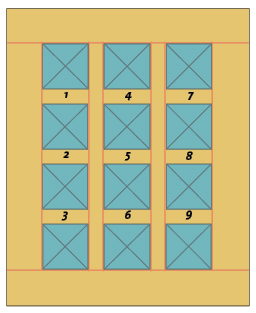
1. Sew bands between the blocks. The fabric band widths determine the quilt top’s size. For a smaller quilt, cut the bands narrower; for larger quilt, cut the bands wider. For the quilt shown, nine 3-1⁄2-inch-wide bands were cut the width of the squares and sewn between pairs of blocks, creating three four-block chains (see the illustration at right).
2. Sew bands between the chains, and frame them. Cut two 3-1⁄2-inch-wide bands the length of the chains. Sew these bands between the pairs of chains to create a three-by-four-block rectangle. Cut and sew a 5-inch-wide band on each long side of the rectangle. Cut and sew a 5-inch-wide band on each short side of the rectangle to finish assembling the quilt top.
This post is a reissue of “Surprise Quilt” in Quick Stuff to Quilt, Fall 2014, which was adapted from “Surprise Quilt Top” by Judith Neukam, Quick Stuff to Sew, Winter 2010.


This is nothing new--Stack and Whack Magic Stack-N-Whack QuiltsJun 1, 1998 | Illustrated
by Bethany Reynolds and One Block Wonder One-Block Wonders: One Fabric, One Shape, One-of-a-Kind QuiltsMar 2006
by Maxine Rosenthal have been doing this for years.
Tried and true methods will be a fun discovery for those who have not seen it before. It really doesn’t matter who has been doing it for years; it will be new to some people. Thanks for sharing this surprise quilt method. It’s a lot of fun and a great way to use unusual fabric with a repeat.