

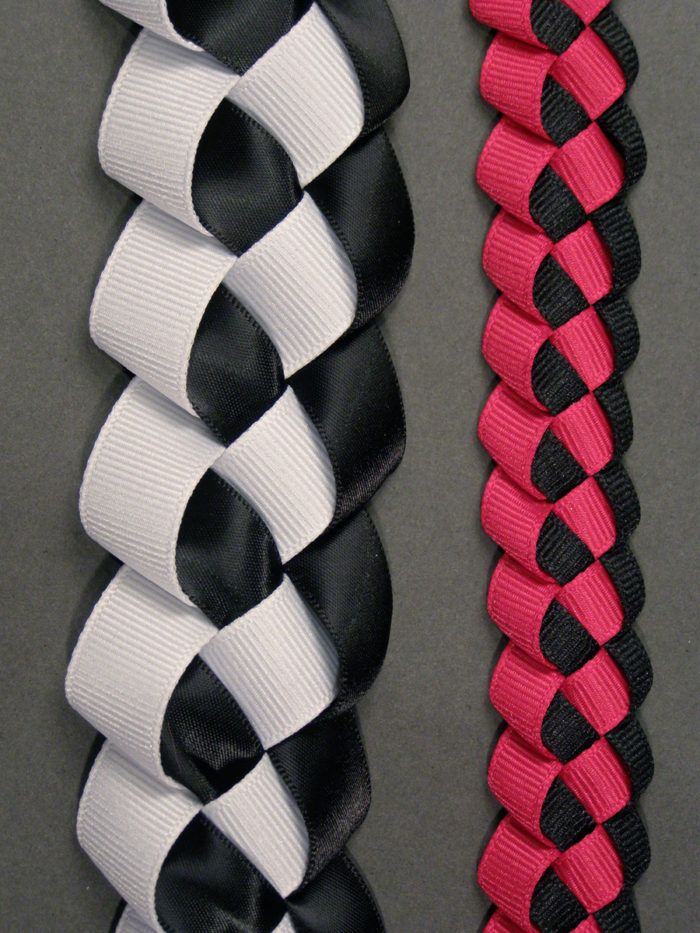
This little braid is one I learned a few years ago while flying to a teaching gig. It’s what is called a “two element” braid, which means there are two strands that go into the making of it. For the demonstration, I’m choosing to use white and black ribbon for clarity, but you can use either the same colors for both elements, or a different color.
This little braid is one I learned a few years ago while flying to a teaching gig. It’s what is called a “two element” braid, which means there are two strands that go into the making of it. For the demonstration, I’m choosing to use white and black ribbon for clarity, but you can use either the same colors for both elements, or a different color.
When learning this braid, I recommend starting with a stiffer ribbon, and a narrower width. The example uses a standard 5/8″ wide ribbon, one satin, one grosgrain. I’d recommend grosgrain for practice, as it has a little more body than the satin.
Fold the white ribbon towards you, so the tail is underneath the loop you just formed. Fold the black ribbon over the same way with your other hand, and slip the loop into the white ribbon loop. Pin the white ribbon loop snugly around the black ribbon loop. Pull a length of the white ribbon forward, and make another loop. Slip this loop into the black loop as shown. Pull the black ribbon backwards with your fingers, to snug the black loop up around the white loop. Pull a length of the black ribbon forward to make another loop. Slip this black loop into the white loop you just formed. Now, with your fingers, pull the white ribbon backwards with your fingers,…
Start your 14-day FREE trial to access this story.
Start your FREE trial today and get instant access to this article plus access to all Threads Insider content.
Start Your Free TrialAlready an Insider? Log in


We used to do this with plastic gimp (the stuff you use to make lanyards) in summer camp--but it certainly looks a lot more interesting in ribbon! Thanks for the reminder of this easy, but great-looking, technique.
I,ve been looking for a way to use those lovely Martha Stewart ribbons I see at Michaels--this is it! Thanks, Kenneth!
Skymom -- that's exactly what I thought when I saw this -- summer camp and the vinyl straps that we used to make the camp lanyards. And you are right -- so much prettier in ribbon.
Oh yea bring on the camp memories! Love this technique with ribbon! Great idea!
I am curious - once you make a ribbon braid - how would you use it? I'm pulling a blank as to what to create or embellish it with.
My dad was in the navy. he taught me to make lanyards when I was in fifth grade or so, but I've never seen this. thanks for the ideas, but I'm like the last poster. How would you use it?
What about using it as an edge on a Chanel inspired jacket? Or maybe on a bag. Could be gorgeous with different types of ribbon and yarn for texture etc.
I think this is the same braid I learned several years ago using 1/8" satin ribbon. Once completed it was spiralled around and glued to a styrofoam ball to make an ornament. Thanks for the reminder!
Thanks for the refresher. A few years ago, I learned this technique (without the use of a pin) while on vacation in Kauai. Upon my return, I made these as ribbon leis for the guests at our daughter's outdoor, island-themed wedding and reception. They are a lot of fun to make and the guests seemed to enjoy getting into the island spirit. Thanks again.
I am very impressed with the quality of your web site and of its individual projects. I am definitely going to reccommend this url.
Hello, everyone!
The main question that seems to be appearing here is: what the heck do you use this for? Fiona has a good idea for trimming the Chanel style jacket, and rally, trimming edges of garments, pockets, and the like, is what this braid is best suited for. It's flexible, so you can easily go around curves, and the abundance of folds in the fabric will conceal stitches well.
Another idea is to make it from different widths or textures of ribbon, and use it, sewn in stripes (generally vertical) onto the body of a garment. I'd go with the narrower ribbon for this, as you don't want to visually add too much bulk, and a wider ribbon, which would suit well for an edge, won't work well for an all-over stripe.
As for the summer camp memories, I never went--but I remember making a braid out of gum wrappers (remember those?) that is similar to this. I should investigate that, to see if it translates to fabric...
Call me crazy but I see these ribbons as a skirt to be made. You'll have to have a lot of patience, but I think it would make a great skirt for a little girl or a cocktail ensemble. Like I said...call me crazy, but I think it would be beautiful. By the way, Kenneth, so glad to hear from you.
This kind of trim would lend itself nicely to home decor, too--around a lampshape, or to embellish a decorative pillow. I admit that I NEVER sew home decor items (making garments is too much fun!), but sometimes I think about it!
As for gum-wrapper braids: I was forbidden to chew gum, so I never learned to make them, but I love the effect. I think I've seen purses woven from wrappers--a very funky reuse/recycle look.
Thank you - thank you! All my life (and I'm 58, but don't look it) I've wanted to know how to do that design. I saw it as a young child in gum wrappers and no one ever knew how to do it. Before I even read the 'comments' of others, I thought: Oh, wouldn't that look great on a collar or trim of a garment. Funny, how great minds think alike! I'm looking forward to making some and even using it for my purses that I am designing.
Now hold on - if any of you out there watch Project Runway (love that show!!) - wait till one of them gets a hold of this idea for trim. Wouldn't that just be so great! I can see Heidi now in a new design with this trimming it out!!
Thanks again for a 'oldie but goodie' design - just like me!! LOL
I have a number of these braids hanging in my sewing studio for use on Homecoming Mums and never thought of using them for a garment! You can add another dimension by using four ribbons. Layering contrasting ribbons on top of each other gives middle stripe with a contrasting outer edge.
I have glued these to the top of plastic headbands for my grandchildren to match clothing I have made. They are really cute. Just glue a wide piece of grosgrain ribbon to the underneath side of the headband to match one of the colors in your braid. It makes a cute addition to their outfit!
I think this braided ribbon has terrific decorating potential. Think of gluing it to the top edge of a basket; or as a package decoration: stretch it diagonally across the top of the box. Or how about using it at Christmas time, a window swag with decorations hung from it, or use on the tree itself?
Little girls would love a shirt with this ribbon attached at the bottom of their skirt...I could go on and on
Thank you for this Kenneth. I plan to use it as an embellishment on a tee-shirt. I think it will look really stylish I imagine sewing loops into the facing at the neckline and then threading the ribbon through the loops as an unusual and elegant statement on an otherwise ordinary garment.
I want to try this with folded strips of fleece to use as a short dog leash. Think it will work?
I love it, must one of the few projects, i immediately swept into action rather than just staring and saving in fav bookmarks. This was a must do for me. and I really did.
I have added this as straps to flip flops. Cute way to liven boring flip flops. I earlier used to to tedius wrapping of ribbon around the entire strap. This braid makes it lot more easier and what more, i added velcro to the straps and to the braids, so i can change the braided straps to match my darling daughter's outfit.
I will also try it with hairbands.....
When a friend taught this technique, she referred to it as Colonial Ribbon Weaving. She also showed how you could weave another ribbon(s) to an edge of the braid to make it wider. She made a baby blanket out of pastel satin ribbons. Beautiful! I'm glad to see this technique shared!
Can't wait to try this! Just have to decide how I will use it when complete (wheels are turning!).
I love HATS! I will use it for a hatband! Thanks, Kenneth!
Thank you, Kenneth!! This will add amazing touches to the children's clothing and aprons I sew. Any more terrific ideas? Have you published a book? Please, tell us more!!
The braid made up very quickly with 3/8" grosgrain. I basted it to the shoulder straps of a backpack that I made for my 4 year old niece and it looks delightful!
Here in Texas where the high school girls have GIANT mum corsages for the homecoming football game each fall, these garlands are made in school colors, usually a yard long, with other ribbons, cowbells, names in glitter, all used to dangle below one to three or four mums.
The bigger the better! Good taste is in the eye of the beholder!
Lou Scan2
I have used this for a Christmas ornament. I wove red and green in 1/8" wide ribbons. Two colors in 10 yards of each makes the length necessary. Then glue it around a styrofoam ball in lines to circle the ball completely. When dry, glue a gold cord in between the circled rows. Add a loop of ribbon then a gold balled pin to hold it at the top and another pin at bottom for a finished touch.
Makes wonderful hostess gifts if you want to invest the time for a GOOD friend.
My Grandmother used to make this. She used it to trim the handles and edges of baskets which she filled with fancy soaps for gifts.
When she passed away she left yards & yards of this trim. I used it to make gifts for family members and often wished I knew how it was done.
Thanks!
I used this to braid shiny red and black ribbon. I did a shorter ribbon braid and used the longer ribbon to wrap around the neck in a cool tie-ish way. I think Andy used this in the party store challenge of Project Runway Season 8 that he won. On another Project Runway note, does anyone have an idea how to make the garbage bag leather pants on Project Runway Season 7?
Here's a site with homecoming ideas and books. baby shower books how to books too.
http://www.fileswap.com/folder/jf1V33uQ/