

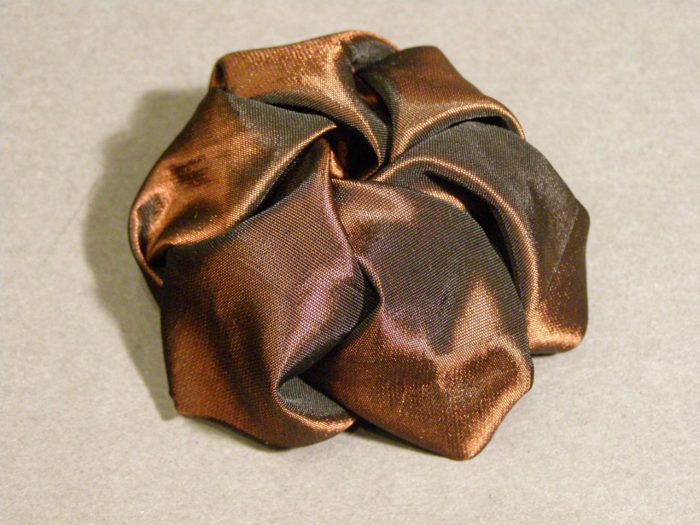
This fabric flower is one I found in an old text I had, and I decided to try it–the instructions in the text were, shall we say, lacking. It can be made from ribbon, or from a strip of fabric. If you choose the fabric strip, you’ll have to finish the edges.
First, a definition: Ribbon width as unit of measure. Candice Kling, in her excellent book The Artful Ribbon, came up with the idea of using the width of the ribbon, as the unit of measure, when demonstrating her techniques. This is an excellent idea, which enables you to create any of her pieces in the book in any scale you desire. I will use the ribbon width as unit of measure here as well.
For this demonstration to photograph well, I’ve decided to cut a strip of taffeta, 3″ wide. The length of this strip is 6 ribbon widths, or 18″ long.
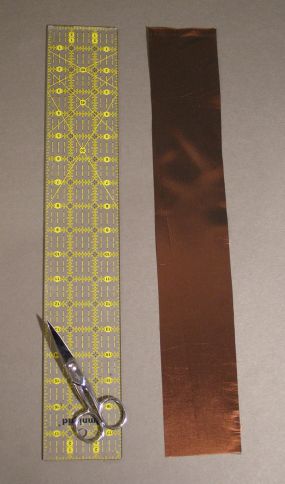
So, the formula: This flower requires six ribbon widths’ worth of ribbon to make. You can choose any width ribbon you wish.
Along one edge, mark ribbon widths on the BACK side of the ribbon. This will divide the ribbon into 6 sections, approximately one ribbon width square each.
In our example, the marks are 3″ apart. Now, press creases across the ribbon on the marks you just made, forming 5 creases. The fabric is wrong-side up in this photo. Place the ends of the ribbon right sides together, and hand-sew a seam, about 3/16″ in from the cut ends. The ends are now joined, and the right side of the fabric is in the center of this loop of ribbon. The flower will be worked around this circle. Fold the sewn seam in half, as shown. Now, fold the ends of this seam back up–it will form a “W”…
Start your 14-day FREE trial to access this story.
Start your FREE trial today and get instant access to this article plus access to all Threads Insider content.
Start Your Free TrialAlready an Insider? Log in


Thank you, that is a really 'niffty' flower! Nice of you to share and such easier to follow direction! Bests, Lyn
Thanks Kenneth - you always seem to come up with a novel approach to something I've been thinking about. You are the best! Carol
What a lovely flower from a simple idea. Thank you so much for sharing. http://fabricateandmira.wordpress.com/
The flower is lovely. Thank you for such clear and easy directions. I love your work. Karen
INCREDIBLY clear instructions for a lovely outcome! Thank you. Ah, that you could be the one to write instructions on how to get through Life!
Janey
Perfect timing. The instructions are nice & clear. These are just what I need to finish off some knitted lace wedding garters for 2 springtime brides.
Such a beautiful, elegant embellishment. I plan to use these on my handbags! Wonderful, clear instructions - thanks so much! Irene
i love ribbon work and this flower is beautiful and i have never seen it before. The directions are clear and concise.
Thank you for sharing a wonderful flower.
FA..BU...LOUS!!!! All hail to Kenneth King! I can't WAIT to try this!
I love the circular flower demonstration. From Kenneth King.It had a smooth and easy look.The fabric made it look nice. He used a soft silky looking fabric. Very beautiful. psfws1963 loved your flowers. Thank you. posted at 6 40 am 3/10/10
psfws1963 writes, I loved the flower demonstration. From Kenneth King. It had a smooth and easy look. The fabric made it look nice. He used a soft silky looking fabric. Very beautiful. 3/10/10
I am definitely going to try it SOON, probably in my fave two-tone iridescent organza.. Trust the King to come up with something clever and so simple too.The cuff idea is BRILLIANT.
So I made this flower, using the same size of strip as in the demo, but I used two-tone nylon organdy, that stuff you see kids' Disney princess dresses made out of-I LOVE that stuff, it's so pretty! I used a pink-and-gold colour.
Well, despite the fact that the strip was a bit wonky due to the fact that the material was sliding about everywhere when I tried to cut it(the downside of that material)the flower was GORGEOUS, and ridiculously EASY. I found a blanket stitch worked better than a whipstitch and curbed fraying better. One long edge had the selvage on it, which made an attractive outer edge on the flower. The inside edge displayed a tendency to want to pop out of the middle. One might want to "finish" both long edges before commencing to make this flower, depending on the material and the kind of wear it is likely to be subjected to.
Also, if you wanted to make it into a cuff for a blouse, the inside edge can be "box-pleated" and stitched to the inside circle; it "opens" the centre of the flower up some, and prevents the centre from everting itself. The design is only minimally affected, and not for the worse, as far as I can tell. Thabnk you for this clever idea, Mr. King!
I needed a quick update to a blue knit dress for a St Patrick's Day dinner. Thank you Kenneth for your flower. Made it using 30" of green satin 10 1/2" wide for each flower. By seaming it lengthwise and then following your great directions created two knockout cuffs for my dress. Easy and so effective.
Hail to the KING..
always the best ideas. Thank you.
Once again The KING comes through with a fabulous idea! How simple and easy this idea and instructions are written by The KING. I plan to make some small ribbon flowers for a broach for a drab jacket....just deciding on the color(s) is my only decision now. Thank you for sharing this with us.
These flowers are so lovely! Can't wait to make some!
thanx for such an awesome post.......i'll surely try dis one out
I'm a ribbon fanatic, and have never seen this flower before in any of the vintage books, or elsewhere. Thanks Kenneth for the instructions. I was just on a plane home from Portland, Oregon and saw the photo of the circular flower in one of the latest Threads magazines - so I came home immediately and looked it up. I took a beading class from you years ago - and you continue to inspire me today. Thanks for all your sewing contributions!
WOW!! I could not wait to make it!!! well, I did my sample in silk organza and it looks beautifull!!! thank you so much for teaching us this technique!!!.....mmm...I think I am going to hand paint some more organza to try out another one!!! thank you!!!!
I'm wondering if using finished off ribbon would do away with the fraying I got from just using a piece of cut satin to 'try out' the technique.
I just finished making some larger satin evening clutches and this type of flower would be perfect on some of them.
Thank you for 're-discovering' this technique. I wish my mom had kept all of her old sewing magazines!!
Hi, I am so impressed with Kenneth Kings ideas! I kind of like the way it looks from the wrong side and wonder if a person could use something circular to "cover" the stitching. I am going to try it. By the way, does anyone know how to do "Japanese" smocking?