

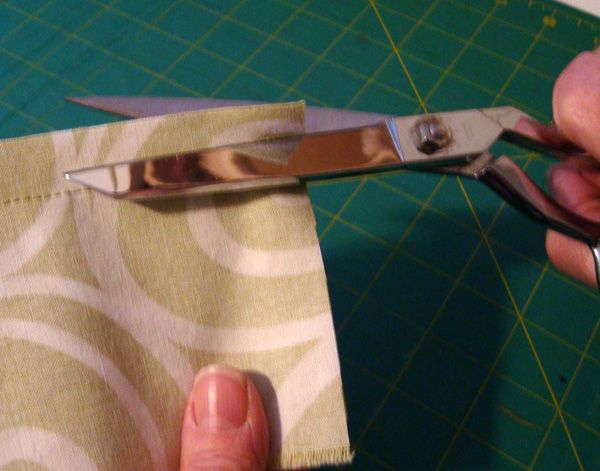
Grading can be done in one step when you angle your shears while trimming the seam.
The most important sewing techniques that every sewer should know are never directly visible on a completed project, yet they’re essential to giving that project a truly professional finish. Trimming seam allowances properly on enclosed seams is one of those steps that will quickly improve your sewing. I learned some tricks years ago that have made all the difference for me, whether I’m making a simple garment or a one-of-a-kind work of art. If these procedures are apparent to you, consider this a refresher course. But if you’re a novice or have learned to sew by seat-of-the-pants trial and error methods – add these simple steps to your sewing arsenal.
Making the Grade:
When you add a facing, make a collar, sew a pocket, cuff, or waistband – anything that requires the seam allowances to get pressed together and hidden on the inside – you need to trim those seam allowances to different levels so they won’t create a ridge on the outside of the fabric. This is called grading. When you grade a seam, you want to be sure the wider seam allowance is the one that is closest to the right side of the garment like the upper collar, for example. You can do this in a 2-step process: trim them both and then go back and trim the lower seam allowance a bit more. But here’s a trick that makes grading easy and the result is exactly what you need: simply hold your shears at an angle while you trim both seam allowances together. This removes a little more fabric from the seam allowance that is toward you – just enough to make the grade!

Grading can be done in one step when you angle your shears while trimming the seam.
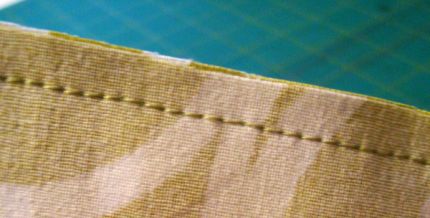
This levels the fabric, leaving…
Start your 14-day FREE trial to access this story.
Start your FREE trial today and get instant access to this article plus access to all Threads Insider content.
Start Your Free TrialAlready an Insider? Log in


Very helpful. I never thought of using my pinking shears. It would be perfect for kids and doll clothes.
I am just learning to sew professionally and just recently I learned about cutting v's around convex curves but I never thought about using the pinking shears. Thank you for that.
I just love this site.
Way back when I was first learning to sew, I was taught to stagger-notch the two curved seam allowances in order to avoid "pokies" on the right side. What do you think?
I think this is another example of how thread has changed - having read it since my sister subscribed to the very first issue. I know from experience, as I am sure do many subscribers, that if you don't stagger the notches on a cure that you will end up with bumps or "pokies".
The pinking shears idea is good for some applications, but Threads has certainly gotten more specialized and dumbed down over the years.
You can still use the pinking shears around the curve, but just do each seam so they aren't laying on top of the other in the same place. In other words, the "V" of each seam would be in a different place when stacked on top of each other.;)
Thanks Mary! A review of these simple but such necessary little tasks is just the ticket for everyone. And the addition of your subtly different techniques is so helpful. I'm so glad to be able to still learn from you -- I know you've retired, but please don't stop feeding us these little pearls of sewing wisdom!
As for mjbains' comment: We're not all at the same milepost along the sewing road. There are many reasons for a review of what we all have learned. As for myself, it jogs me to remember to pass along to my newbie sewing friends the things that I take for granted! We need to encourage the next generation to join the sewing party, and these 'mini lessons' help them to produce professional results earlier on.
I am so enjoying my new subscription to your Threads magazine and learning so much from these online tips too. Thank you for helping me to embrace my love of creating and make it even more fun and interesting.
Great ideas!
I have used this technique for years. Several years ago I purchased a pair of applique scissors and found that they worked wonderfully for grading seam allowances. I found the technique especially helpful with trimming seam allowances for bras. When adding channelling to a padded bra, it is necessary to remove as much bulk as possible and this was a great way to speed up my work.
Thank you this is wonderful advice and reminder. I learned this tip about 15 years ago and it makes all the difference.
Just starting to sew again after some 30 years without a machine and need a refresher course. Just found this website. Looking forward to using it. I live near Taunton in UK!
My pinking shears have laid unused since I got my serger as I thought that avoiding raveling was their only use. I love the idea of grade curves with them!
I spent hours and hours sewing as I was growing up, could not wait to get back to my sewing machine. In recent years because of weight fluctuations, all I have made are home dec projects. I've been thinking of going back to sewing clothing...some simple projects without too much fit, and these tips were great reminders of easy tips and tricks that make such a difference in how well a project finishes up. Thanks for taking me back to the basics!
This is great thanks a lot
I sewed for years but then life caught up with me and working two jobs I stopped. I am now going back to it and when I see a simple article like this I am reminded of some of the basics which I might still be doing but not in the proper way and yes there are some articles I skip as not being interesting to me -- but the mag and the site rock -- where else can you go to learn everything from the simple to Heirloom? My mother who was a Couture Sewer would have loved this site and mag! This was a great article for me, because although I trim I had forgotten the stacking part -- halfheimers!
For some reason, pinking shears never cut well for me--even brand-new, and a quality brand, they don't cut nice sharp points. I've given up on them...
I think "duck-billed" scissors work well for grading one edge of a seam so that you don't accidentally catch the other side.
For most rounded collar applications, this technique works well and eliminates all bulk and ridges:
Stay stitch the neck edge of both collar pieces, and interface the lower collar piece all the way to the edge. (Usually, you'd only interface to the seam line.) Sew the outer seam of the collar (the one that will be turned)with a very narrow zig zag. Trim the seam allowance as close to the zig zag stitches as you possibly can. This is a good time to go very slowly and use excellent lighting and/or a magnifier. When you turn and press the collar, nudge the seam allowance a thread's width toward the underside. I use a rounded metal spatula as a pressing aid inside of round collars. It gives a firm edge to press over, and conducts heat quickly and effectively. I keep one in my sewing box just for this purpose; it has an offset handle to make using it more finger-friendly!
What a great reminder about grading seams. Amazing what a small adjustment can do to your project. Grading seams really gives your garment or project a finished look. Instead of using a pair of dress maker cutting shears, I use a pair of appliqué scissors. Placing fabric piece on table top, and holding scissors blades parell to the table top, the results are exactly the same as angling the dress maker’s shears to the fabric.
I really have to comment on your explanation about notching. Notching removes excess fabric on convex (outward) curves on enclosed edges. It does not create space! It makes it so the excess doesn't overlap itself and make ugly bumps in between the layers. When the outward curve is turned back on itself ( as on an enclosed edge, as pictured) the length of the raw edge is longer than the space it has to fit in, so notching removes the excess length and lets the edge fit into the new, shorter space.
Notches need to be wide enough only to take out the excess - no larger. In other words, the edges of the notch need to meet each other when the edge is right side out. If made too wide the seam allowance changes from 4 layers to 2 layers and back again to 4- very uneven and ugly.
I've taught sewing for over 30 years and have read Threads for many years. This is not your best article.
I agree with MachineQueen. Staggering the notches makes for a smoother convex seam, just as staggering the slits is better for a concave seam. It's more trouble, sure, but worth it for special projects. I don't bother with pinking shears for anything but silk organza. They just don't work for me.
My daughter says that I need two people to make anything: myself to actually do it, and someone else to tell me when it's done. I do tend to be a teensy little bit of a perfectionist. When I found myself putting a zipper in a duvet cover for the fourth time (a 60+" long zipper), I finally had to tell myself that it was going to be tucked in; I wasn't planning to wear it.
Any tips on clipping/notching when you need to under-stitch? I tried this tip tonight on a dress that required interfacing around the neckline. I was afraid to use the clip/notch approach because I needed to under-stitch the interfacing and was thinking that all the thin snips would flip up or down as I tried to under-stitch - or that I wouldn't have enough seam to stitch on. I ended up using pinking shears - it doesn't look bad, but the seam was still a bit thick.
Thanks for the reminders of things we sometimes forget and new ideas we have not thought of. Grading with the scissors is a great idea. Also notching with pinking shears. Simple ideas................why did I never think of them???????????
This was a great reminder for us frequent sewers and a good tip for newbies. I gave up my pinking sheers for a pinking blade in my rotary cutter it is faster and more efficient than the scissors. I usually hurt my hand trying to cut through layers with the scissors but the blade is no pain and all gain. Give it a try.
Great ,, Keep up the good work, I look forward to all your tips, some are new to me, some I already had discovered on my own .... Thanks again..
I love my pinking shears, but I also discovered using applique scissors. I can get in fairly close, and stagger the edges well! Thanks for the tips!
Leeza asked for tips on clipping/notching when you need to under-stitch. There is a trick that allows the curve to lay flat and look beautiful from the right side. After you grade the seam and are ready to clip, the trick is in how you clip. Instead of clipping both layers at once and at a 90 degree angle to the sewn seam, clip each layer separately at about a 45 degree angle. One layer will be clipped to the left at a 45 degree angle, the other layer will be clipped to the right at a 45 degree angle. Then under-stitch as usual. You will be pleasantly surprised at how beautiful it lays. And there won't be any notches visible through the layers on the right side.
I don't see Threads having "dumbed down" by presenting basics. We're getting expert instruction for free. Sometimes it's a reminder, sometimes it's things we already know, sometimes it's an "aha" moment. But since we're all at different stages of experience and most area trying to learn a skill without a resident expert - this is a wonderful resource. I do have a question. Why press the seams open on the edge of a collar that is going to be turned inside and pressed? I understand the clipping (and loved the pinking shears and off-set clips ideas), but when you turn the collar, doesn't the fabric just go back together the way it was sewed originally?
Leeza asked for tips on clipping/notching when you need to under-stitch. In addition to the tip she was given, I would likt to add:
When you understitch, you may want to do that by hand in tricky places. The reason is that when you machine understitch across these clips/notches, you can wind up undoing the 'give' and flex you added with the notches by stitching down the notches into the facing layer. If you hand understitch, you can avoid that by not biting the facing layer when crossing the notches, but allowing the thread to "float", e.g. not "bite", across those gaps.
Hi Tissy,
Your question about pressing a seam open before pressing it together is a good one. You need to do it to open out the seam so when you do turn the collar, or whatever, to the right side you don't have to struggle to get a neat, crisp edge. The best tool you can have is a point presser and pounding block, which is essentially a very narrow solid wood ironing board that lets you get right into the point of a collar, but works when you press curves and straight edges, too. Pressing open before you turn is one of those essential steps that makes all the difference in your results.
I just love reading all the ideas and reminders of sewing on the basics. This is a real treasure. Thanks
Thanks to all of you for sharing these tips and the information. Although I have been sewing home dec for years I am new to fashion. You all give such great advice. I love this site and the magazine. Keep up the great work!!
I want to thank you so much for this article. I too have been sewing for years and have used this technique, but there are many who don't know about it or need to be reminded of it.
My mother used to say "you can't please all of the people all of the time but you can please some of the people some of the time", and those "some of the people" are very grateful for these tips!
Thanks for sharing.
Thanks Mary very helpful !!!
Ok, girls. Lets get serious. If you really want to know what machine to buy go to the ones that service them and talk to the repairman. Ask him or her which machine do you see the least in the repair shop? I worked for a dealer and saw all kinds come in but the one that seemed to have the least amount of problems was the Viking and Bernina. The next thing is go get on line and talk to owners that own a Viking or Bernina. They mainly tell you they are work horses. Read the trouble shoot in the manuals to see what goes wrong, goes wrong, goes wrong. Then try to find a dealer that doesn't rip you off when it comes to repairs. I found a dealer in a small town that was reasonable and good but had to drive 50 miles. What the heck, how many times do you have to do that? You might even ask which one is cheaper to repair? It's worth the trip. Viking and Phaff merged so keep Phaff in mind as well. Have FUN! Just be an educated shopper. If you can't go first class, don't go. You'll be glad in the long run.