


This detail lends a bit of flair to a basic pant and can be made in any fabric from linen to lightweight wools. Start with a pattern without a side seam, and add a seam down the front. Then add a vent, loop, and button to finish the look.
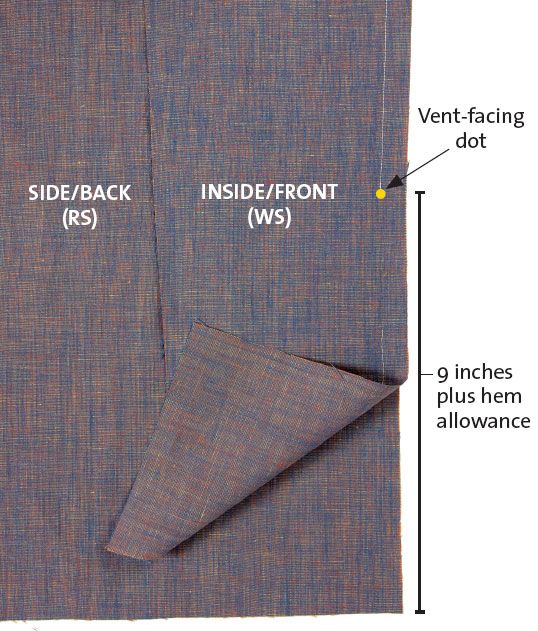
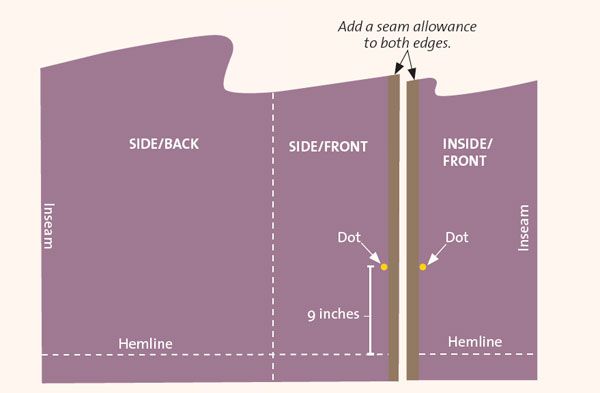
1. Draw a new pant pattern. Determine the front-seam position on your pattern, and draw it parallel to the grainline. Cut the pattern along the line. Add 5⁄8-inch seam allowances to each freshly cut edge. Mark a dot on each piece 9 inches above the hemline on the new seamline.

2. Cut out, and mark the pant fabric. Cut two, front inside-leg pieces and two, side/back pieces. Mark the crease-line dot on all pieces.
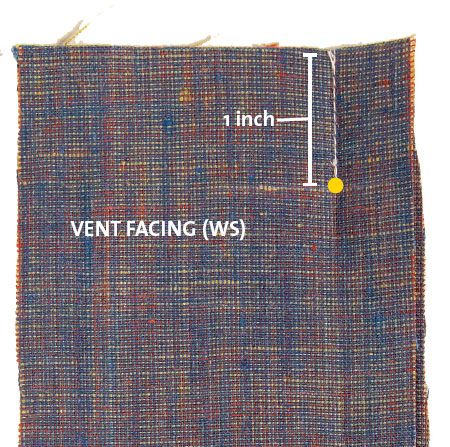
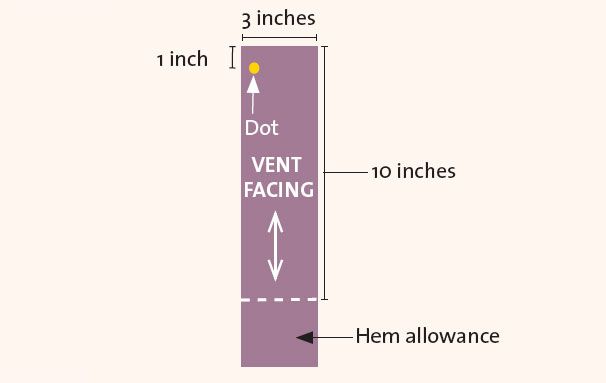
3. Cut the vent facings. For the vent facings, make a pattern 3 inches wide and 10 inches long plus the hem allowance. Mark a dot along the vertical seamline 1 inch from the top. Cut four vent facings on the straight of grain.

4. Make the loops. Cut a bias rectangle 2 inches wide and 6 inches long for the loops. With right sides together, sew the loop with long edges aligned using a 1⁄4-inch seam allowance. Turn it right-side out, and cut it in half to make two finished 3-inch-long pieces. Fold the strip in half to form the loops.
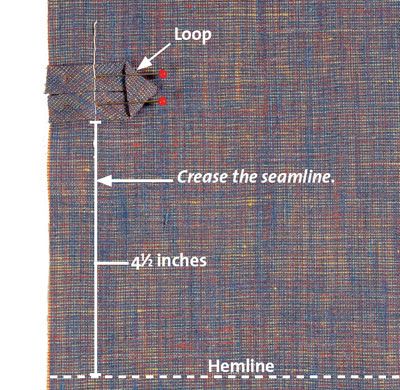
5. Attach the loops. Place one loop on each inside front leg piece 41⁄2 inches up from the finished hemline along the seam. Point the curved end of the loop towards the inseam with all raw edges aligned. Baste along the seamline.

6. Sew the front seam. With right sides together, sew each inside-front leg piece to its corresponding side/back piece seamline, stopping at the vent-facing dot.

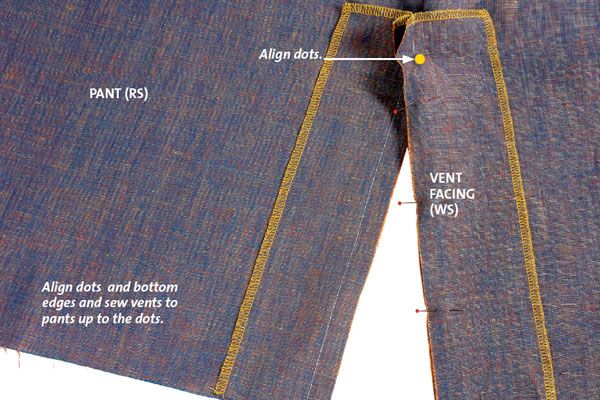
7. Assemble the vent facings. With right sides together, stitch two vent facings together from the top for 1 inch. Press the seam open. Sew the remaining pair together for the second vent facing. Finish the top and unsewn side edges as desired.

8. Attach the vent facings. With right sides together, and raw edges and dots aligned, pin a vent facing to a pant leg. Stitch from the dot to the hem edge. Sew from the garment side, beginning one stitch below the dot. Repeat on the other vent edge. Repeat for the other pant leg.

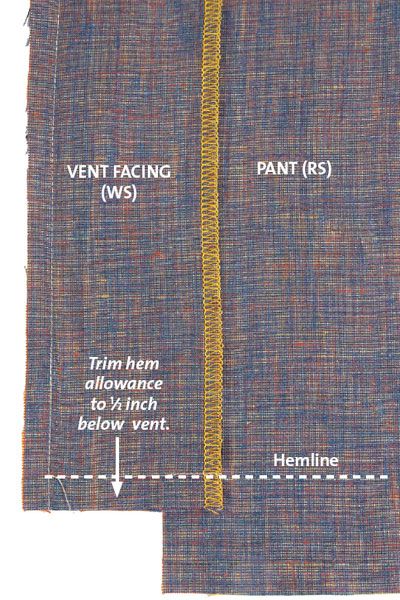
9.Sew the vent hem. Press the seam allowances open. Turn the vent facings right-side out, and press. Turn the vent facings right sides together again, and stitch across the finished hemline. Trim the pant hem allowance 1⁄2 inch along the facing.

10. Turn the facing. Turn the vent facings right-side out once more. Edgestitch around the vent opening.
11. Finish the pant legs. With right sides together, stitch the pant legs at the inseam. Turn the pants right-side out, and topstitch the hem and around the facings with a distance equal to the hem allowance. Sew a button opposite each button loop.
excerpted from “One Pant, Five Looks” by Linda Lee
Threads magazine issue #149, p. 32


What a great idea. Thanks for sharing.
I am truly enjoying the learning pieces of this web site. Would someone be able to tell me the pattern number of the pants used to make the front vent. I'm looking for a pattern with the side back and side front are one pattern piece.
Thanks so much for lessons...keep up the good job!!!!
Victoria
Im doing a pencil skirt with a side vent. I think Ill add this pretty touch! Thanks.