

Keep Pinking and Zigzag Stitching Among Your Basic Seam Finish Options
Simple, yet effective, ways to prevent fraying with little bulk

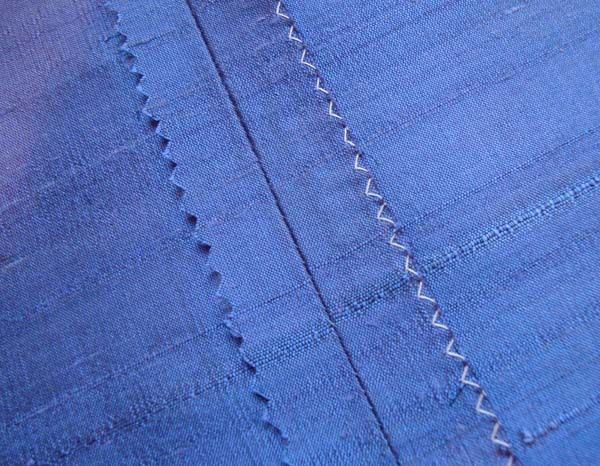
Pinking or zigzagging are great ways to beautifully finish a seam's edge.
Seams are arguably the most basic part of sewing and finishing seam allowances is essential to creating a well-made garment. Choosing the best method depends on the fabric used and the function of the garment. Finishes can range from beautifully bound seams that make a jacket look as good on the inside as on the outside, to a quick pass with a serger that can trim and bind with thread both seam allowances at the same time. There’s a place for each and everything in between. Seam finishes don’t have to be complicated. They simply have to do the job and, in most cases, the less you do the better. I’d like to put in a plug for a couple of basic finishes: pinking and zigzag stitching. Both are often overlooked or trumped by more elaborate options.
Maybe you’ve set aside your pinking shears because you think they’re passé and difficult to use. Or you may think a zigzag stitch on your sewing machine can’t compete with the complex stitch produced on a serger. You may just need a refresher on how to do them effectively and why they’re are often the best choice when all you really need to do is prevent the fabric from fraying.
Pinking
This technique is an easy, clean way to deal with seam allowances on stable, tightly woven fabrics.
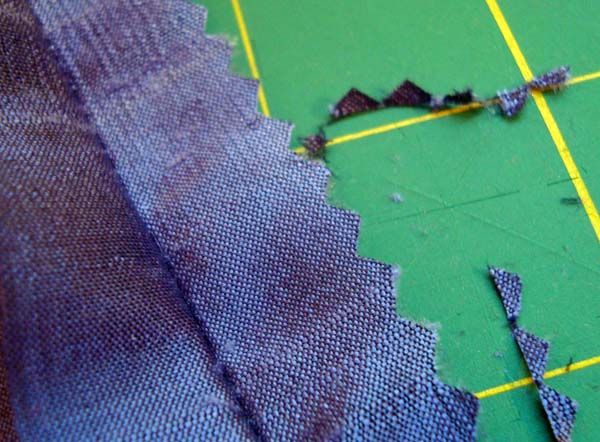
I especially like to pink seams when using crisp, smooth fabrics like taffeta, for example, because there’s no added bulk from thread or binding and the saw-tooth edge creates less of a “ridge” on the right side when the garment is pressed. With less stable fabrics you can add a row of straight stitches on the seam allowance only for extra security.
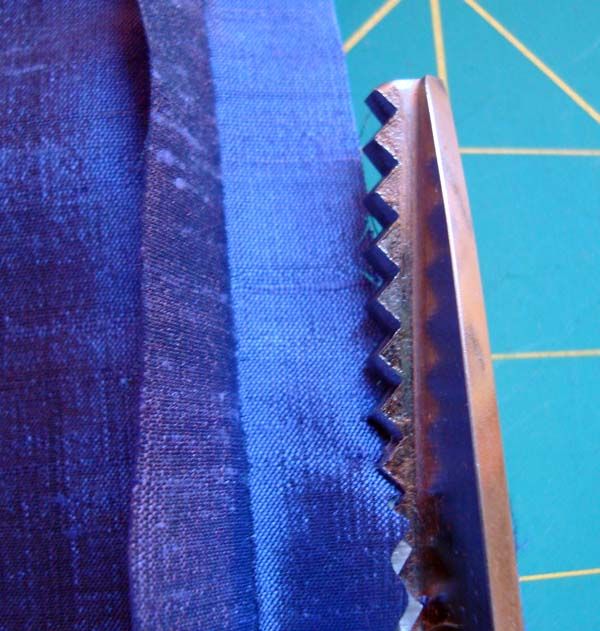
Pink a seam effectively and painlessly
Trim away each seam allowance separately on the very edge, taking off just a tiny strip of triangles at the most. This will keep the edges straight and even with less stress on your hand because the shears seem to work better when used just along the edge. For the most painless method, try a pinking blade on your rotary cutter. You can easily cut along the very edge of a seam allowance with or without using a ruler.
|
|
|
|


Zigzag stitching
A zigzag stitch is a good alternative if you don’t own a serger or if you just don’t want to rethread for a small project. But, in some cases it’s the better choice because it binds the edge to prevent raveling, but doesn’t add a lot of thread in the process.
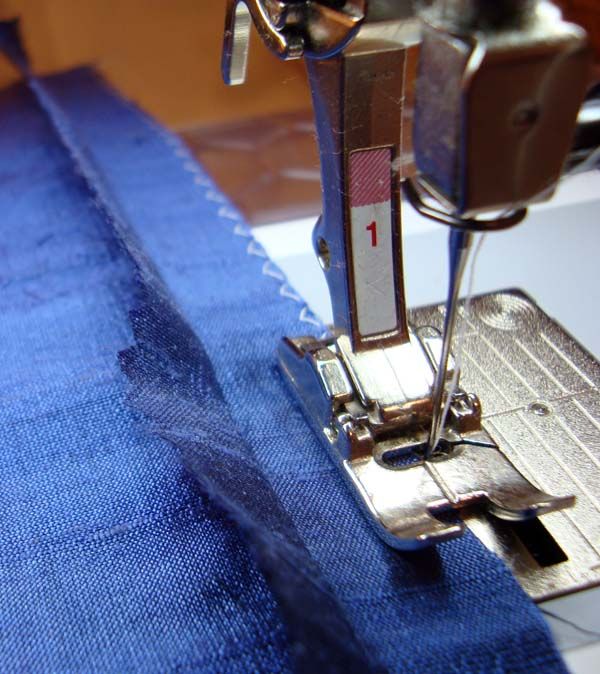
Create an effective zigzag finish
The zigzag stitching needs to be done on the very edge of the fabric as well.
Stitch so that the outside points of the zigzag are off of the fabric. I generally use a 3 mm stitch width and a 2 mm stitch length, but always test the stitches on a fabric scrap and adjust accordingly.

Sew along the very edge of the fabric so the stitch binds the edge.
Remember: it’s important to finish and press seams as you go, whatever method you choose, because you can’t finish a seam completely if you’ve crossed it with another seam.
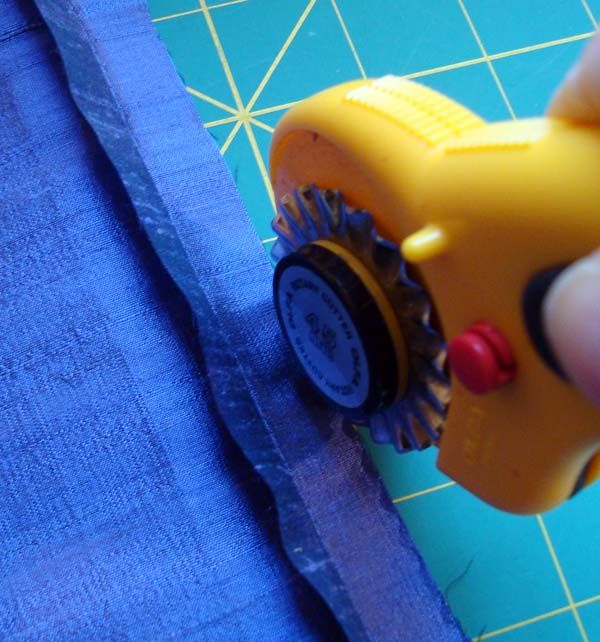


I find it easier to use the rotary cutter for pinked edges.
Thanks for the refresher.
I didn't know there was a rotary cutter with pinked edges. Thanks for sharing! That looks so much easer to use.
I would love to zigzag just the edge of my seams, but if I do it scrunches the raw edge into a little round pile. Perhaps I should place paper under the raw edge and stitch the two layers?
great tips. thanks a whole bunch.
Another great use for a rotary cutter! I finish the edges of many of my projects with a rotary cutter. After a few washes the raw edges can look a little fuzzy but still look finished and unique.
Beensewingfor50years, instead of paper, you might try a strip of tear away stabilizer under any fabrics that seem to want to bunch up. Love that stuff!
I'm not sure what you mean by the edge being scrunched "into a little round pile," but if your fabric is "tunneling" when you zig-zag you might try adjusting your tension or using a narrower zig-zag.
If you mean that it's balling up (making a thread nest) at the beginning, try holding the bobbin and needle threads behind the presser foot and very gently tug on them as you start sewing. This is one of my favorite tricks to keep points and corners from getting scrunched.
Also, isn't the idea to finish each edge separately and leave the seams pressed open?
To prevent tunneling, I usually use a multiple-stitch zig-zag to finish edges. It uses a bit more thread, but is very flat. I generally use a 3 mm width and a 1 or 1.5 mm length. I also use it for understitching, especially on curves, because again, it holds the inside seam edges very flat.
If you want to use a regular zig-zag stitch, loosen your tension a bit and hold your fabric taut to prevent tunneling.
Thanks for this tip! I have a question: how do you finish a princess seam in shirts?
For the first time, I'm disappointed in the follow-through of a Topic lead-in.
After showing the example of a reversible hem in the 'teaser', I was expecting some brilliant new ideas along the lines of David's shirt techniques.
While these are all good basic techniques that everyone should learn, and realizing that there will always be newcomers eager to expand their skills, had they been identified more clearly as such—BASIC Uses of Pinking & Zig-Zag—in the subject title, I wouldn't be so disappointed.
Please give us more advanced, NEW finishing ideas next time, for inspiration??
Thank You!
I'm finishing a cotton, navy, v-neck dress with buttons down the front.
I used a lighter blue hong kong finish on the lapel facing's edge just for me to admire. Its a medium weight cotton so I will finish the seams with pinking shears, they raveled slightly. Then pressing will be easier.
PINKING SHEARS DO HAVE A PROPER PLACE IN SEWING, we decide how much effort to put into a project. I made my dress special with the welt looking pockets and hongkong finish, but its just an older Ebay pattern. I think its a sharp looking, tailored summer dress, so it suits me fine.
Our choices of color, style and fabric makes our design unique. Its our own creation, we are the artist at work!
I enjoyed the challenge of reducing the 1980s "football" shoulders after reading one of your articles. "Fitting/Alteration is the title but I failed to copy the month and year, it just says page 20.
I'll put your good information to work, and thanks.
RACU,
In answer to your question about finishing princess seams -- It always depends on the fabric, but I think that there are times when the finishes I used in this post can be appropriate. If the curve on the seam is deep, you'll need to do some clipping which opens up the seam allowance. This is not a problem when you pink a seam, but if you finish the edge with a zigzag stitch, be sure you let the seam allowance spread at the clips so it shapes over the bust area then do your zigzag stitching letting the stitch form a "chain" across the open areas.
I hope this makes sense!
Mary
Thank you for the article. I can really use this educational information.
What is the best way to finish a zipper seam when the rest of the garment has finished French Seams?