
Like I said earlier the sewing bug has bitten me hard. I am nearly manic about sewing again. I chose this project because it was easy or so i thought and quick. It was fairly easy and pretty quick. But in the process I was reminded that I hate my sewing machine.
Part of the sewing bug is that I want to make retro things. I would love to make things from all time periods but right now I want to focus on items from the twenties through the fifties.
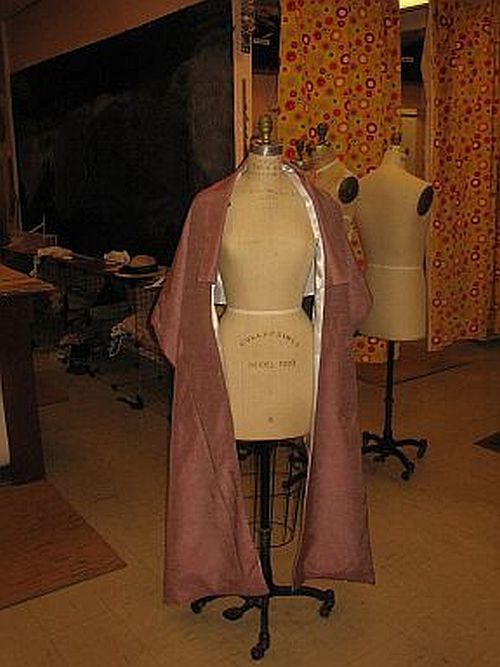
This project came from scrounging the internet one night. There are free patterns on Buterick and McCall’s website, if you sign up for their email list. So I did that. It prints in four page PDF. The first one is just the illustration and supplies.
First of all the amount of yardage required is wrong. The pattern claims that it can be created from 2 yards of 45″ fabric. This is not the case. The two panels if cut side by side will only leave 5 inches left over. The collar pattern is eight inches wide.
I am trying to do this on the cheap. The outer fabric is antique satin that was $1.50 a yard at Walmart. Its a pale rose color with the wrong side having a white sheen. This was a wrong choice for this piece. While the fabric is pretty, is ravels quite easily and doesn’t really like the serger. For the lining fabric, I chose white fabric. The walmart didn’t really have any lining, at least not any white…. so I drove 45 minutes to the mecca of shopping that is quincy. At Joann’s, I didn’t like any of their lining so I chose costume satin. I worked with it before and hated it. I thought that it would be okay this time and it was for the most part. It shreads something awful, but it achieved the look that I liked.
This is a four page patten from Butterick. The first page is the cover with the illustration and the yardage requirements and fabic suggestions. I would like to make this out of taffeta next time. Annd perhaps make it more contrasting like black satin with hot pink lining.
Fabric suggestions:Lightweight Broadcloth, Lightweight Brocade, Lightweight Velvet and Taffeta. For Lining: Taffeta and Satin.
Yardage:2yds (1.80m) of 45˝ (114cm) wide fabric or 1-3/4yds of 60˝ (160cm) wide fabric
• 1-1/2yds (135cm) of lining
Okay so this won’t work. You need more that two yard of fabric to create the outer garmer, because according to the pattern instructions say that you should cut two panels 20 inches wide by 60 inches long.The collar pattern is eight inches wide and needs to be cut with the length wise grain. 20 inches wide panel plus the second twenty inch wide panel plus the eight inch collar makes 48 inches, hard to do on 45 inch wide fabric. SO what I did was using the remaining lengthwise fabric after I cut the two panel Made it four inches wide and then cut two strips of the to the proper length acording to the pattern, and sewed them together. THe seam would be then on the exact edge of the collar.
What I should have done while I was laying out the fabirc was press it out completely flat. Then measure out the dimensions for the pieces I needed and then cut. Instead of cutting the two panels with the edge against the fold cutting out the panels and then cutting down the fold. It threw off the grainline completely.
If I were to do this again with the same fabrics I would probably serge all the seams. Err the edges.
Next I put the pockets on, by top stitching. The instructions werent super clear or I was confused so I turned down the seam allowance on the top and pressed it into place. Then I topstitched the pockets on.
Now the instructions said to stitch the lining pieces together at CB leaving an opeing for turning. Instead skip this step, Stitch one half of the linign to one half of the fabric wrap. Therefore you can press the seam allowances open so you can get a nice sharp edge. Repeat with other side. then when you get to the center back fold one edge under and slip stitch closed. Voila.
I had fun with this quick project, and can’t wait to try it again.


Log in or create an account to post a comment.
Sign up Log in