

Add Room with a Simple Bust Adjustment
Add room to the bust with this simple pattern alteration
This simple bust adjustment is a quick and easy way to get more room for the bust and upper chest. This slash method will not add length at the center front. It also does not add a bust dart. This method is a good alternative for a striped, print, or plaid fabric.
1. Find your bust point. Standing in front of a mirror, place the tape measure at the corner of your neck/shoulder seam. Let the tape drop directly over your bust point, when the tape drops away from the body, this is the apex of your bust point. Now measure the distance between your bust points. Transfer the vertical and half of the horizontal measurement to your tissue pattern front.

2. Draw a vertical line from the hem to the bust point, parallel to center front. Continue the line at a diagonal from the bust point to the outer third of the shoulder seam.

3. Draw a horizontal line from the bust point to the side seam.

4. Slash the pattern along both lines, leaving 1/8-inch hinges at the shoulder stitching line and the underarm corner. Slide tracing paper under the pattern. Slide the side pattern section away from the center front section keeping the vertical slash parallel from the bust point to the hem. This width will be doubled in the completed garment. Tape all the sections in place.

5. True the hemline.

6. True the shoulder seam.

7. The slash can also be closed at the hem, if width is not needed in this location.

8. True the shoulder seam, side seam and hemlines.

This bust adjustment is a quick and easy way to get more room for the bust and upper chest.


I think this is a useful alternative to adding darts to a t-shirt as well.
It doesn't add length and I usually need that also.
I don't see how this can work unless only a tiny bit needs to be added. I always need to increase the length in a FBA. And without a dart, how can you avoid the front flaring out below the bust point? Is that what closing the bottom is actually doing, creating an invisible vertical dart?
In knit patterns that include different fronts for 4 cup sizes, I've seen the fronts lengthened and a "bulge" in the side seam that is eased into the back. Pretty easy in stretchy knits.
This method works OK if you only have to add a small amount, 1/2 inch or less to each side, or if the armhole is for a dropped shoulder style. But I've found the Palmer-Pletsch method, which involves an additional pivot line from armhole curve to bust point provides better fit, especially for regular armholes (fitted close to body for set in sleeves or sleeveless styles). The Palmer-Pletsch method adds a dart for the best fit, but one can omit the dart by reshaping at the hemline; this, of course, works best for a loose-fit garment. If it is fitted garment, the dart is a must.
Also, the method described here does not allow for extra length in front to go over a large bust. Without that addition, the front will pull up so that the hemline does not remain parallel with the floor.
Louisse does say that it for adding "a little bit more" I wonder how it would work with T shirts
Yes, exactly, this technique is for just a 'bit more room' in the bust and upper chest area...not a full bust adjustment. This alteration is for a garment that a dart would not work...such as in a print, plaid, strip, knit, etc. I will submit a 'full bust alteration' soon...and yes, that type of adjustment needs more tissue and then fabric at the lower level of the front of the garment so it doesn't 'hike' up when worn.
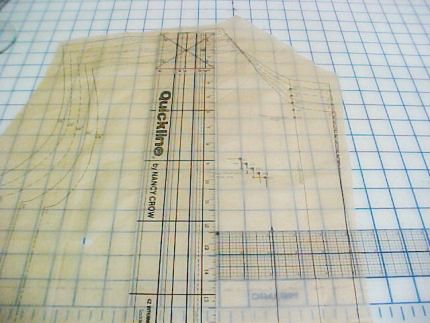
As you can see on the grided mat in the photo, the two parallel vertical lines are only 1" apart. And then can be brought back to nothing if no extra fabric is needed from side seam to side seam around the tummy area.
This adjustment is needed when you have measured yourself from side seam to side seam, over your bust and then after measuring the pattern in the same spot, you find there is just not enought room 'right there' but the garment will fit everywhere else. It's just adds 'bit of room' so you don't end up with 'gaposis' at the center front of your blouse.
till later, Louise Cutting
Anyone ever use the pin and pivot method Nancy Ziemann uses?
I need to adjust a Hospital 'Scrubs' style pattern for a large bust. This style doesn't have a set in sleeve and it's very difficult to get enough fabric to cover the bust and still taper into the arm pit.
Suggestions on how to give bust room without tenting?
I can't really tell by the picture what's happening with the horizontal seam from breast point to underarm. Are you overlapping the pattern there? Thanks.
I think that Louise is one of the foremost experts in this field as are the other people mentioned. There are many techniques that might work, but I have always found Louise to be reliable in her information. If you need length add it. That doesn't really need an explanation does it?
This is terrific but my problem is a small bust. I'm forever trying to reduce the bust in dress patterns. I love vintage/retro patterns with a fitted bodice but end up frustrated by the fitting problems. Will you offer such suggestions for those of us who are less well-endowed? Thank you in advance.
To sewkat: I think you would measure your bust as she did for enlarging but you would swing the hinge inward by overlapping (instead of having a gap) until it satisfies your bust and hip measurements. However whenever I've used the slash and pivot method, something elsewhere does not work well, as folks are commenting above. For you it might alter the hip measurements and waist curves. For myself I use a paper tape system I bought in England about 40 or so years ago and am amazed at how accurately it works. I thought it was out of print until by accident I came across a fancier version of it via another site's link that took me to lutterlohpatterns.com. Their price is way too high for me knowing I have a paper cut out version of it in my drawer but if you have trouble fitting yourself it may just be worth its weight in gold at today's prices. My version was printed on a sheet of papercard that you had to cut and tape together to make the oh so much nicer measuring tape you see in the kit they offer for sale. I've changed greatly over the years and it still works. I am petite, short waisted and wide hipped and thus seldom can buy a nice store bought item that fits and that includes patterns. Making my own pattern from scratch with the tape is easier than the alteration steps above. Go watch their video. It is as easy as he demonstrates it to be. If you too hate the price, then slash and pivot is a usable crutch, but one you have to tweek to get right for you.
I can see that this should work for a small amt being added; however I'm very interested in seeing how Louise alters for a full, low bust line.
I use the Pivot and Slide method to go up to a C bust and have been very pleased. It's easy and doesn't change the shape of the armhole.
Just checking back in here...if you need length...just true up the front hem adding the amount needed at the center front...remeber, this is just for small bust enlargment...I'll submit for larger bust adjustments soon.
The armhole doesn't change in the adjustment, the horizontal line is at your bust point and generally intersects the side seam about 2" below the armseye point.
For a smaller bust, try to slide the cut lines the other way...overlapping the vertical lines just a little. A small horizontal pie shape opens up that will need to be filled in with tissue.
In the photos (7 & 8) check where the horizontal lines overlap. They have to overlap to make the pattern lie flat.
Got to run,till later, Louise Cutting
again, this is for a "tiny bust" enlargement. I have a daughter who is a 32DDD (36 over bust, 28 underbust and a retail size 4), and it has vitually stopped her 4-H sewing because all the dresses she likes have asymmetrical, pleats and/or empire bustlines. there is NO WHERE to get help to help her fit bodices to her bust. (ironically, she is built very Dolly Parton)
please, please do a series on how you alter some of the newest fun dress and jacket styles to get fuller busts into today's patterns. kids are not into princess seams.
HELP!!!!!!
Thank you so much for this tutorial.
A FBA is a bit beyond my beginner skills at the moment and I'm only trying to add a little bit more to the patterns, without having to resort to the "go up a size in the bust" alternative.
Your suggestion saves me having to buy two packages in most of the patterns as I am a hip in 14 and a bust in 16!
What a relief!
I read the instructions twice and I don't see where you tell how much to spread the pattern for more bust space. Possibly the measure of difference between the pattern measurement and the actual bust. But some people have small backs and larger in front. I guess you would have to actually measure the pattern for the answer to that.
For anyone needing extra help, or even video instructions, especially for the large bust, FBA, or the smaller bust, I think the website I go to is Perfect Fit and Sew. For less than $5.00 per month, you have 24/7 support and help..Check it out, I really have learned a lot on this website.
I need some help and or encouragement to alter a pattern for my 20 year old, 5'-9" daughter. She wears a 34 G bra and is a size 12-14 pattern. I have read my Vogue sewing book and various other publications to get some tips on creating a sloper pattern for her. I bought a very fitted dress pattern with a multi cup sized front, used the D cup pattern and cut out a full bodice. I did the slash and add method of making the bodice fit. Now I am nervous to take it all apart and create the actual pattern. It has been many years since I did a major pattern alteration and never have I done a large bust alteration! She is also short waisted by about 1/2" and has a small back. I actually used the size 14 pattern but should likely have used a 12 for the back. ARGHHH!!! Poor kid, it is so frustrating to wear anything other than knits.
Any suggestions on what to do next? Any tips?
Thanks, K
Louise,
Please, when is later for the really larger bust sizes?? My post was 8 months ago. Have you forgotten us?
Hi Louise,
Great tutorial. How would I add a dart to a camisole? Would I estimate the measurement from my shoulder to bust point?
A measurement I would like clarified is when measuring from to shoulder to the waist, are we suppose to run the tape with our fingers under our bust or let it fall straight to the waist. I would think it could make a difference for big breast.
Thank you,
Linda