


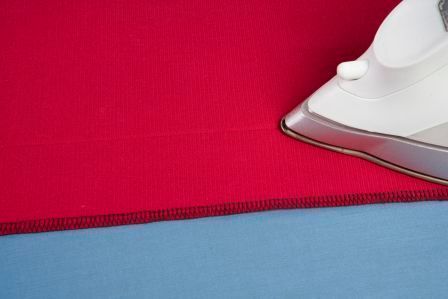
Fold the hem facing up and press.
In Threads June/July Issue 155 (on sale May 10), Barbara Emodi shows how to extend a skirt in clever ways. In the issue she explains how to extend at the waist with a knit yoke and two creative ways to extend within the skirt with straight or wavy inserts. Here, she shows how to extend at the hem.
This traditional approach is often referred to as adding a “false hem.” By letting out the hem and adding a facing, you can add an extra 1/2-inch to 1 1/2 inch to a skirt’s length (depending on the depth of the original hem). Be sure to select a hem facing that is lighter in weight than your skirt fabric to minimize bulk.
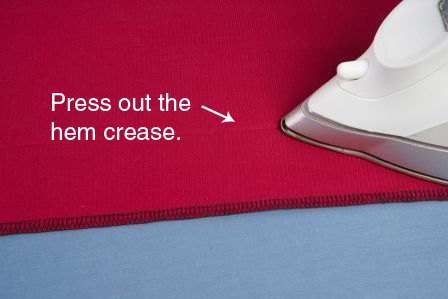
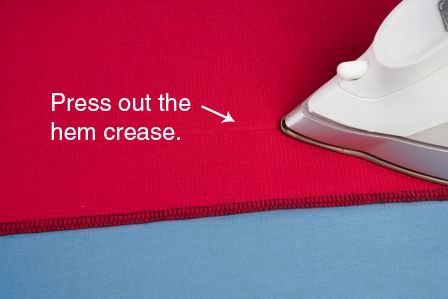
1. Unsew the original hem. Remove any seam binding on the hem edge. Press out the hem crease, first on the wrong side, then on the right side.
Give marks the brush off: For fabrics with a slight nap, like some wool flannels, a gentle brushing with a soft fabric brush helps remove stitching traces.
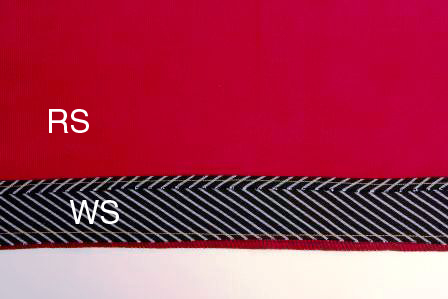
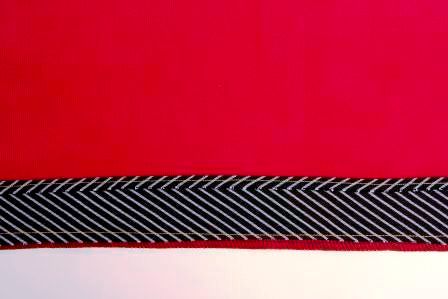
2. Cut a facing to make a new hem. The intent is to replicate the original hem, so cut a facing strip to equal the hem depth, plus a 1/4-inch seam allowance. Measure the skirt’s hem circumference and make the facing 3 to 4 inches longer.
TIP: Get creative
Consider making the hem facing a feature—use a contrasting or patterned silky fabric for facing.
3. Sew the facing to the hem edge. Starting at a side or center back seam, stitch with right sides together with a 1/4-inch seam allowance. Trim and turn under the facing to overlap the start when you reach the seam’s end.
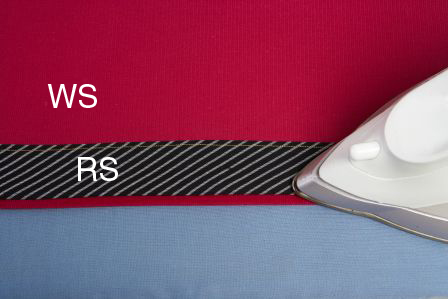
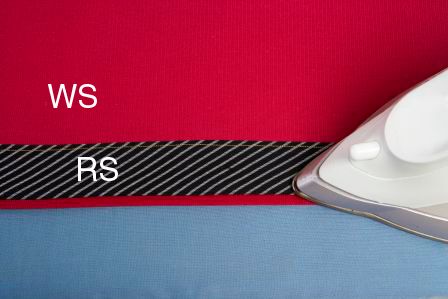
4. Press the seam, then fold the facing to the skirt’s wrong side. Roll the facing slightly to the skirt’s wrong side so that it doesn’t show at the hem edge.
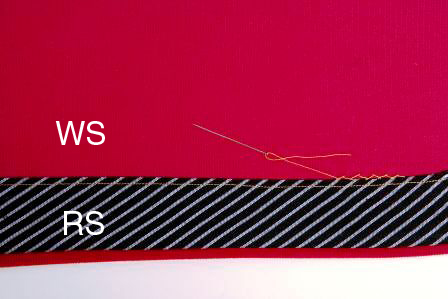
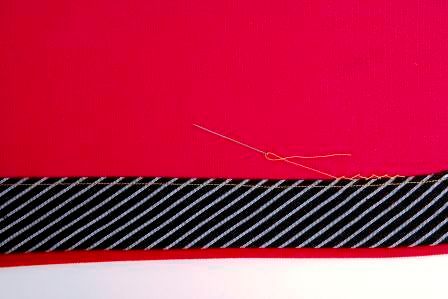
5. Finish the hem by hand or machine, understitching if necessary to support the facing.
Be sure to check out the complete article in Threads issue 155 for more ways to add length to a skirt.


I'm not an expert sewer but I know enough ... and I would love to understand what exactly is being suggested here. Is the hem extended with a different fabric? I'm not sure what the "facing" is. Are we using the *same* fabric? Thanks.
merri1 - It isn't explained,but the last 2 pictures are of the inside of the garment. It's a way of making the skirt as long as possible with the fabric available.
after I remove a hem, I always take a cloth with a little bit of ammonia and rub into the edge of the hem, cover with iron cloth and press and it will desappear.
The turn of the hem will look much better if the seam is pressed open first then turned and pressed into place.
I assume that the contrasting fabric used in the article had two purposes. One is that a contrasting fabric can be a "fashion statement". The other is to show what is being done.
Beverly A.
As PeggyKemp says, the pictures do not explain when you are looking at the right side or the wrong side of the skirt. Any good sewing book (I love Simplicity's Simply the Best Sewing Book) will show how to do a false hem.
Basically you have let down and pressed out the original hem. Then- Right Sides together-- you attach the false hem at the very bottom of the skirt, sewing just a 1/4 inch seam. After pressing, you then fold the false hem up to the
Wrong side, press again (with rolling it up just a little so the false hem does not show) and hand stitch the new false hem in place.
Thus you have used only 1/4 inch of the original hem length, and have attached the false hem to finish it off as well as give it weight to hang properly. So now the skirt is extended lengthwise by as much as the original depth of the hem, minus 1/4 inch for the seam.
It is sort of a similar idea in construction as a facing at neck or armhole, tho serves a different purpose.
To answer merri1's original questions, a facing is the section fabric which provides a finish to the edge of a garment. Just to be (slightly) confusing, this is generally referred to as a "hem" when it's the lowest section of a garment i.e. a skirt, dress or trousers. Most commonly it is made in the same fabric as the original. In a skirt or trousers the fabric is usually folded at the bottom and turned up to create the finished edge.
However, the facing or hem can be made in a contrast fabric to save on material - maybe of an expensive fabric –, to extend the length of a garment seamlessly, or to provide a fun finish. Additionally Threads Magazine often uses contrast fabrics to highlight the techniques they are depicting.
When finishing a hem, I like to cover the upper (internal) edge with bias tape. If I have enough lining left, I cut some bias strips from this, otherwise I use pre-made satin bias for a professional looking finish. This also makes it easier to hide the stitches, which attach the hem to the main body of the garment.
Thanks everyone! Now I understand. Interesting and clever way to do it. Thanks so much.
What a great article! It brought back so many memories. One used to be able to buy something called "hem facing." It was cotton, about two inches wide with fold-overs along each long edge, not dissimilar to single-fold bias tape. My mother would eke out a few extra months on dresses of a girl who was growing like a weed. Only for every day dresses, though. Some people don't understand the logic behind making ultra-deep hems in smocked dresses but girls can get taller at the wrong times!
I am flabergasted that anyone had trouble understanding how to do this--it is a technique that has been around forever. Forever since little boys pants have to have hems let down because they GROW! I am 79 years old. Back in highschool, in 1948, dress hems suddenly changed from knee length to mid-calf. We ALL learned how to face hems. We used a similar fabric to the skirt if possible. Other wise a contrasting fabric was used as in the illustration above. Also, we put strips of insertions into skirts to lengthen them. That striped fabric used for a facing above would look great as an insertion just above the original hem. Then one could trim a jacket with the stripe, and on, and on. There is truly nothing new under the sun when it comes to sewing.
The top and bottom raw edges of the new false hem were addressed but not the false hem's raw SIDE seams. After letting out and pressing the original skirt's hem, you will have to then loosen one original SIDE or back seam by one inch. If the skirt was sirged, you will have approx. a 1/4 inch SIDE seam. If the skirt was conventually sewn, you will have a 5/8" seam. Place both the false hem's and the skirt's hem edges good sides together. Now align the false hem's SIDE seam to the skirt's SIDE seam that was just loosened. Pin to avoid slippage. Start stitching at this point. This will allow you to begin stitching the false hem's 1/4" seam at the very beginning of the original skirt's SIDE seam raw edge. After you have stitched the entire circumference of the false skirt's hem, you will be ending at the very end of the other skirt's original raw edged SIDE seam. You will now need to cut any extra false hem fabric that has extended past this SIDE seam edge. Now to finish the SIDE seam. Duplicate the way the original SIDE seams were sewn starting where you loosened the seam originally. If the seam was originally pressed open make sure the new false hem SIDE seam is pressed open, as well. Now, the new false hem is ready to be flipped up to be sewn to the back of the skirt. This article was not written for inexperienced sewers and it needed to be. An experienced seamstress would not have needed to have directions at all because this is a simple procedure for us. More steps and explanation of terms needed to be given.
Good job you have done here!