

In this online extra to the Threads issue 158 article “Garnish with a twist,” you will learn a third variation on creating bias-strip insertions. In the article, I explained how to insert bias cut bands into a straight or curved inset on a garment for a stunning embellishment. Here, you’ll see how to apply the bias bands to a shaped garment section. To adhere to more dramatic contours, the shaped variation of these twisted bias-band insertions require using bias pieces of varying proportions.
Start by using the modified pattern, as outlined in the article “Garnish with a twist“ from Threads #158, on newsstands now (or buy online). For this shaped variation, I have again used the example of a skirt with a yoke added.
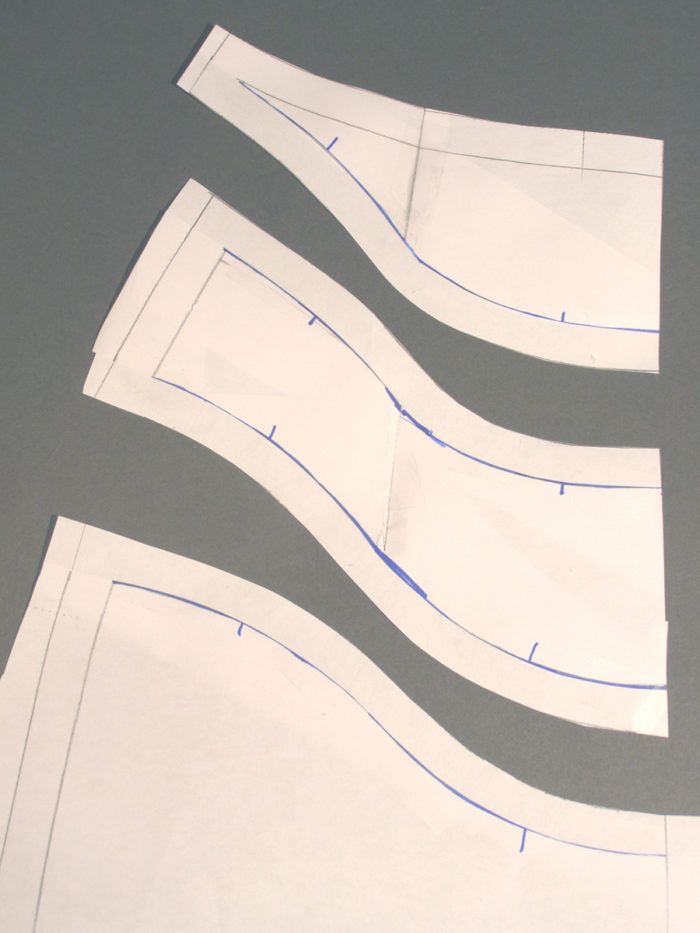
Following the more pronounced curve of this shaped skirt yoke, the insertion panel (shown left) takes on deeper inside and outside curves.
Draft vertical lines on the insertion panel pattern for the bias band placements. As the bands encounter the panel’s curves, they become more wedge-shaped. Each section of this pattern represents a finished bias band. Number the sections on the pattern for future reference. On each band create a lengthwise center fold and position the strips on the insertion panel with the folds facing center front.
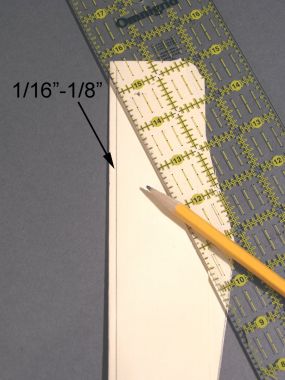
Use manila folders to make pattern pieces for the bias bands. Fold the manila folder in half and draw a line 1/16 inch to 1/8 inch from the folded edge. This will compensate for turn of cloth.
Lay the marked insertion panel pattern over the manila folder. Align the pencil line with the left band edge. The opposite band edge will be folded in to the center fold line in a later step (in this example, the section’s right edge).
Start your 14-day FREE trial to access this story.
Start your FREE trial today and get instant access to this article plus access to all Threads Insider content.
Start Your Free TrialAlready an Insider? Log in


I loved this embellishment when I saw it in the magazine. I think it would look great on cuffs, hemlines, lapels or even as a feature on an art quilt!
I like this very much. Two questions for you: 1) What would the limit be on the length of the bias strips without altering the look/effect? 2) How can I print this supplement, so I can put it in my Threads magazine? THANK YOU SO MUCH!
Very interesting. I am especially intrigued by FiberArtiste's suggestion of incorporating into art quilts.
I wish I'd been able to locate the prior 2 articles referenced in this one about other insertion methods.
Dear Mr. King, I love you.
Ooops. Thank you to author gailete for the suggestion of incorporating into a quilt.
FiberArtiste: to print, go to the top of the article. There is a small inset box with the option to PRINT.
Correction, 1st paragraph, 1st sentence: "159" should be "158". ;o)
Wonderful! I can't wait to try this! Love it!
I wonder if he has an idea for inserting athese band on a straight piece of fabric. I think it would look great in a strip quilt.
i kind of liked it before the twist! :)But it is a cool technique.
I really would have liked seeing the finished skirt on a model.
Looks like a cool neckline treatment to me. Brilliant, as usual Kenneth.
k
This looks like a fun technique for a front or back yoke or down a sleeve, but I personally do want attention drawn to my abdominal area. I agree, too with the comment that it looks good before the twist.
Oh Kenneth! Yet another awesome technique. You are the BEST! Thanks, Rhoni
In answer to the question of length of strips, I find that they work well when they are 3 times, to 4 times longer than the width. So, the wider the strip, the longer they can be.
I showed this on a skirt, but this technique can be used anywhere, as some of the comments here reflect. (I also understand about not wanting to draw attention to my midsection!) We chose a skirt for the model, because it required less construction, and would allow the technique to show well without the distraction of the rest of the garment details. But this technique looks well on a back and front shoulder yoke, or as trim for cuffs, down the center of a sleeve, or at the hem of a garment--quilts, too!
Glad you all are enjoying this!
The issue number has been corrected. We get a little ahead of ourselves around here since we are currently working on the next three issues! Thanks for the catch.
Thank you Mr. King, for a great technique. And the instructions are well written and easy to follow.
This is beautiful! I can't wait to try it on something!
Really clever technique, beautiful result, and in a favorite fabric of mine! I may just have to incorporate this in a future project.
Mr. King, another gorgeous and versatile technique, well explained. I'm going to use it on a swimsuit. Thanks for inspiring us!