

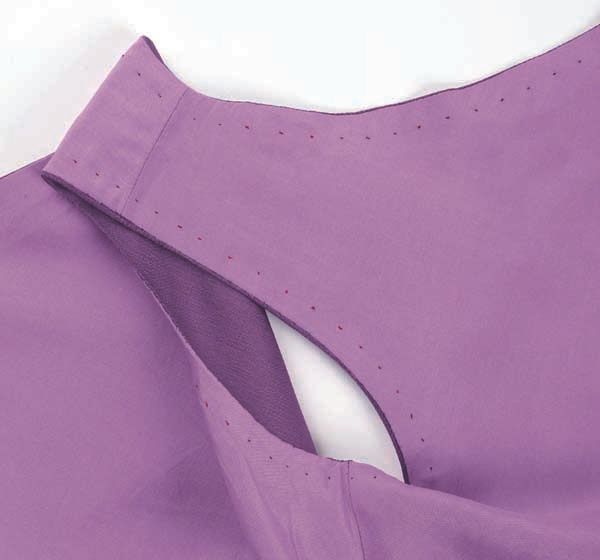
Understitching is not just for necklines. This garment is understitched around the armhole as well.
There are subtle differences between garments that are hand-understitched and those understitched by machine. We’re getting really picky here, but there is a softness and a pliability that only hand stitching can supply. This process can be applied to garments that are underlined and have either a facing or a lining.
Understitching is not just for necklines. This garment is understitched around the armhole as well.
1) Sew the facing to the garment. Press the facing toward the seam allowances; work your way along the seamline, a little at a time. In addition to orienting the seam allowances, this establishes a nice curve before you clip.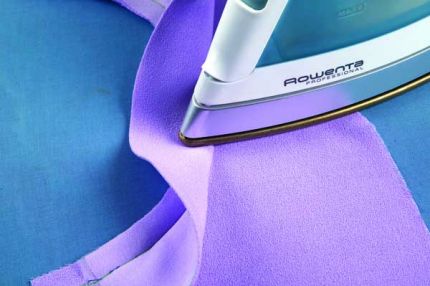
2) Clip the seam allowances perpendicular to the stitching line. Clip as much as is needed to allow the facing to lie flat against the garment. More clips are better than fewer clips-they release the curved seam’s tension, and the resulting edge is smoother.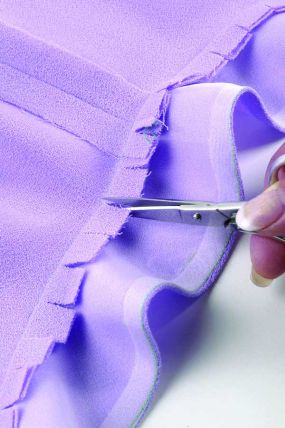
3) For the understitches, use a pickstitch, which is a tiny backstitch. With the inside of the garment facing you, place the stitches about 1⁄2 inch from the garment’s edge and about the same distance from one another. Stitch through all layers except the outermost. You can use pins to mark even placement. With practice, though, your stitches will form evenly.
4) To make a pickstitch, stitch right to left (reverse if you’re left-handed). Anchor the stitch between layers and emerge on the facing side. Take a tiny backstitch through the facing and the seam allowance, and then slide between the layers and repeat for the next stitch.
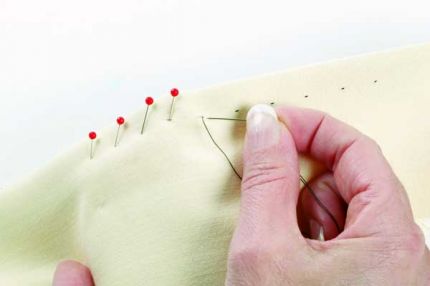
Stitch back to form tiny pickstitches.
5) Maintain even, dotlike stitches. If you draw the needle too far backward, you’ll form a dash. If you don’t go back far enough, you may go into the hole the thread came out of, and the…
Start your 14-day FREE trial to access this story.
Start your FREE trial today and get instant access to this article plus access to all Threads Insider content.
Start Your Free TrialAlready an Insider? Log in


I have found in clipping my seams I clip one seam allowance at a time. In clipping the second seam allowance I alternate placement of clip so clips don't fall in same places on both seam allowances. Seems to give clipped seams a little more stability.
Thanks for posting this, I have always preferred the hand stitching to machine. It's quite easy and I feel looks better. I anchor the lining and facing on the shoulder and side seams. It looks very professional ! Yes I am old school :)
I agree with June123. I never clip both seam allowances at once. I think it weakens the seam and doesn't create as smooth a curve.
Thanks for the detail in describing understitching. I needed a tutorial in my bag of tricks and Unerstitching is just what I was looking for.
i made my very first bound button hole, thanks to Susan today, for my granddaughter coat, i have worried about the button holes for day, what if the machine snags what if it jams, so i thought i will have go a hand making a buttonhole, studies all i could find and looked up my notes when i did a course of pattern review with susan, and practised, very pleased with my first effort, may be this is always how i will do button holes now.
Excellent and very helpful.
See you in LA.
Nice tip and great photos. I agree with June123 re clipping layers separately and staggering the clipping - stronger overall and doesn't show through as lumps once pressed.
Only problem I've encountered with this pick-stitch technique is that it will draw up and sort of pucker if I don't leave the thread a very slightly loose as it travels inside between the pick stitches. A bit of practice with a light hand is good preparation before embarking on the finished product.
Hand stitching -- it's a zen thing ;-)
I'm a little confused because step 3 states ' Stitch through all layers except the outermost ' yet the stitches are clearly visible on the sample in the first photo. I always understood understitching is not usually visible on the outside of the garment.
Hmm...I don't know whether this is a new idea or not...
I rarely use sewing machine to do this kind of finishing. I always use hand understitching, for bags, clothes, etc...It's one of 'basic' technique I learn in every sewing course I attended...Unless...it's another hand understitching technique...
This really makes a garment look very special - this technique gets added to my tech-stash.
JDNow, the first photo shows the inside of a lined garment, not the facing in the photo's of the tutorial itself. I also had to take a second look. I must say, pick stitches showing on the outside of a fine garment should make for beautifully delicate embellishment.
I love using this technique. Often, I will add a seed bead for and added detail. Looks very rich along a zipper - the shimmer of a glass bead on that simple black dress...
Please tell me how the edge of the facing was finished. It looks very smooth and flat. Thanks.
For Lauriesannie, it appears that the facing shown in the construction photos has been lined with a sheer fabric like organza.
For JD Now, the pictures in lavender which show the pick stitches appear to be of the inside of the garment. I agree with "cFields" it appears the facing was lined with organza for finishing and interfacing.
Excellent tutorial.
I agree with June 123 regarding clipping seams. For the majority of sewing that requires understitching I have always done this by hand as i find it a lot easier in the long run as it sometime a chore to maneuver an armhole, neckline using the machine and less conspicuous.
Usually I pick up a thread or two of the outer fabric when stitching the facings down, it doesn't show on the garment and is easier to keep flat after laundering. Less ironing is always a good thing! But I agree with the others regarding staggering the clipping of seam allowances, staggering them gives a much smoother look when pressed and finished in most any manner.
We used to call it Back Stitching the seam;But hand pick stitching the facings as pick stitching a zipper is a sign of skill and beauty
Isn't the facing only one thickness? So, I don't get this.
Sorry, thanks.
The facing itself is only one layer, but the understitching catches the seam allowances of fabric, underlining and facing (or whatever layers the construction includes). This prevents the facing edges from rolling out to the outside of the garment.
The tutorial is confusing because the garment has decorative pick stitching around the neckline and armholes. It would have been better to have not done that and just stuck to the facings.
The objective of the pick stitching is to keep the facing neatly tucked to the inside.
Excellent explanation, Susan. Thank you!
For those of you who are confused about the first picture, that photo is of the inside of the lined garment, not the outside. The understitching shows only on the inside. I hope that helps ;-)
I am taking Susan Couture dress course online at craftsy.com. Her skills are shared in an excellent video format. Pick stitches can be used in inserting your lining. They show on the inside of the garment and only go through the underling (organza) and lining. Never through your fashion fabric. Sign up for her Craftsy couse you will not be disappointed.
I know this is an old article, but I found it inspirational for my latest project (which is not quite finished. I wrote about understitching on my blog: http://heavenlyprincess.wordpress.com/2012/10/22/understitching-what-difference-does-it-make-anyway-and-a-sneak-peek/
Jordan Elizabeth