

April 28th is the big day. My dear friend Meme (we’ve known each other since nursery. We fought over who was Kristen French’s best friend, me or her. I won) is getting married and as I have said before, I must look smashing. She has found her husband, meaning she can look like crap for the rest of her life. I, on the other hand, have not found my husband, not even a man (any takers?) and therefore must look amazing at all times.
In early December I found (and fell in love with) the dress I’m going to make for the big soiree. Over the holidays, I let the idea sit, thinking about how I would tackle the project. Over the past 2 weeks, I have been drafting the pattern and after a minor obstacle on Friday the 13th (my tire blew on the way home from the fabric store. I sat on the side of the road, car on one twenty-four inch rim, in 30 degree weather. Not a glamorous moment for me at all) I have finished the pattern and sew-up (yay!).
For all you sewers and techies, I show you how I drafted the pattern below. There are a lot of details I left out (how I will finish the neck, what the bottom hem will be, if there will be a CF seam, pleat depth, how I will make the waistband, ect.) so this post wouldn’t turn into a novel (and to spare you a headache) but if you’re interested in the details, then please, please, please email me and we can chat more.
For all others, just take a peek to see how the pattern for a dress like this is made. I apologize if my explanation gets a little tedious (it does, I know). But I think it is cool to see how to recreate a real world garment.
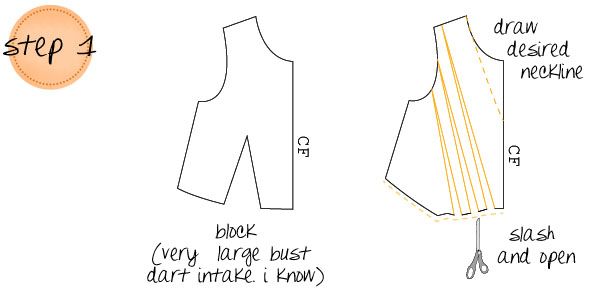
The bodice. Looking at the picture of the BHLDN dress, it was easy to determine that the dress had pleats at the waist seam. But how many, the intake, or the placement of each pleat I did not know. To determine this, I quickly draped a bodice. What I got was 6 pleats (total) centered at CF (center front). With this information, I transferred the bust dart on my block and slashed and opened at each pleat point the desired amount.
I could also see from the picture that the bodice had a little (just a titch) of bloussant. So I added 1/2″ to the CF length, tapering to 1/4″ at the SS (side seam). The front should always have more bloussant than the side and back. Just an FYI.
Oh, and I also drew the neckline I wanted. I decided on a front neck drop of 7 3/4″ from HPS (high point of shoulder). Sexy but not screaming take a look at the puppies.
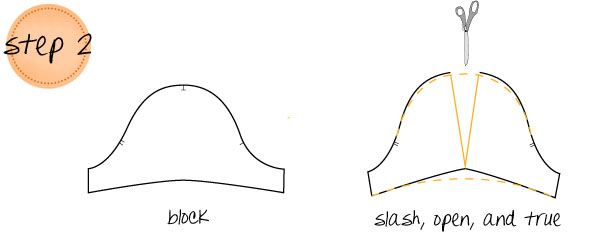
The sleeve. The sleeve was easy. It’s sort of industry standard (I work in technical design) that the shirring width at a sleeve cap is approximately 3″ (give or take). And looking at the picture, the shirring ratio looks as if it is 1 ½” : 1” (I simply guessed). So, I slashed and spread my sleeve pattern 1 1/2″ (if you’re a techie, you’ll know how I got this number).
After, I trued up the pattern by redrawing the sleeve cap and sleeve opening. I redrew the sleeve cap by lowering it just a tad. Why? Because when I slashed and opened it, I made the sleeve cap a smidge bigger (it’s hard to show this in the sketch, but slash and open for yourself and you’ll see). And a big sleeve cap height with shirring I definitely don’t want; I’ll end with 80’s puffy sleeves. A no-no.
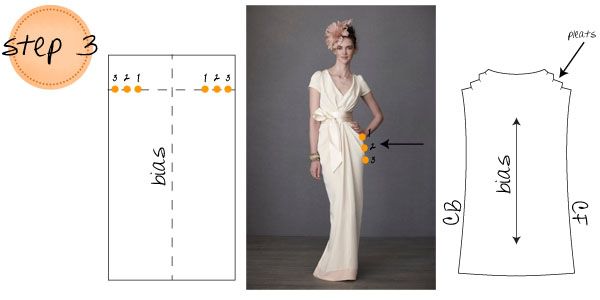
The skirt. The skirt was a little more difficult. I teetered back and forth between whether I should manipulate my block or drape the skirt in order to create the pattern. I finally decided to drape the skirt first and then true it up against my block. Why? I personally feel that with any draped kind of style, it is best to use the form and fabric to drape a quick mock-up (no matter how messy or how imperfect it may be) before starting the pattern. It’s hard to guess how the fabric will fall and it will be a lot easier to determine where to slash and open your pattern if you spend the 5 minutes draping.
So, I drew a line on the bias of the fabric (I bought cheap fabric similar in hand to the one I would use for the actual dress) and drew another line perpendicular to it. I drew these two lines so that as I draped, I could make sure that the bias fell straight at the SS and didn’t wing forward or backward when I began pleating.
Holding the bias parallel with the SS on the form, I created the first cowl by pinning the first set of orange dots (see sketch) at CF and CB. If I wanted the cowl to sit lower on the hip, I placed the second set of orange dots at CF and CB. If I wanted the cowl to sit even lower, I pinned the third set of orange dots at CF and CB (and so on). Once I established the first cowl, I then began pleating up at CF and CB to create the second and third cowls (I ended up with 3 stacked pleats at CF and CB).
Trueing the pattern was simple. Other than cleaning up the lines, I made sure the length of of the waist seam matched that of the bodice and that CF length and CB length matched.
That’s it! Like I said before, I have sewn the first fit (practice) sample. There are definitely some fit and design issues (neckline needs to be lowered and the sleeve is funky) in order to get to the BHLDN dress but that’s what a second fit is for (nope, I’m not making the actual dress yet!). So stay tuned; a follow up post is to come of how I fixed these issues.
Oh, and just as an FYI, I didn’t include a sketch or an explanation for the back pattern because all I did was convert the waist dart into a pleat and add 1/4″ to the length for the bloussant. Simple, simple, simple.


Just love the silhoulette of this simple jet very ellegent dress.You are really doing great work with the design
Love the plan. The dress is beautiful. And thanks for all the detail. Fun to read. I look forward to seeing the finished product!
Thanks Kate and Antgie! I will definitely keep you posted on my progress. My goal is to have the 2nd sew up completed in about 2 weeks (exciting!). And don't worry... I will let you know how that one turns out.
Sincerely Always,
Maddie
http://www.madalynne.com
Exquisite. You are undoubtedly gifted, and have a feel for fabric. Only one complaint,and that is that next time you use larger photos. ;-)
Eliza, thank you so much for the kudos! I know, I know, the images are teeny, tiny but click here for a full view (and to check out more of my creations)
http://www.madalynne.com/?p=8049779
Sincerely Always,
Maddie
http://www.madalynne.com