

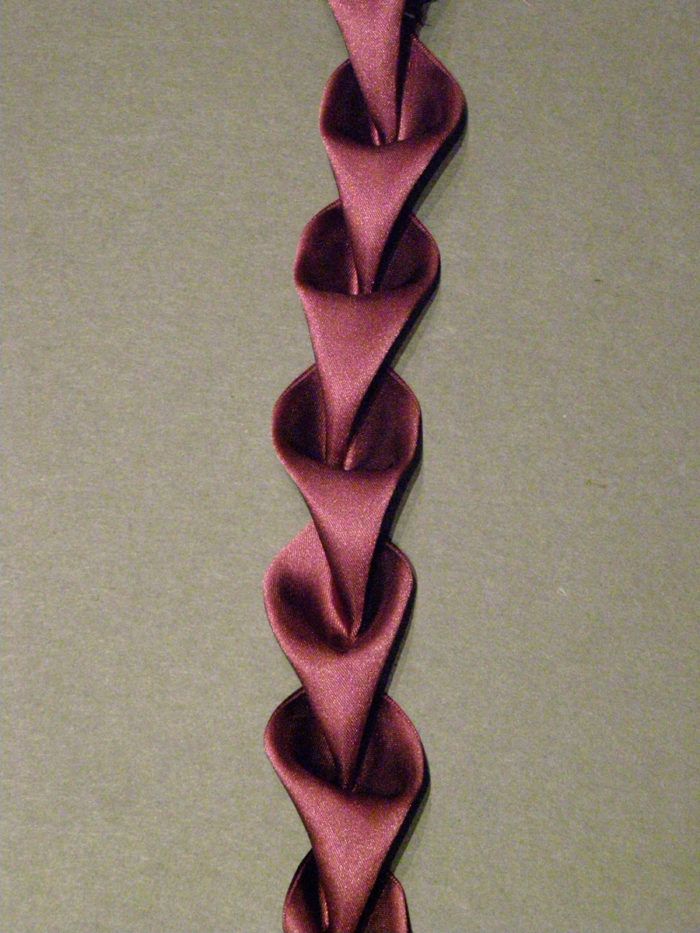
Recently, I purchased a stole at a vintage shop. I had to have it, just to get an example of this extraordinary ribbon trim, which I then had to figure out how to make. This post presents the results. Don’t miss other Threads techniques like this by purchasing a print subscription which comes with FREE access to our tablet editions.
Here’s a detail, that shows how this sweet trim can be used to good effect.
When explaining this trim, as well as other kinds of ribbonwork, I will refer to the unit of measure as “ribbon width.” I learned about this method of measurement from Candice Kling’s excellent book, The Artful Ribbon (C&T, 1996).
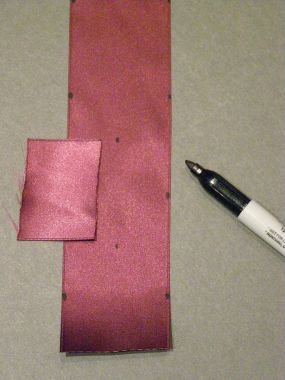
Using the width of the ribbon as the increment of measure makes any work easily scalable, either larger or smaller. The trim on the inside of this stole had a 3/8-inch finished width at its widest point.
Since you will lose 25 percent of the ribbon length when making this trim, make sure to cut your ribbon length 125 percent of the finished length you need.
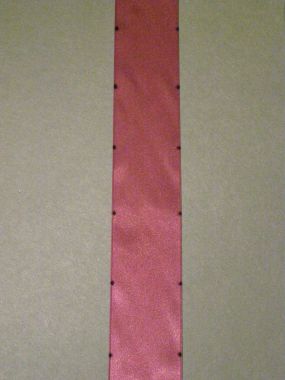
Mark the ribbon
1. Mark dots along the ribbon selvages, one ribbon width apart, as shown. Do this along the entire length of the ribbon.
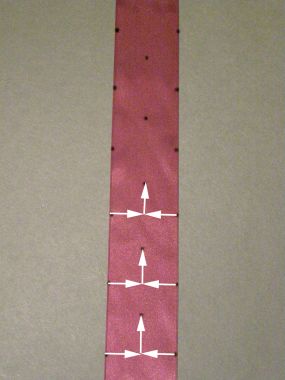
2. Next, make a third row of marks between the selvage marks in the middle of the ribbon as shown. Make these marks the full ribbon length.
Begin stitching
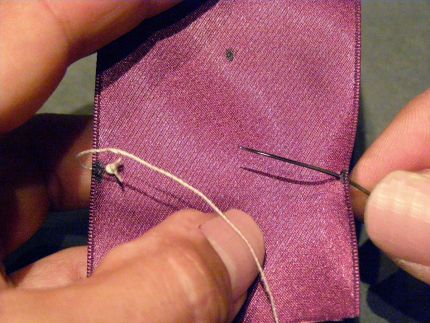
1. Begin the stitching at the lower end of the ribbon and work upward. With a needle and thread, pick up edge marks on opposite sides of the ribbon. Whipstitch together with a couple of stitches.
2. Next, fold this stitched point, up to the nearest middle ribbon mark.

3. Stitch the stitched point to the middle mark with…
Start your 14-day FREE trial to access this story.
Start your FREE trial today and get instant access to this article plus access to all Threads Insider content.
Start Your Free TrialAlready an Insider? Log in


I love all the work you do Kenneth and I can't wait to try this. Sorry to be a math nerd here but I do have a question. If your work shrinks 25% wouldn't you need to cut your starting ribbon 133% of finished length. For instance, if you desire a 12" finished trim my calculation suggest that you would need to cut the ribbon 16" long. Once sewn up the 16" (12 times 133%) ribbon loses 25% and shrinks to 12" while a 15" ribbon (12 times 125%) would come up short at 11.25" Keep up the great posts.
Wow! Thanks for posting this. It's a great way to embellish a garment.
Thank you so much for posting the step-by-step process with detailed photos. I have a ribbon trim book with this design included, and this particular pattern was one I wanted to try. They call it "Shell Smocking." The instructions are written but the only stitch diagram shown is confusing to me. I've tried to figure it out on a few different occasions but never succeeded and remember feeling completely frustrated.
Your detailed diagrams make this design process crystal clear. So very much appreciated.
I am not sure how I will use this trim technique right now, but I will used it. The ribbon is just too cool.
I am so impressed with our math wizard here. I don't even understand what they are saying, just sounds good so I'll believe it, LOL!
I can't wait to try this lovely trim. Just put it on my pinboard. Thanks again for your expertise, Mssr. King.
This is awesome! Absolutely charming! It would look great top applied onto the side seams of a pair of tailored pants!
or onto the hem of a skirt!
Sincerely Always,
Maddie
http://www.madalynne.com
Thank you for your effort, expertise, and generosity that has led to your professional posting of this trim. I value it all.
I'd like to see it trimming a christening set. Perhaps wider ribbon on the edge of the bonnet and narrower on the dress but would need to give it more thought.
Flower girl dresses too would be given an extra special touch with this trim, including their head bands.
Christmas wreaths and tree decorations would benefit too, using appropriate colours. Can't you see it edging a star etc in the chosen colour scheme, silver on blue, cream on gold, red on green and so forth.
Thanks too, for the inspiration this post has given rise too.
Simply beautiful, beautifully simple! I'm envisioning this trim adorning a satin, vintage-styled evening bag ... can't wait to try it. Thank you for sharing and for your very clear instructions!
Hi Kenneth,
thanks for always posting such interesting tips.
I wanted to share with you all, that this type of trim is a traditional embellishment of Bavarian and Austrian dirndl tops and jackets. It is mostly sewn around the neckline and we call it "Herzruesche" which means as much as "heart trim".
There are more trims similar to this one used in dirndls, e.g. "Froschgoscherln" which means "little frog mouths" and many others. Often there are several rows of different trims combined around the neckline to yield the impression of one broad trim.
You can see some examples here (click on the images to enlarge them)
http://www.lungauervolkskultur.com/de/miedergewand-tracht-lungauer-volkskultur.html
and here:
http://shop.sportalm.at/productimage/1704x2386/P9008128285928_4.jpg
It's very interesting to see our traditional embellishments being used in couture.
Greetings from Germany
Barbara
Lovely little detail Mr. King!!! thank you so much!! I could not wait and made it in a 2/8 of and inche ribbon and came out beautifully!!! Thank you, thank you again!!!
Assuming that you do lose 25% of the ribbon's length, you would need to add 33% to the desired width. Chances are that's not a problem, because I expect Mr. King has done it this way with his measurements and it worked out fine.
This trim is just exquisite. I love you, Threads, for all of the wonderful information you provide on the net. It is great that you have the top notch designers like Kenneth King, on this site. I appreciate it so very much. The perfect directions make it so easy to follow and get beautiful results. Keep up the good work.
Thank you for sharing this project. It looks awesome and I trust I will find time to try it. Kindest regards
Lantern and Shadows, thanks for the math as that is NOT my forte.
Barbara from Germany thank you for the wonderful lesson and links.
I can't wait to do this trim. I think I will do a baptismal baby bib first with it. Short and sweet project.
For some reason (and several tries) this is not pinning to my pinterest board :-(
Thank you so much!!! I am avid embellisher. I have always dreamed of figuring out this type of trim. You have made my dream come true. Thank you, thank you so much!
Thank you for sharing this beautiful embellishment. This would be beautiful to enhance sleeves and neckline on a simple dress.
I absolutely love this ribbon embellishment. Kenneth King you are my favorite designer and you have been ever since I saw you many many years ago on a Sandra Betzina sewing show. I also would like to thank you for sharing all of the fabulous information that you find and your many tips and techniques.
Unfortunately, some of us live where this kind of valuable information is not available and again I can't thank you enough for what I have learned from you!!!! Cindy
This appears to be counterchange smocking done only on the vertical. Don't worry about the math. You will probably just keep smocking until you have the length needed.
I wonder how the trim is attached to the garment? Hand-tacked along the underneath where the joining/forming stitches are located? One more pic would complete the instructions for me! Thanks, all, I appreciate the comments so much. Lantern and Shadows, YOU are the math wizard as you seem to inherently understand how to calculate markup.
wow this makes me think of the beautiful night gowns and robes my grandmother used to wear. They looked sort of like a négligé soft and billowy but not see through and the gowns were beautiful. In fact she would wear a lace "mañanita" or morning jacket for modesty sake when the Dr would come to see her either in the hospital or at home when such was the norm. mañanitas are waist length, the one i liked the most was dusty rose and pale gray lace over the top that draped very soft.
This article has brought back a flood of such pleasant memories.
This was such a great embellishment. Thank you for sharing.
This reminds me of ruching; I have a pillow that was my grandmother's, and though it was an allover ruching, the technique is very similar.
What a wonderful idea! Thanks so much for this article. I can see many applications for it.
By the way, the "wrong" side has lovely folds as well. If a decorative thread were used, that side would also make for an interesting trim option.
Kenneth: I always loved the look of the trim. Thanks so much for the directions to make it. Best Regards Dianne Beach
This one has inspired so many people. I can't wait to try it on one of the Project 1912 projects.
Hi, My question is: how do you attach this ribbon trim. I am thinking of using wedding ribbon as a trim to a baby blanket.
Can't wait to try this. The instructions are very clear.
With a little work, it almost looks good even on the reverse. I'm going to try this. It is nice to be able to make something that looks so ocmplicated!
This is awesome. I am making doll dresses for my Granddaughters American Girl Doll and I can't wait to make this with a tiny ribbon to put on an old fashion dress. Oh the possibilities!!
Thank you so much for sharing.
Absolutely beautiful! Thanks for sharing. I look forward to seeing all of the projects via newsletter and my subscription to Threads magazine. I have been a subscriber since the first issue.
I am making my first crazy quilt and this will make a stunning addition, it's so great looking and looks fairly easy. The directions are great and good pictures. I love Threads.
I love it! Thank you so much, I can't wait to try this.
Thanks ever so much for your generosity in sharing so much . . . and your brilliance in capably deciphering and presenting the "how to"s of so many things. Awesome!
In love light and healing~)
Thank My King for this beautiful looking trim I going try this trim and expand on this by incorporating some bling to it...
oops i mean MR.King sorry typing without proof reading
Hello!
I'm glad that you all like this trim! It was lovely on the inside of that stole, and this is a trim that can go many places.
The question that keeps coming up--how to attach? I just slip-stitch it to the ground, tunneling the thread under the fabric between units and catching the trim at the stitching points.
And yes, if you use a decorative embroidery thread while working this, the back of the work will also look nice.
Another variation, is to make two or more lengths of this, and sew them together parallel at the stitching points--it makes a fuller trim, one that, if you use three lengths stitched together, would make a nice finish on an edge of, say a scarf, or, even a quilt.
Enjoy, folks!
Thank you Mr. King. This is neat. I'm anxious to try it out.
Thanks Kenneth - Another wonderful How-To from you! I love it and will be using it on a number of things for myself and for my DGD.
Every time we get a lesson or article from Kenneth King, I feel so lucky! Kenneth, I love how you share so much of your knowledge by teaching SO many people in the many ways that you do. For being so famous, you are incredibly down to earth and generous. Many thanks!
I LOVE this. I'm don't usually have the patience for elaborate trims, but I am going to make a special trip for ribbon.
I am a huge fan of Kenneth King and loved this before I realized it was his...I should have known. Thank you again for sharing another of your spectacular creations!
Senor King continues to demystify the universe, when he isn't expanding it.
I love this technique... haven't tried it, yet, but my head sure is spinning.....
Superb..I love it :)
I have this trim in a custom-made coat that my mother-in-law had made for her in the 1960s! It borders an inside pocket in the lining, and I've always loved it. Thank you!
ACK! This is fantastic!!! I would love to make a whole dress based upon this idea. I'll need to become independently wealthy and quit my job first, however. Or start now, and wear it when I'm 70.
Thank you for the fantastic tutorial!
Thank you so much for this trim. I was just wishing for a creative trim to use on the neck line of a dressy but plain T-shirt. You answered now to attach but how is it laundered?
I'm sure by hand but does it get out of shape or ever look wrinkleld? I can't wait to start on mine!
I sure wish I could "Pin it". Tried and tried, and no luck. Sigh.......
For anyone who wants to see more fabulous ribbon-work, as sculpture and as applied to surface, look for Candace Kling, who is a master ribbon-worker and has written at least one book on ribbon-work, which goes back several centuries, especially in historic European costume.
OOPS, Got mixed up about what to do first...post or write! Anyway, this trim is already planned for the next Christening dress, scarf or embellishment I will be doing soon to present to my Fiber Arts Guild next week. Thanks so much for the fun, interesting and pretty trim.
Do you have to use silk ribbon for this to work? Thanks.
For the question about only using silk ribbon for this trim--no! I use whatever will make up well, so, whether you like natural fibers or man-made, this will make up nicely!
And, I join my voice in another shout-out about Candice Kling's book "The Artful Ribbon", it is one of those that should be in everyone's library. She is the (for lack of a better word) Elder Stateswoman of this kind of work. She was researching these techniques and reviving them way before most of us knew they existed. That these techniques continue into the future is mainly because of her efforts.
Word has it from good sources, that she's working on another book. I'll keep you posted as to its progress...
This is just gorgeous! I am going to get out my box of saved ribbons and have a play. I can see this trim decorating the next clutch or handbag that I make. Thank you so much for your wonderfully clear instructions.
asolutely love the ribbon worl reminds me of pillows mun had when i was very young. Would like to know where to purchase "The Artful Ribbon" book. I am in
australia. Thanks
I am not surprised that Kenneth King added another simple and elegant tool to our bag of tricks. I am grateful for your itchy brain Kenneth, which MUST learn something new when you see it.
This is absolutely beautiful. I love everything Kenneth does. I haven't seen any books by him though. Does anyone know of books he's written.
In regards to my books, my current book, of which I'm most proud, is called "Cool Couture", and can be got on Amazon.com. (Also know that in the UK, they re-packaged this book under another title, ISBN number, and cover--why, I don't know. Don't be fooled into buying both. Buy Cool Couture.)
I also did a book called "Designer Bead Embroidery" in 2006 (translated into French in 2007), and lastly, my first book was called "Designer Techniques" (I HATED that title and cover!) in 1996. That one is out of print, and Cool Couture is the book I wanted that one to be.
Thanks for asking!
how cool! i can see this as an embellishment on so many things...wedding/prom dresses, art quilts, or even edging on a quilt, bags or purses...i am inspired!
My biggest wish is that I could apprentice beside him.
Hello Mr. King.
I have ordered your book and am eagerly awaiting its arrival.
Thank you so very much for the ribbon trim technique. Really! It's been a huge help to me. I work a lot of three-dimensional ribbon embroidery - lots of flowers. I've been searching for a technique that makes very realistic Foxglove and this is it!!!!!!!!!!!!! I'm so very happy with how it turned out. Upon completion of my blooming stalks, I pained some "freckles" and voilà - *perfect* Digitalis purpurea!!!
I am so very grateful to you for sharing this beautiful project - more than you'll ever know.
Kindest regards and much love, Pam.
Thanks Kenneth, This ribbon trim is beautiful. Thanks for sharing with your expertise how to make it. I thought I might put a bed in each little pocket as you attach the ribbon. Just a thought. Cleo
I hope you know I did not proof read my note. I wanted it to say attach a bead. Cleo
I am curious if anyone has ever seen this trim in a painting portrait. I am wondering how far back it goes...I do mostly 16th century stuff....
It is so pretty!
Dilly Dally
This technique created such a pretty trim that I stitched up 6m + 25% (1.5M)= 7.5 meters to trim a contemporary version of a quilted jacket.
...have also just completed a sample where the ribbon treatment is tacked into place between strips of mink trim and it looks very 'rich'. I have no idea yet where I will apply it, but I LUV it - thank you Mr. King
Благодарю за подробный мастер класс!!!Так просто и симпатичною,лент полно..буду думать куда применить такое украшение.
I just had a go at this and realized its basically the same as doing one column of canadian smoking. But all the same its a lovely trim and I alsways enjoy something new.
I'm curious as to what the stole looked like, what was the fabric and where was the trim applied.