
Paint Lace for Customized Color and a Unique Look
Apply dye with a bruch for multicolored effects.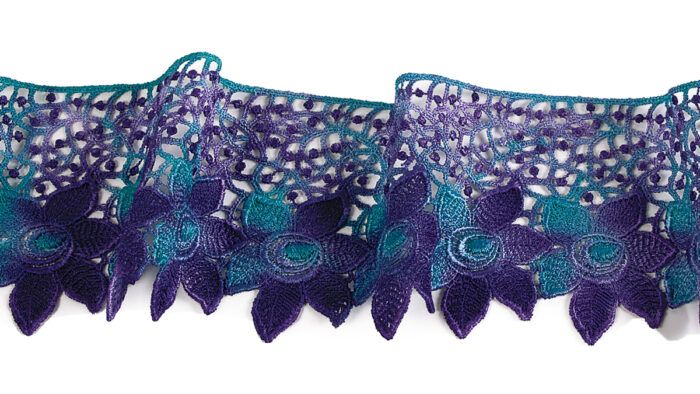
Lace is romantic, but painting it with multicolored dyes opens a kaleidoscope of possibilities: color depth, precise application, and artistic blended effects. It’s an easy way to create a beautiful, unique detail for garments and accessories. Dye bonds to the fibers without changing the lace’s hand.
You can paint lace of nearly any fiber content using the proper dyes, but lace made from rayon—especially Venise lace—takes color best. Rayon Venise lace trims have a wonderfully fluid hand and come in many designs and widths. Their heavier, satin-stitched motifs also provide substantial surfaces to paint with color.

Painted lace trim shopping list
• Permanent Lace Dye Kit (SewingArt.com), Rit Dye, or Jacquard I-Dye or I-Dye Poly (DharmaTrading.com)
• Rayon Venise lace trim in any width (TouchOfLace.com, SewingArt.com, LaceHeaven.com)
• Bottle dropper caps or eyedropper (the tip of a toothpick or spoon also works)
• Fine-mist spray bottle
• Old towels or paper towels
• Small dish, divided plastic plate, or other sectioned container
• Sumi-e or other paintbrush (FabricAndArt.com)
• Waterproof dropcloth or large plastic bag
If you love this painted lace trim project, become a Threads Insider and get access to other projects like this and much more.
Prepare the materials
Set up a convenient work area, and have all the necessary tools at hand. Since the dyes’ color density varies with the water saturation of the lace, it’s important to work smoothly and have a misting spray bottle and blotting towels handy to keep the application consistent.

1. Set up the workspace. Lay a plastic bag or dropcloth on a flat surface. Fill a fine-mist spray bottle with water, and keep it near the workspace for quick touch-ups and to keep unpainted lace damp as you work. If you are using the Permanent Lace Dye Kit, replace each bottle’s cap with a sealed dropper cap, then shake the bottles well. Position the divided dish on the dropcloth, along with the paintbrush and towels for blotting.

2. Squeeze one to two drops of each dye color onto a divided plastic plate or other sectioned container, and add 10 drops of water. The dyes are concentrated, so a little goes a long way. For stronger, darker color results using either wet or dry application, increase the ratio of dye to water.
3. Soak the lace in a sink or basin of water. Remove excess water by rolling the lace in a towel, until the lace is just damp. If the lace is lightweight or loosely patterned, spritz it with water from the spray bottle a little at a time as you paint.
Apply the colors
Test the dye-to-water ratio on a lace scrap first, to assess the color saturation and blending. Proceed with the desired painting effect, then dry the lace for final results.


1. Load the paintbrush with dye, then paint it on the lace. Venise lace absorbs dye quickly, so paint with a light touch and build up to the desired color depth. Use just the tip of the brush for precise application; to cover larger areas more quickly, use the entire brush head. Encourage a watercolor effect by keeping the lace damp as you apply dye and using the brush to blend the dyes further.

2. If the lace becomes saturated, blot away the excess. Use a paper towel to remove excess dye. If you aren’t satisfied with your results, you can remove the dye from the lace (see “Care for Painted Lace” on the facing page). Note: Dyes are darker when wet.

3. Overdye to darken colors that dry too light. Allow the dyed lace to dry completely, then paint additional layers of dye on any area where you wish to intensify the color or accent details of the lace’s design. Don’t wet the lace again.
4. Dry the lace. Let the lace dry naturally to acquire a mottled look. Using a hair dryer to speed up the drying process reduces the migration of dye colors as the liquid evaporates, limiting the mottling effect.

5. Once the lace is dry, set the color. Iron it from the wrong side for about two minutes, using your iron’s wool setting and without steam. Heat-setting the color this way also softens the lace.
Care for painted lace
The lace treated with dye does not require much special treatment. Some preparation will preserve the colors and integrity of the lace longer. On the other hand, if you desire, it’s possible to extract the dye from the rayon lace.
- Machine-wash thoughtfully. The lace can be machine-washed in warm or cool water; place the garment in a mesh bag. It can also be machine-dried on medium heat or permanent press. Dry the garment alone to prevent abrasion and damage from contact with other garments and closures.
- If you change your mind, you can remove dye from lace trim. Fill a basin with water and add two to three tablespoons of bleach. Immerse the lace and agitate it in the solution.Most, if not all, the color will be removed. Rinse thoroughly, then wash the lace with a gentle detergent, such as hand dishwashing liquid. To repaint the lace, let it dry before beginning the dampening and painting process again.
 This painted lace trim article by Cindy Losekamp first appeared in SewStylish Spring Fashion 2012. Photos by Sloan Howard.
View the full article by clicking View PDF below:
View PDF


Love this idea! Great way to get exacatlly what you want! I have "dyed" my natural raffia with a permenant marker when I needed just a little. This would prob work a treat on raffia too!
I really like this idea as well. It looks like an ombre effect.
Since I dye and paint all kinds of fabric all the time I was happy to see the advice to practice on a less costly piece of lace of the same fabric type first. I learned my dyeing and painting practices from an expert and that was one of her first tips---always practice on something inexpensive before you do the real stuff. It has saved me many, many heartaches over the years.
I really apprciated yur ideas!!!
I reallly like yur ideas
Very creative ideas!!!!
I used a big piece of nylon lace,and I painted it light metallic green,and silver metallic.Strangely enough(I used fabric paint and fixitive) it made the lace stronger,and hardier.I had it in the storage room,for years,got it out,looked perfect still.The other job was painting a piece of lace gold,and I sewed sequins on it,made a necklace out of it.--this fabric painting can be pretty fun, but its as much work as sitting down to paint with oils,or other big art job. I never thought of using regular dye this way, great.gotta try it.Thanks.