

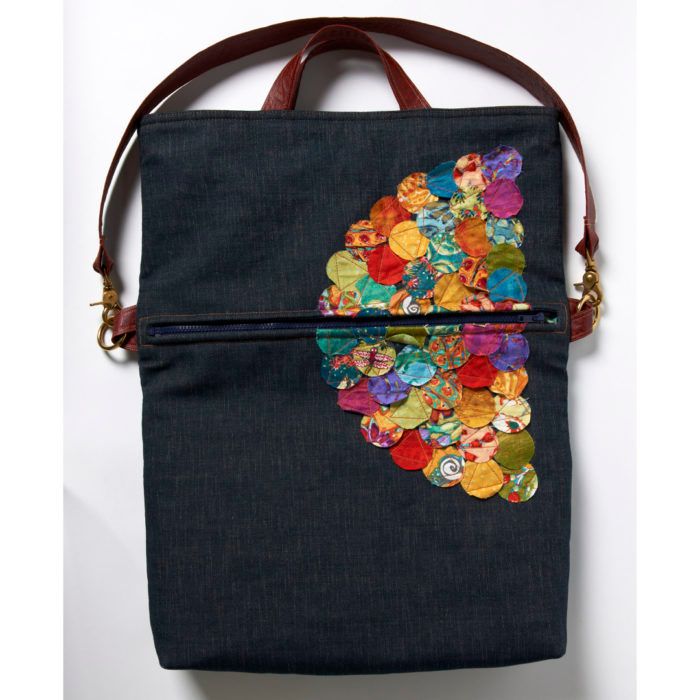
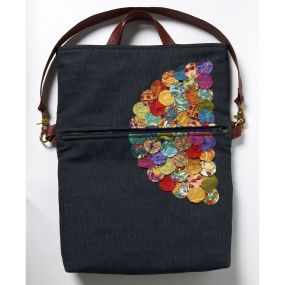
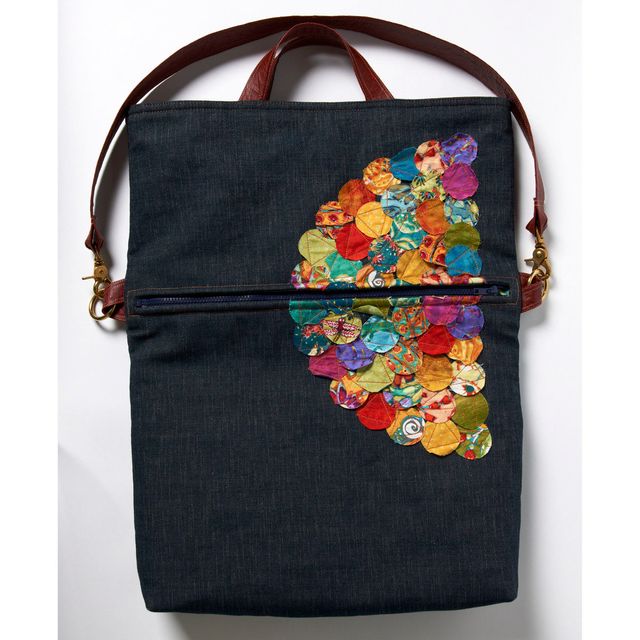
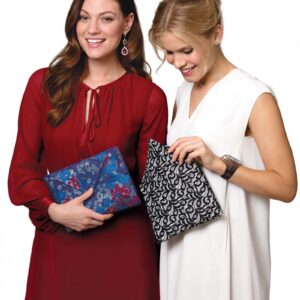
The Bohemian Fold-over Bag. The applique embellishment is stitched-down quilting-fabric circles.
The Fold-over Bag by Cheryl Kuczek of Paradiso Designs (Paradiso Designs.com) is a top-handled shopper, or a folded messenger bag with long strap. The design is simple and classic, so you can use unique materials to create different looks from the same pattern. The completed bag is a roomy 22 inches long and 18 inches wide. There is about 3 inches depth at the bottom boxed corners. The zipper/foldline is set 8 inches below the bag’s top edge.
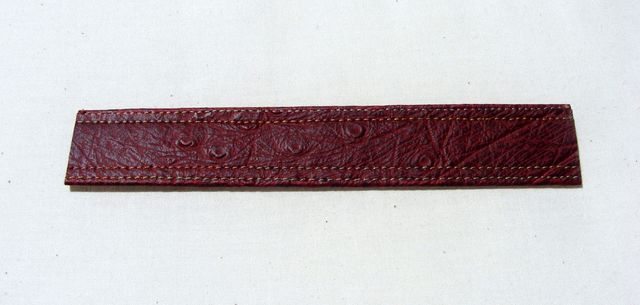
The Luxe version is shown in SewStylish Fall 2012, made with chromed mock croc with black faux leather trim. It has a strap and handles supported by soft plastic tubing. We’ve got another version for you: The Bohemian take on this design is made in durable denim with a raw-edged appliqué embellishment. The flat strap and handles are red ostrich faux leather trim with topstitching.
With a few exceptions, the techniques to make the different bag versions are the same. In this online tutorial, we’ll take you through how to make the Fold-over Bag, with particular materials and methods here and there for creating the Bohemian version.
Download the pattern for this bag
Bohemian bag supplies
Fabric
Straps, handles, and trim: 3/8 yard faux leather
Bag body: 7/8 yard of 10- to 12-ounce denim
Quilt fabric scraps to create the raw-edged appliqué embellishment
Lining: 1 yard quilt cotton
Interior pocket: 2/3 yard quilt cotton
Contrast pocket lining: 3/8 yard quilt cotton
Interior pocket trim: 1/8 yard dupioni silk
Stabilizer
Interfacing: 7/8-yard lightweight, sew-in polyester fleece batting
2 yards 44/45-inch-wide muslin for interlining
Notions
12-weight topstitching thread for bag straps
Standard thread for bag seams
16-inch heavy-duty non-separating zipper, with metal or plastic teeth (Wawak.com)
Two 1 5/8-inch diameter metal rings
Two 1-inch diameter swivel clips
Tools
Pinking shears
Pins
Rotary cutter and mat
Sewing machine and basic supplies
Teflon or roller presser foot
Sewing machine needles, size 100/16 or 110/18 for denim, topstitching or leather
Clips for holding faux leather (alternative to pins) (GettaGripClip.com)
Sharpie or pen, in shade similar to the faux leather
Cut and prepare the bag pieces
Follow the pattern to cut all of the bag components. Establish a straight edge on the faux leather, then work from that edge to cut the straps, handles, and trim with a rotary cutter. Label each piece and mark the top edges with a straight pin in the seam allowance.
1. Layer the bag front and back pieces. Stack the pieces right sides up, aligning all edges. The order is muslin, then fleece, and then faux leather on top. Use clips to hold the layers together.
2. Layer the exterior open pocket pieces. Place the exterior open pocket faux leather and lining pieces with wrong sides together and all edges aligned. Clip the layers together.
3. Prepare the zipper pocket pieces. This pocket is lined on just one side. The lining is underlined with muslin. Place the lining piece over the muslin piece, right sides up. Pin the layers together.
4. Assemble the lining pieces. The bag’s lining is underlined with muslin. Stack the lining over the muslin with right sides up and all edges aligned. Baste 1/4 inch from the edges.
5. Prepare the interior pocket pieces. The pockets are lined with contrasting fabric. Pin the layers with right sides together and edges aligned. Sew the bottom edge with a 3/8-inch-wide seam allowance. Press the seam as sewn, then open. Fold the layers wrong sides together with the seam at the bottom edge. Align the raw edges.
Add the appliqué embellishment
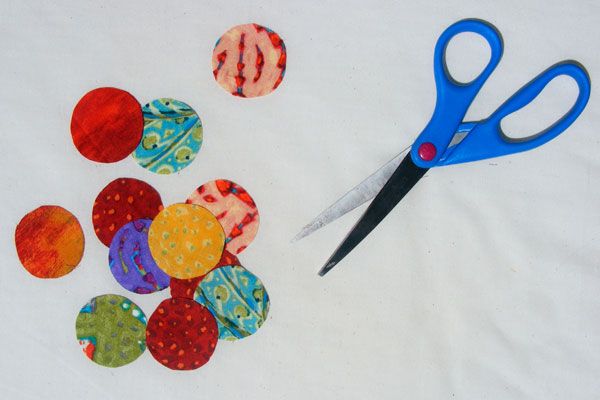
1. Cut circles. The quilting fabric circles are 1 3/4 inches in diameter. Make a cardboard template and cut 45 circles from assorted cotton fabrics. You need only 40 circles, but it is good to have a few extra.

2. Arrange and stitch the appliqué. The fabric circles are arranged in a semicircle (later bisected by the bag’s exterior zippered pocket). Start by pinning a line of 11 circles, edges just touching, parallel to the bag’s side seam as shown on the diagram. Stitch equilateral triangles through the appliqué pieces, points reaching the edges. Use topstitching thread and a 2.5-mm stitch length.

3. Continue stitching the appliqués into place. There will be five total rows of fabric circles. After the first row of 11 circles, the second row has 10, the third row has 9, then 8, then 6, then 4, fanned out into a semicircle. Place, pin, and sew each row of circles in the same manner. When you’ve completed the appliqué, proceed with the bag construction.
Sew a handy zippered pocket
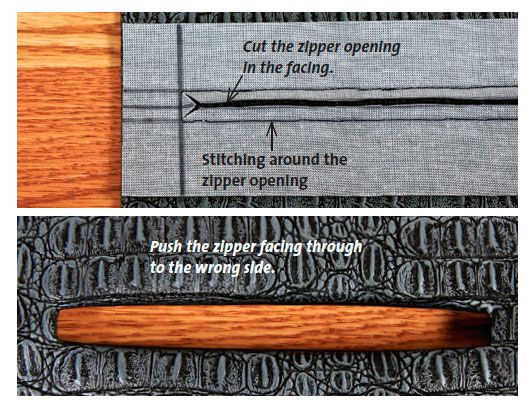
An enclosed, exposed zipper on the bag front opens a convenient pocket you can use even when the bag is folded. You’ll sew a facing to the bag surface, cut an opening, then turn the facing and topstitch it as you sew in the zipper.
1. Place the zipper facing on the bag front, right sides together. Position the zipper facing so that the opening is parallel to and 9 1⁄2 inches from the bag front’s top edge. Pin and/or clip the facing in place. You can pin through the faux leather within the marked zipper opening.
2. Sew around the opening with standard thread and a 3-mm stitch length. At each corner, pivot the work with the needle down for a clean 90-degree angle. Cut the zipper opening. Use a craft knife or sharp scissors to carefully cut along the opening’s lengthwise center. Begin and end the cut 1⁄2-inch from each end. Angle cuts from the center to each corner, cutting up to, but not through, the stitching. Turn the facing through the opening to the bag interior. Clip the facing back.

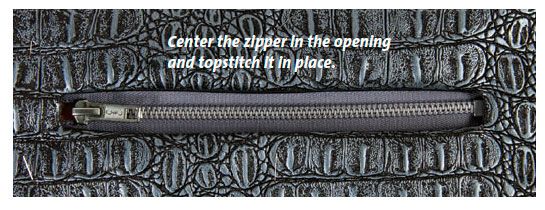
3. Center the zipper, right side up, in the right-side-up zipper opening. Use masking or painter’s tape to hold the zipper in place. Topstitch and sew the zipper in place 1⁄4 inch from the opening’s edge. Stitch carefully and pivot with the needle down at the corners. Pull the tape off after stitching faux leather.

4. Place the zipper pocket lining piece (it’s already basted to its muslin underlining) right side up beneath the zipper opening. Align the lining with the bag top edge, the bag side edges, and beneath the zipper opening. Clip in place. With topstitching thread still in the sewing machine, topstitch the side and bottom edges of the zipper opening again, over your first topstitching. Switch to regular thread, and baste the bag side and zipper pocket lining together 1⁄4 inch from each side and the top edge. This pocket is “upside down” when the bag is unfolded, but when the bag is folded over, the pocket is usable.
Add an open exterior pocket
A divided pocket is sewn into the bottom and side seams of the bag back. This open pocket is the perfect place to stash nonvaluable items you need quick access to, such as pens or gum. First, edge the pocket top with faux leather trim, then attach the pocket to the bag back with a line of stitching that also divides the pocket in half.
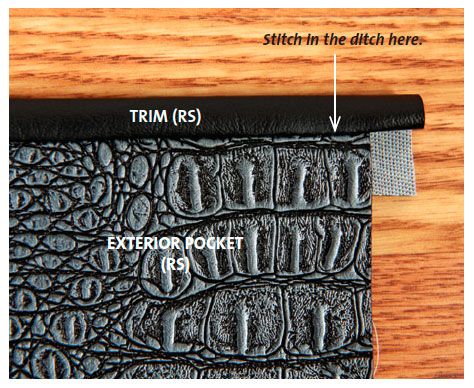
1. Start with the exterior pocket piece and lining that are already basted, wrong sides together. The trim is a 2-inch-wide piece of faux leather, at least 21 inches long. Clip the trim to the pocket’s exterior top edge, right sides together and edges aligned. Use a zipper foot with transparent tape on the bottom, and set the stitch length to 4.0 mm. Sew the trim to the pocket with a 3/8-inch-wide seam allowance.
2. Wrap the trim up and over the pocket’s top edge to the lining side. Clip in place. On the right side, stitch in the ditch over the first seam.

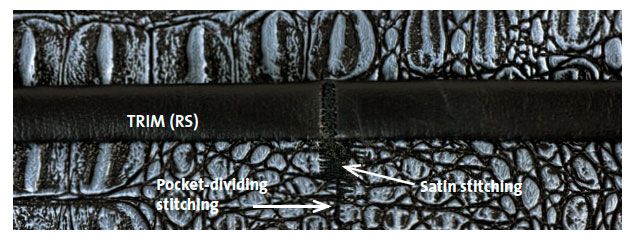
3. Trim the faux leather on the wrong side with pinking shears. Cut the trim’s short ends flush with the pocket edges. Mark the pocket’s dividing line at its vertical center, perpendicular to the trim.

4. Align the side and bottom edges of the exterior pocket and the bag back. Clip in place. Stitch to divide the exterior pocket. Sew with a 4.0-mm straight stitch along the pocket dividing line, from the bag bottom toward the pocket’s trimmed top edge. One inch from the pocket top, switch to a satin or zigzag stitch (with a 1-mm stitch length and a 4.0-mm stitch width) to sew over the pocket’s top edge and firmly secure it. Extend the satin stitch slightly beyond the pocket trim, then turn the work 180 degrees with the needle down, set the stitch back to straight and 4.0-mm long, and sew over the first stitching line back to the pocket’s bottom edge.

Make the strap, handles, and tabs
Each bag version has a long shoulder strap as well as two short handles. The shoulder strap has a swivel clip at each end to connect it to ring tabs sewn into the bag’s side seam. The Bohemian bag has flat and triple-topstitched straps and handle.

Make the handles and side tabs
The handles and tabs are sewn in one strip and then cut apart to length.
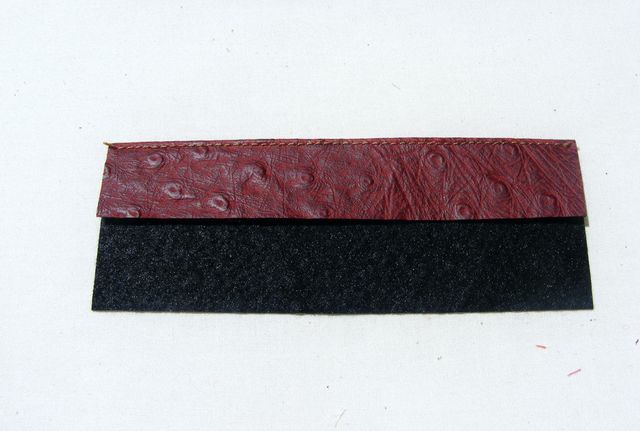
1. Mark and fold a 3-inch-wide faux leather strip. Mark the strip lengthwise on the wrong side, 1 inch from a long edge. Fold the strip’s other edge in to meet the line. Sew 1/8 inch from the fold along the strap’s length with a 4.0-mm stitch length.

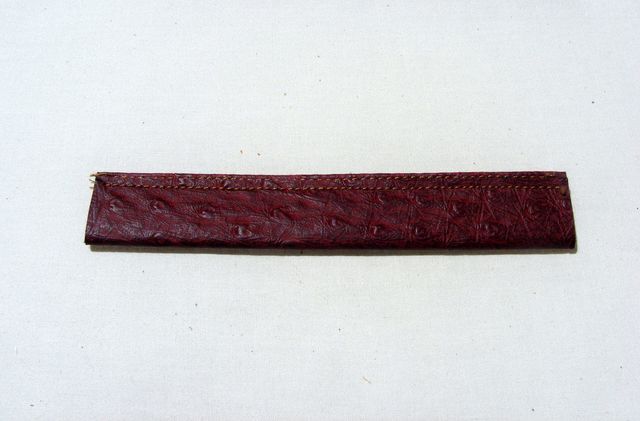
2. Fold the strip’s remaining single layer in to meet the stitching line. Clip the fold in place, then topstitch 1/8 inch from the raw edge.

3. Mirror the stitching on the strap’s other edge, for a total four rows of topstitching. Cut two 12-inch-long handles and two 5-inch-long side tabs.

Make the strap
The strap is wider and has two more topstitching rows than the handles and tabs.
1. Mark and fold the 4 1/2-inch-wide faux leather strip. Note: Double-check that the strip is straight and of even width; its length is the faux leather width from selvage to selvage , typically 55 inches. Mark the strip lengthwise on the wrong side, 1 1/2 inches from one long edge. Fold the strip’s other edge in to meet the line. Clip the 1 1/2-inch-wide fold to hold it in place.
2. Sew 1/8 inch from the fold along the strap’s length. For the best results, sew each topstitching seam in the same direction. To keep track of the ends, leave thread at the beginning of seams, but trim it at the seam ends.
3. Fold the strap’s remaining single layer in to meet the stitching line. Clip the fold in place, then sew 1/8 inch from the fold. Topstitch 1/8 inch from the stitching, then again 1/8 inch from the second stitching. Mirror the stitching on the strap’s other edge, for a total six rows of topstitching.
4. Trim the strap piece to 36 inches long. Feed each end 1 1/2 inch through a swivel hook ring. Stitch across the strap through all layers to secure the ends around the rings. Sew 1/8 inch and 3/8 inch within and parallel to the folded-in end. Repeat at the other strap end.
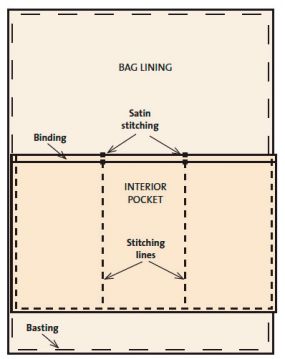
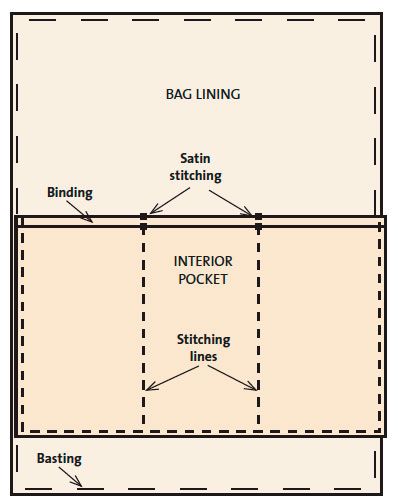
Create the interior pockets
The pockets within the bag are sewn much like the exterior open pocket. They are panels, segmented by vertical stitching and sized to fit in the lining’s side and bottom seams. Two differences: The lining pockets are bound with fabric strips instead of faux leather, and they are divided into three compartments instead of just two.
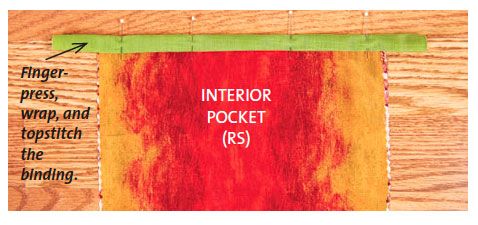
1. Start with the interior pocket pieces and their contrast lining that are already basted together. Pin the right side of the 2-inch-wide silk dupioni binding to the wrong side of an interior pocket’s top edge, with raw edges aligned. Sew through the binding and pocket layers with a 3/8-inch-wide seam allowance. Trim the binding’s short ends flush with the pocket edges. Repeat with the other binding piece and interior pocket.
2. Press the binding seam as sewn. Then, fold and press 3/8 inch along the unsewn binding edge. Wrap the binding over the pocket’s top edge to the right side. Topstitch 1/8 inch from the fold to secure the binding to the pocket’s right side. Repeat with the other interior pocket and binding piece.

3. Place the pockets on the lining pieces. To reduce bulk in the side seams, stagger the pocket’s upper edges. Place one 10 inches and the other 10 1/2 inches from the bag bottom. Pin in place. Stitch the pocket bottom to the lining twice, 1/16 inch and 1/4 inch from the seam edge. Then sew the pocket compartments with seams perpendicular to the pocket bottom seam. Stitch through the pocket and lining layers as for the exterior open pocket, reinforcing the pocket’s attachment at the upper edge with zigzag stitching.
Construct the bag
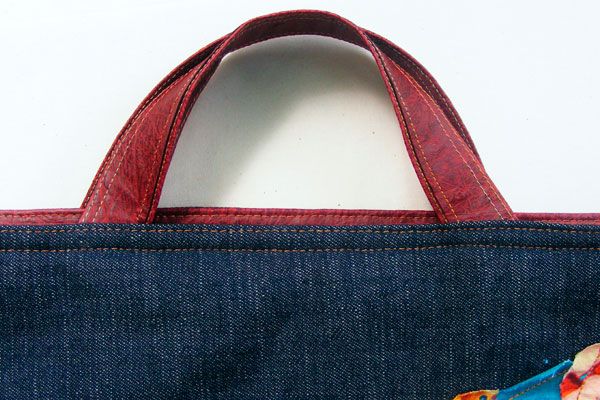
The seams that join the top and side layers also attach the top handles and the ring tabs to connect the shoulder strap. The bag and lining are sewn together at the top edge with a piece of faux leather trim sandwiched in the seam. When the bag is turned, the trim folds down into the bag interior to protect the lining’s top edge.
1. Find and mark the center of the bag front’s top edge. Clip or pin a handle in place on the right side, placing each end 2 1/4 inches from the mark. Angle each end so that the handle corner closest to the mark is about 1⁄2 inch below the top. Baste the handle in place with a 1/4-inch-wide seam allowance. Repeat with the other bag handle.
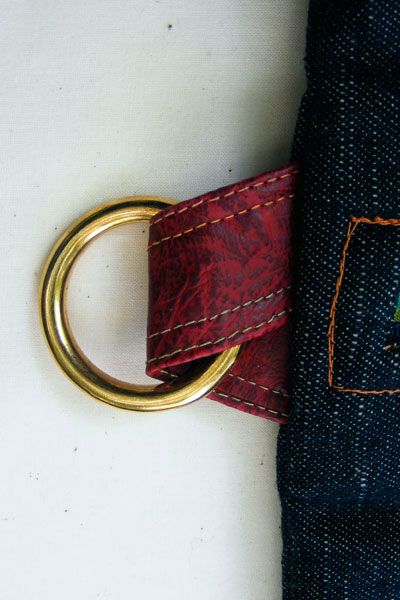
2. Baste the ring tabs in place. Fold each tab through a ring. Fold the tab in half at a 45-degree angle, and pin or clip the folded tab to the bag front’s edge, aligning it with the zipper opening center. Baste the tabs in place with a 1⁄4-inch-wide seam allowance. Trim the tab ends even with the bag body’s edge.


3. Sew the bag bottom seam. With right sides together and edges aligned, clip the bag front and back pieces together along the bottom edge. Use a 3.0-mm to 4.0-mm stitch length to sew the bottom seam with a 1⁄2-inch-wide seam allowance. Finger-press the bottom seam open. Fold the bag body right sides together. Align and clip the top and side edges. Sew the bag body side seams with a 1/2-inch-wide seam allowance. Finger-press each side seam open.
4. “Box” the bag bottom. Fold a bottom corner into a triangle with the side seam at center. Lay the triangle flat, and with a ruler perpendicular to the side seam, mark a line at the point where there is 2 inches of material on either side of the side seam. Clip the folded corner in place, then stitch along the line perpendicular to the side seam. Turn the work with the needle down and sew this corner two or three times, backstitching to secure the seam ends. Repeat for the other bag body corner. Trim the triangle corners, leaving a 1/2-inch-wide seam allowance.

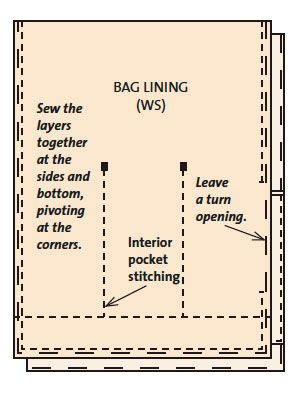
5. Sew the lining. Place the lining pieces right sides together with raw edges aligned. Start at the top edge on one side. Sew around the bag side and bottom edges with a 1/2-inch-wide seam allowance. Leave an 8-inch opening in one side seam. Box the lining corners as for the bag exterior.

6. Clip the 2-inch-wide faux leather bag top interior trim to the bag’s top edge, right sides together. Overlap the ends near a side seam, and cut the overlap to 1⁄2 inch. Baste with a 1/4-inch-wide seam allowance along the top edge. The bag handles are sandwiched between the bag exterior and the trim piece and pointing down.
7. Place the lining inside the bag body, right sides together. Align the top edges and side seams, and clip or pin in place. Sew the lining and bag body together at the top edge using a 1/2-inch-wide seam allowance and a 3.5-mm stitch length.
8. Turn the bag right side out through the opening in the lining side seam. Turn up the handles, and turn the bag top trim to the bag’s interior. Clip or pin the trim in place, then topstitch around the bag top edge twice, with a 1/8-inch-wide seam allowance, then a 3/8-inch-wide seam allowance. Pink the trim’s free edge to about 3/8 inch wide.
This article by designer and sewing instructor Cheryl Kuczek was first published in SewStylish Fall 2012, pp. 62-68. Photos by Sloan Howard and illustrations by Emily Bronson.


Nice Patter. Anyway we could find out the finished size?
Hi Donna, I can tell you about the finished size. The completed bag is a very roomy 22 inches long and 18 inches wide. There is about 3 inches depth at the bottom boxed corners. The zipper/fold line is set 8 inches below the bag's top edge. I'll add this information to the post text. Thanks for asking! - Sarah McFarland, issue editor
Such a handy bag. I'd love to make one, but the pattern won't print nicely for me. Can you please put the pattern on 2 pages? Thanks so much.
To Arlene: it isn't a pattern that you print and use to cut your fabrics. You simply follow the dimensions written in the instructions and cut pieces to those dimensions. Hope that helps you.
I want to change the size of the Bohemian Bag. I see no measurement in the instructions to cut the pieces other than the 22"x18" finished size. Can you add the cutting instructions for the bag so I can resize it?
Thanks for the help
Emma Lee
I cannot find the online video for the foldover denim bag. Can you please help?
Sandy
This isn't the easiest pattern to follow. I wish I hadn't bothered starting it. The pattern page misses out the fleece, maybe its obvious, but adds to confusion. The denim bag still has faux leather instead of denim when you put the peices together, I couldn't work out if it was talking about the strap pieces at first. It wold be easier if the lengths of the straps were on the pattern page. The part where you baste the muslin and lining is confusing as you have already clipped the muslin and lining to the bag fabric. Scratching my head a lot over this, and it's written by a teacher. Hmm
I have been sewing for over 75 years but I, also, find this pattern confusing. And, The templates could be a lot larger. I had to get the magnifying glass out to read the dimensions even though I have no trouble reading small print without glasses. I'll make the bag but only because I have enough experience to make the pattern work for me.
The only thing that was clear on this bag were the instructions for cutting circles and the supply list, although I think I bought faux leather that I don't need.
Where is the on-line instructions to view? I think I 'm stuck with fabrics and no bag for a Christmas gift.
Where is the link for the how-to video? Do you reply to these comments?
I'm one-third the way through and dreadfully confused, too. The pattern refers to bag sides, but the instructions refer to front and back. If I was making this from fabric, I'd give up but I'm using leather and have too much invested to give up.
I'm one-third the way through and dreadfully confused, too. The pattern refers to bag sides, but the instructions refer to front and back. If I was making this from fabric, I'd give up but I'm using leather and have too much invested to give up.
There is an error in the instruction for Create the Interior Pockets. The top of the interior pocket should be 10 or 10.5 inches from the TOP of the bag not the bottom. Otherwise the pocket sags down into the "floor" of the bag. Nasty.
If I had not already are a lot of handbags, this one would have been my last as instructions are not user friendly.