


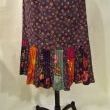
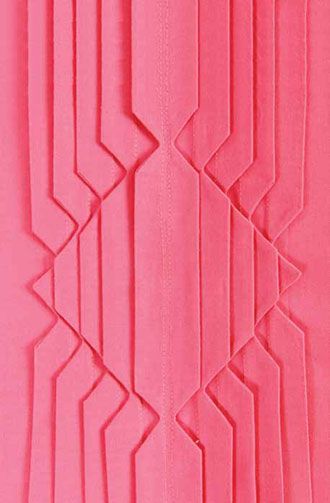
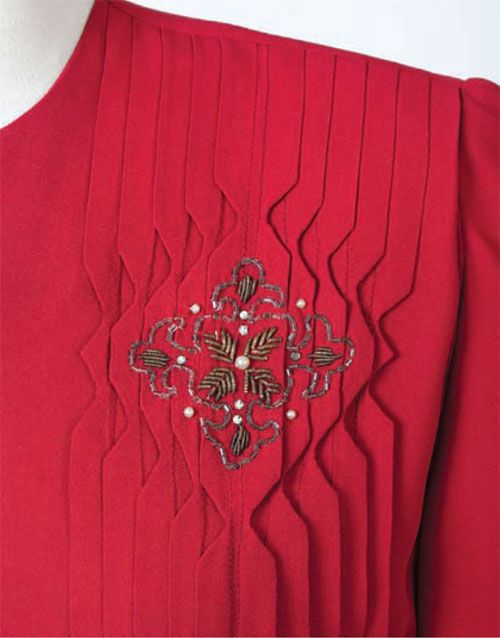
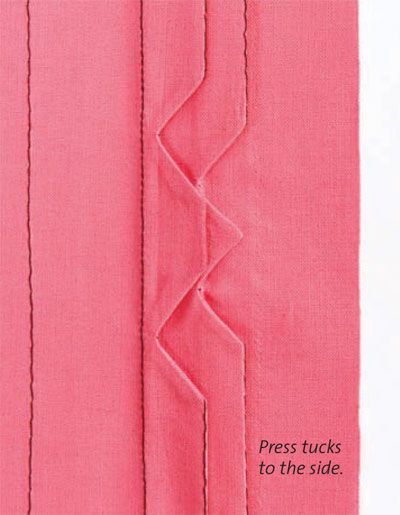
You can use this attractive tuck treatment on anything you sew. It would look great on a decorative pillow, a lovely blouse, or as shown, on a sophisticated crepe dress. Plan the tucks before you cut the fabric. Then, add the necessary space to your pattern. Sew the tucks before cutting the pattern so you’ll have some room to adjust, if needed. This amazing effect comes together far more easily than you would guess.
Get more articles on tucks:
• Video: How to Sew and Press Tucks
• Video: How to Create Curved Tucks
• Pintuck a Ruffle
Line up and baste folds into shape
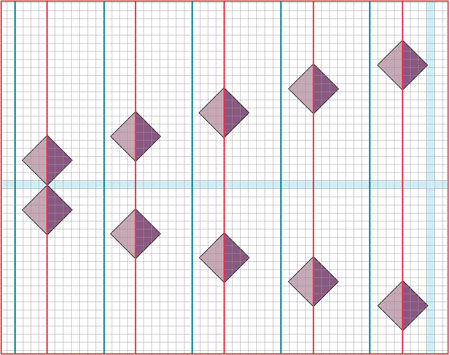
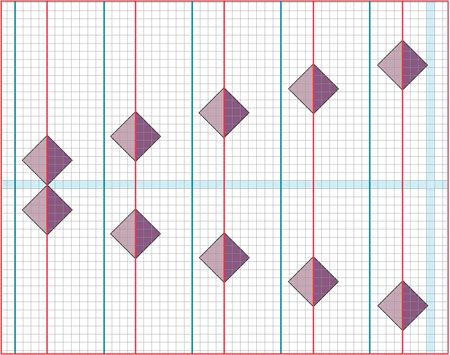
Start by planning a template for the tucks. The tucks shown were drafted on graph paper spaced six squares to the inch. The template is indispensable and will help you get accurate spacing and consistent, well-laced notches. The template shown is for one half of the tucked unit. The wide blue lines are the vertical and horizontal centers of the complete tucked motif. For each tuck, you form the notches first, then stitch the tuck.
1. Chart the pattern. Plan the tuck and notch spacing on graph paper, following the diagram below. Draw a vertical red line every 10 squares for five lines. These are the mountain folds. Draw a blue line four squares to the left of each red line for the valley folds and tuck stitching line. Follow the spacing on the illustration for placing the notches and center each on a red line.
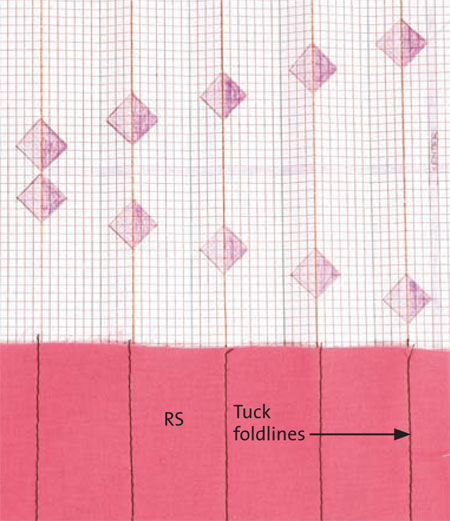
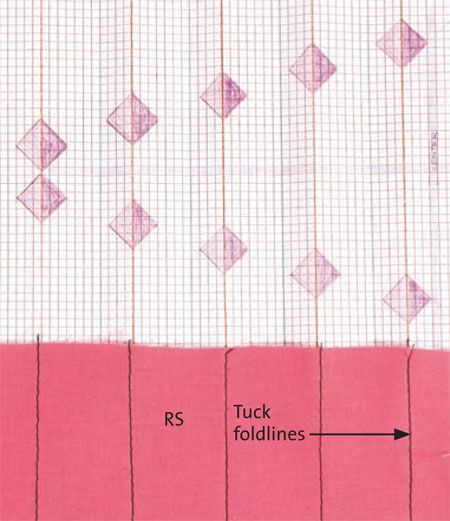
2. Machine- or hand-baste the tuck foldlines on your fabric that match the red lines on the template.
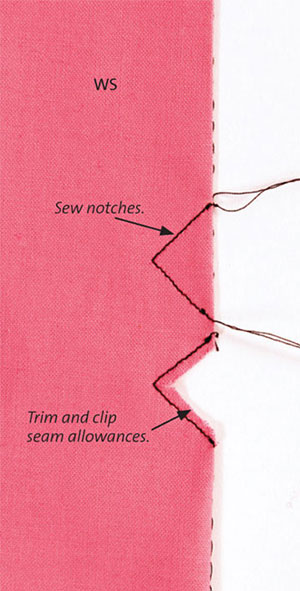
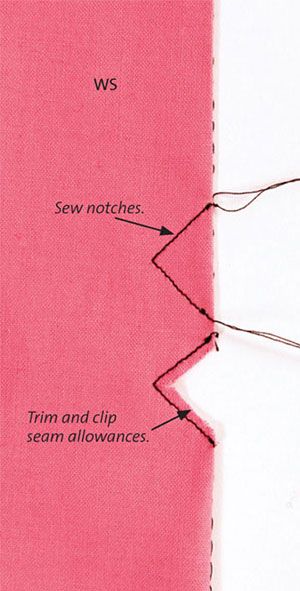
3. Cut the notches from the graph paper to use the resulting void spaces as a template for sewing. Fold the fabric along the outside tuck line with right sides together. Position the folded template over the double-layered fabric, aligning the folds. With your sewing machine set at a short 1.0 mm to 1.5 mm stitch, follow the cut edge of the notches. Then trim the seam allowance to 1/8 inch or less and clip into the point.
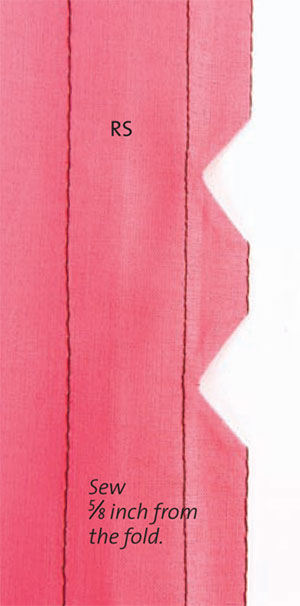
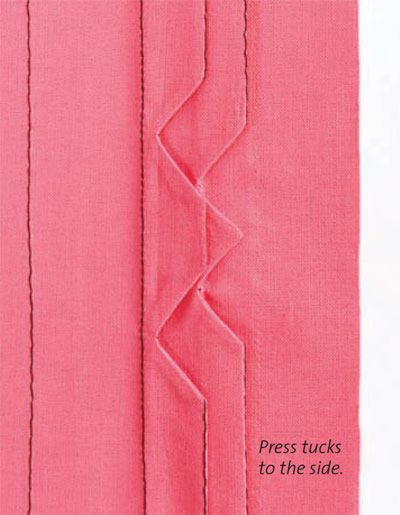
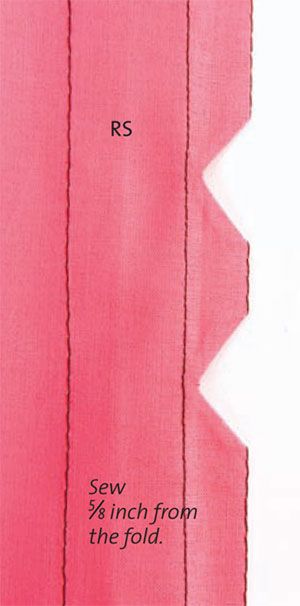
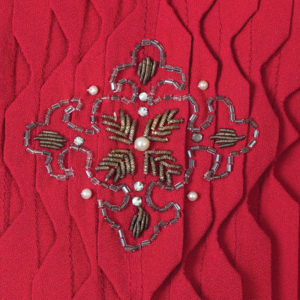
4. Turn the tuck right side out and press a crisp edge. Stitch through both tuck layers 5/8 inch from the fold to make the tuck. Proceed to the next foldline and repeat for each tuck. Turn over the template and continue in the same manner on the other tucked section half to complete the full design. Remove the basting stitches. Embroider over the tucks if desired.
This article was first published in Threads #163 Oct./Nov. 2012, pp. 28-29
Photos: Sloan Howard


She did it again! This time it's fabric manipulation made understandable.
Mostly magic, with a little mischief, that's Judith Neukam.
Gorgeous! Absolutely Gorgeous!! What a great decorative idea!! You can't go wrong with a little fabric manipulation. Thanks Judith!
Looks great! I didn't realize at first that this was a version of "shark's teeth" from Martha Pullen. This looks more grown up andis definitely easier too.
Fantastic idea! Amazing what a little time can do to make something over the top when you don't have funds to buy trim or embellishments. I love the idea because it is so 'grown' up for us older women that want to do something special with our clothes but not look silly.
I have never seen this before and LOVE IT! I can't wait to try this. Thank you THREADS for keeping me inspired and for giving us such easy to follow instructions with great photos. You ROCK!
Beautiful! Reminds me of the "old" Threads with pictures of fabulous vintage clothing on the back cover. Thanks for the instructions.
This is shark's tooth? I have Martha Pullen's book, a huge one, about heirloom sewing, and always meant to figure out how to do some of these things, but make them current. Another one I want to do is smocking.
This is my kind of "art to wear."
Judith Neukam, My Hero! :)
Love Everything you share with us. Can't wait to try this.
I taught classes in "shark's teeth" some years back. This effect is similar but a different type of construction than the traditional heirloom method. I like that this method actually sews and turns the tucks. In the heirloom method they are cut, turned under on the right side to make the points and then then secured by topstitching on the tuck stitching line, not the greatest technique for a beautiful crepe but great for a sharp linen. I really like this idea, Judith, and am anxious to try it. Thanks.
Beautiful! A wonderful detail for a "plain" garment. Judy's typically concise directions break the complicated-looking process into doable steps! Thank you.
Oh, I absolutely love this. Can't wait to try it - will certainly give an old dress pattern a new flair! Thank you, Judith!
Wow, I really love this and hope to make some time to try this out..........looks fantastic on the dress, and as you say would be lovely on either clothing or home furnishings.
Thank you so much for sharing this technique.
What a great idea for pillows.
This is very very cool!!
Please make a How To video of this. I think it would help a lot of people out. Can't wait to try this,
Nicely done.. Awesome
Great idea I love it !