
How to Make a Floating Shoulder Pad

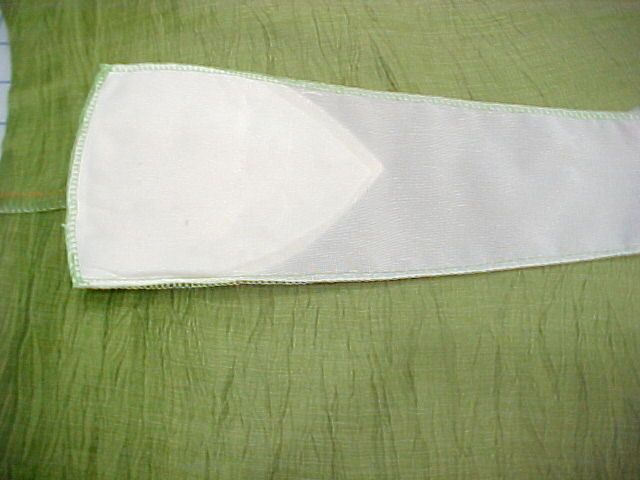
I saw this idea in an Escada shirt several seasons ago. The shoulder pad cover is extended toward the neckline and then sewn into the neck seamline. This holds the pad in place but also enables it to shift with your garment as you move. This is a great technique for a boatneck garment and other tricky necklines because the pad can’t peek out at the edge. It is very nice in garments with a jewel neckline, a convertible collar, or a collar band. It also prevents ‘shoulder pad drop-off’–that section where the shoulder pad ends between the arm and the neck and often causes an indentation along the shoulder seam of your garment. A floating shoulder pad is a solution to filling in the seamline and to enable natural movement of the garment when wearing.
Preparation:
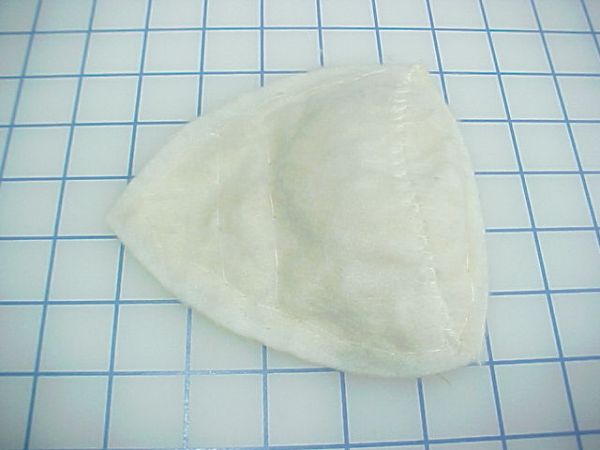
1. This method works best with an uncovered ‘bull-nose’ shoulder pad such as the one shown. It is stitched to wrap over the shoulder. Don’t use a foam pad because it can’t withstand the heat needed from the iron.
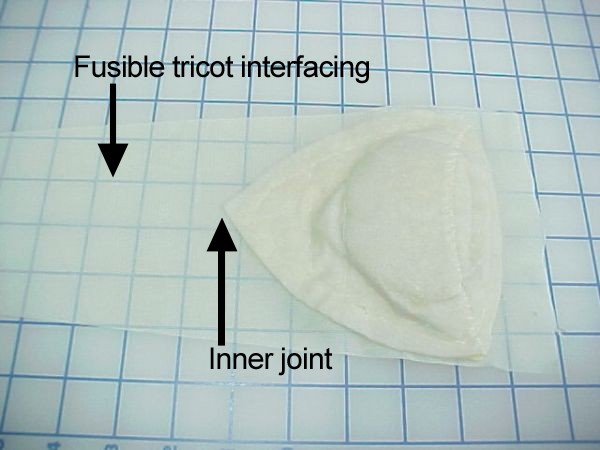
2. Cut a piece of fusible tricot interfacing slightly larger than the underside of the shoulder pad, and extending from the inner point of the pad to the neckline of the garment. The inner point of the pad is the part that’s closest to your neck.
3. Pick a solid color lining fabric or silk charmeuse that does not shadow through your garment. A color that matches your skin tone works well under white fabric. When I first saw the Escada ‘man tailored shirts’, they were available in white, ivory, and black heavy organza. The fabric that covered the top side of the shoulder pad (that would show through the organza) was not in white, ivory, or black silk charmeuse. Under…
Start your 14-day FREE trial to access this story.
Start your FREE trial today and get instant access to this article plus access to all Threads Insider content.
Start Your Free TrialAlready an Insider? Log in


This looks like a great shoulder pad treatment. I understand all of it except step 6 and illustration. I will have to walk this out to understand it better. Thanks for the great method! Carla Chapman
It took me a while to figure out what floating meant but the construction including the thread chain illustrates this well. Thank you Louise.
How did you know I was wondering (today!) how to get shoulder pads in my dropped shoulder sweater jacket?? This will be just the thing. Thanks so much!
I love this idea. I've often wished for a way to keep shoulder pads from showing in necklines, especially if I'm adding them to something not originally meant to have a pad in it, or from looking overly stiff, and this is perfect. I wish I'd known about this long ago.
But now that I look twice, I find the picture and instruction in step 6 a bit confusing. For one, which side is the RS of the extension ? Is it the silk side or the tricot side ? If it is the silk, then it looks like the extension is shown in the picture as RS up, not down. It is not clear from other instructions which side is the RS in this construction.
Instruction also says to place the facing between the pad extension and the garment. If the picture is showing a facing stitched down one side, with the neck edge still to sew, when you fold it over at the seam and sew the neck edge, the extension would be the bottom layer.
If that is actually the shoulder seam shown in picture 6, are we to assume the facing is underneath it ? If so, the extension is still going to be the bottom layer when it is stitched together. Is it intended to be the lowest layer of all ?
I'd have guessed you would place the extension between a facing and the garment fabric. Then when the neck edge is stitched, the extension would be the centre layer at the neck edge. It would be covered by the facing on the bottom and the garment on top at the neck with no chance it could show at the neck edge.
But you might see it shadow, perhaps, more so once you're past the facing.
If it is meant to be the bottom layer, with the facing and the garment on top of the extension, is this meant to lessen the chance of shadowing at the neck edge ?
I of the Cocker Spaniel shoulders (or perhaps "shoulder" would be more accurate, since they aren't even) LOVE this idea! I wear shoulder pads with EVERYTHING except perhaps my nightgown -- ha! -- and it can be a real challenge in certain garments. Plus, I hate that little "dent" that may appear at the end of the shoulder pad nearest your neck, right next to the dent that's already in existence due to the ever-prsent bra strap. This is such a great idea. THANK YOU for sharing it with us in such a clear and concise way. :o)
Great idea. Thanks for sharing. Perhaps one last instruction is needed. I assume that after the extension is sewn into the neckline, the excess at the neckline is trimmed away before understitching. Am I right?
What a great tutorial! I have struggled with sheer blouses and this seems like the perfect solution! Seems like it would go well with sweaters too, so that the shoulder pads don't look "dropped off".
Thanks Louise.
This is a great idea - very timely for me as I've just cut out a boatneck sweater that could do with some shoulder height.
Would really like to have a tute showing how to make shoulder pads from scratch one day. They are quite difficult for me to find where I live - we don't all have the luxury of haberdashery stores nearby!
It looks to me like the green in photo #5 is the WS of the Shirt, and the white is the WS (bottom) of the pad.
The work has been turned over in #6.
With the facing added, you'd have a RS-up stack of -from the bottom up- Pad; Shirt (hidden); and Facing (light green).
Stitch as usual. Yes, SueatMagnolia: trim the excess pad extension; snip curves where needed; and turn the Facing to the inside of the Shirt.
Furballs ~ That'd give you the Shirt-Pad-Facing sandwich, and a clean edge. If you sew the Pad in between, you'd end up with the Pad on the bottom.
Thank you! This is a wonderful idea for the shoulder-deficient (like me). I think I understand the order of the "sandwich" - thanks everyone for the comments that went before mine.
Does anyone know where to find Dritz raglan shoulder pads? I used to buy 1/4" or 3/8" size at Jo-Ann Fabrics to use in blouses, but not available for the past year. Like the "bull nose" model here, they wrapped the end of the shoulder.
Thanks in advance for any assistance with locating these or similar products.
I'm here to help clear up a few of the questions you are having.
In step 5 you are looking at the wrong side of the garment and the tricot underside of the pad. The silk side is toward the wrong side of the garment (you don't see it in the picture). That way when worn, the color of the silk will blend with the color of the garment.
Step 6: I think I confused you using the word "between"...you would place the facing with right sides together on the right side of the garment, matching the necklines. Stitch the facing to the garment neckline in the conventional way. Trim the neckline seam trim the excess of the shoulder pad, clip the neckline, press the neckline seam open over a point presser and turn to the wrong side of the garment, press into place.
The extension of the shoulder pad will now be sandwiched between the wrong side of the garment and the wrong side of the facing. Hand stitch to secure the facing to the tricot side of the shoulder pad.
If you have different shoulders, you can put 2 different heights of shoulder pads in a garment...you will then have another pair of different height pads for the next garment. ;-)
Louise, how brilliant of you to come up with this idea. I have sometimes inserted a floating shoulder pad into a blouse with a yoke, but couldn't figure out how to add one to a regular blouse without stitching it to the shoulder seam, which doesn't always work so well.
As usual, you have blown me away with the simplicity of your ideas, and lovely instructions!
Jean, aka, whoneedlesthis
This makes too much sense - all the silhouette, without the rigid limitations.
Thanks Louise!
Very clear and useful tutorial, thanks again Louise for making a set of instructions that are easy to follow. I too would like something on how to fashion a shoulder pad like the one used in this instruction as they can be difficult to locate in exactly the right depth suitable for each garment and instructions on making your own would be great.
Thanks again and have a lovely Christmas, Nita W