

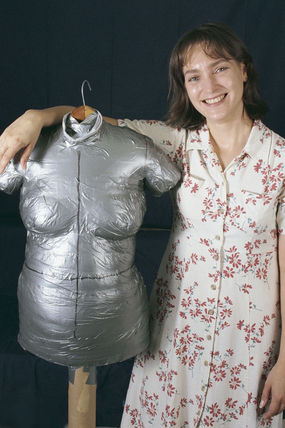
Leah Crain, a dressmaker and costumer from Cincinnati, OH, has another take on the duct-tape version of form making. You can find her complete directions, including stand ideas, photos, plus comments and questions from other sewers at www.leanna.com). Leah’s forms look remarkably like their prior “inmates.”
![]()
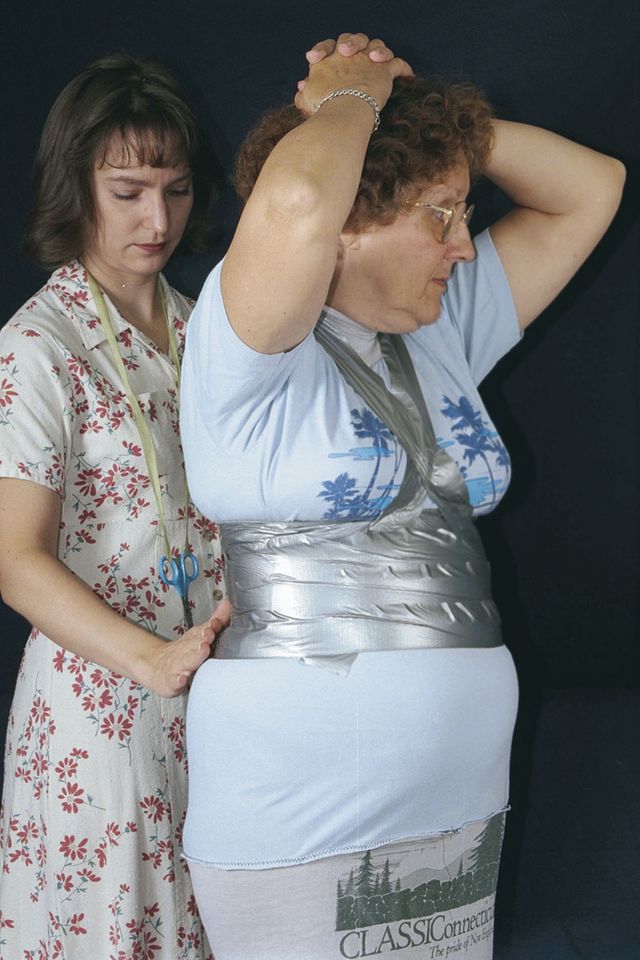
Leah Crain’s duct-tape forms are close matches of the originals. Like duct-tape dress form #1, this one uses three layers of tape.
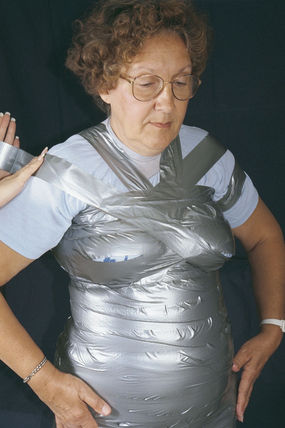
Here are the highlights: You’ll start with a similarly underclad wrappee, but Leah suggests cutting off one sleeve from a second T-shirt and basting it onto the first to form a neck cover. Start wrapping under the bust, snugly, then proceed to a “cross-your-heart” taping that goes from one shoulder under the opposite breast then around to the back, to define the bust area. You’ll use three layers of tape, with the second arranged vertically, but wrap more snugly than for Joyce’s method, and extend the wrapping around the upper arms and onto the neck, always keeping the bust contours well defined. Mark the final layer carefully with plumb lines at center front and center back, around the waist, and carefully establish the proper height and posture by marking the same distance from the floor to the hip level on four sides, then cut the tape shell up the back as usual.
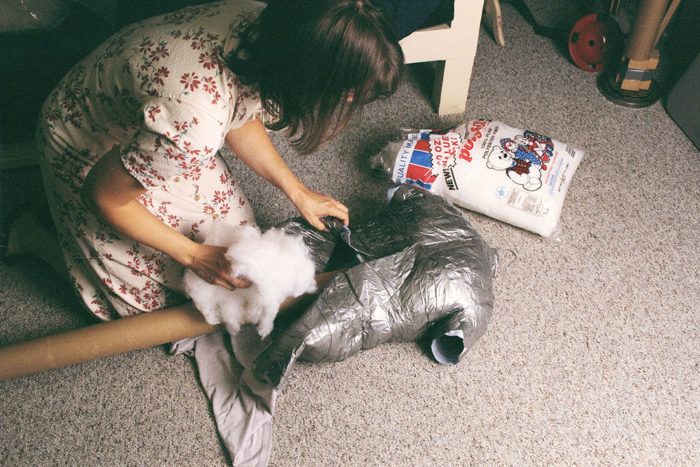
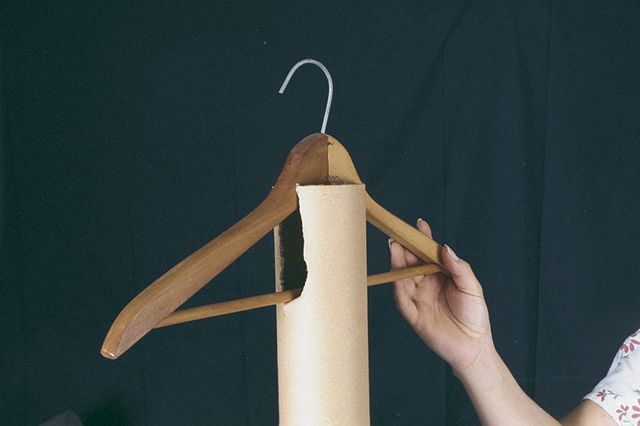
A strong wooden hanger placed inside before stuffing is the start of either a hanging form or a simple stand. For a stand, use a piece of PVC piping or a cardboard tube long enough that you can cut it to your height when the form is ready to set onto its base (you can use a Christmas-tree stand on the outside of the tube, or a microphone stand inside the tube). Tape the hanger to the tube and put it inside the form before stuffing it, then start stuffing by supporting each breast with a glued-in foam raglan shoulder pad if the bust contour needs the additional support (larger bust shapes may tend to cave in over time). Tape the opening at center back closed as you complete the stuffing, then use the hip markings to help arrange the form on the tube to match the wrapper’s posture.

![]()
![]()
Start under the bust. Wrap the midriff snugly, then do a cross-your-heart taping to define the bust area.
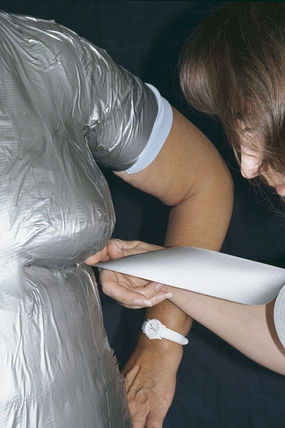
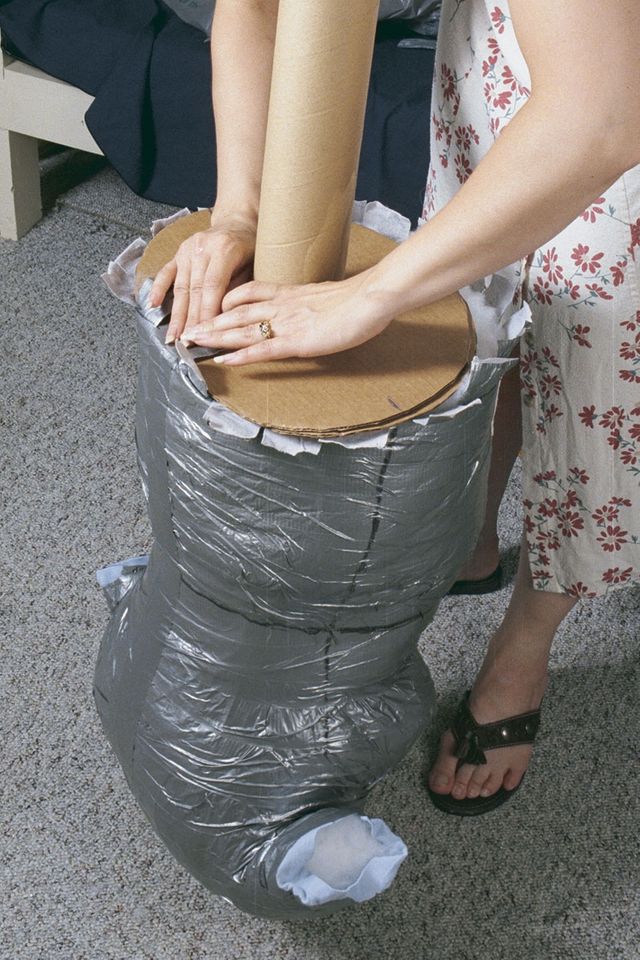
Cut a cardboard base using dimensions from the wrappee, and cut a hole in it so it can slip up the tube, then tape it in place. Stuff and tape over the ends of the sleeves and neck where you want them to end, then compare measurements from wrappee to form. You can adjust the form by cutting slits to form darts, squeezing the form to the new dimension, and retaping.

A sturdy wooden hanger set into the top of a PVC or cardboard tube gives support to the shoulders.

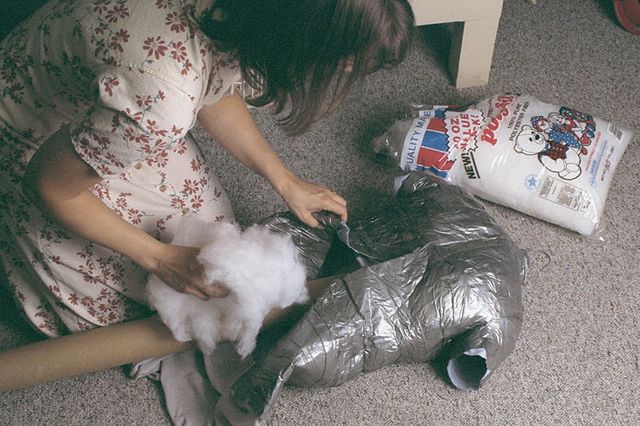
Stuff the finished form with polyester batting. A sturdy wooden hanger set into the top of a PVC or cardboard tube gives support to the shoulders.

Finish with a cardboard base. Cut the base to the same dimensions as the wrappee, and tape it in place.
More on dress forms:
- How to Select the Perfect Dress Form
- Quick and Easy Duct-Tape Dress Form
- Molded Papier-Mâché Form
- Paper-Tape Dress Form


My niece and I made these forms exactly one year ago with much laughter and surprise. We found it very strange to try to breathe when wrapped so well! I'm 6' tall and she's 6'1" so sewing is proving to be more useful all the time.
Wonderful Ideas,always welcome by eager to learn students of all ages,skills, in the art of sewing.Thank you Thank you. Lauralee22
I found it helpful to measure the front to back to maintain depth proportion...By standing between storage racks (facing one) & using two dowel rods that rested one on each rack. Move them in so one touches you in front & the other your back at the same level (as if an arrow were shot through you). Mark the spot where they cease to rest on the rack. Then move out & measure the space. Do this at two or three places & use a dowel cut to those lengths & taped inside before stuffing. A friend & I did the duct tape procedure & discovered it flexed too much in the stuffing so lost accuracy.
Apology for lengthy note. We're women. We're wordy. We try to be thorough!
Suchpae
I thought that this Idea was awesome. Another cool idea.
I found about 8 or 9 cans of house insulating spray foam at a yard sale and filled mine with that.It makes it very sturdy!
I TOTALLY agree with DARKSSYDE about using the expanding type of insulating foam; however I partially filled the center with crushed & balled up newspapers first. The foam had room to expand inwards into the paper and outwards into the shell.
Suchpae brings out the MOST valid point as well, that one must be conscious of the depth and width of the form: just making up the complete circumference in inches isn't the same as replicating a body's exact shape as the true dress forms do.
I made a second foam-filled form, and using the dowel idea, pushed the marked-depth-dowels through my duct tape form from front to back in the exact spot that they needed to be for my body, leaving approx 1" on the outside and then taped them in place, before stuffing in the newspaper (they helped hold the balls in place!) and before squirting in the expanding foam.
After the foam had cured I sawed off the ends that projected outside the form and sealed the spots over with duct tape. Now it truly is an exact replica of my body, with NO distortion from just stuffing it with polyester batting.
Thanks for your input & tips, Ladies!!!
rkr4cds
this is great if yoour younger and still growing then u can use the paper maicha one beacause its more detailed i make my own clothes cuz i finit hard 2 find clothes 2 fit me because im pettitethis will make it so much easier thanks
I have a preformed form, but my measurements now exceed the same. I was looking for a low cost way of altering the one I already have. This method might work. I am new to adjusting patterns and ask how you go about adding in ease when draping your fabric on the form?
Do you I purchase a store bought pattern, layout and cut out the fabric from this pattern, then drape it on your form for adjustments? Any assistance in this regard would be helpful. Thank you.
i want to do it, but I dont have anyone that is willing to wrap me up in duck-tape. Go figure! Anyone live in the Clinton Twp MI area that want to do this too? email me
[email protected]
Thanks Victoria
I was thinking of making one of these for myself, but I live so far away from all my friends and family. I am going to try to make a series of directions for doing this yourself, but with changes. I need a dress form that has arms down to almost the elbows and a little of the legs too (I'm making a lot of very exact costumes). If I can get it done properly, I will make another post the directions on my own website. Reading this has given me ideas for how to go about making my own dress form.
~~Costume Witch
okay so i just tried this and it's awsome! I had to add a little more boobs and A LOT more butt to my duck tape dress form after my family finally got me cut out lol but with some of the quilting poof added that easily and ducktaped over it.
My grandfather, who taught tech classes at the university I go to, and who is always coming up with interesting stuff, used an old Christmas tree stand, the kind that comes with a fake tree you have to put the branches hooked into holes onto attachments on their pole (alot of words lol) and used the indentions on the pole to kind of "grab" the stuffing in the dress form on the inside and hold it up better.
two important thoughts: put the pole inside the dress form BEFORE stuffing it, it's a pain to try to do afterwards
and don't tape too tight, you cant breathe lol
one very important thought: don't try this as a party game or while intoxicated!!!! I was completely sober and still acted like an idiot once wrapped in duck tape cause it was so fun:) What is it about being wrapped in duck tape that makes one want to run around and be filmed? lol
To add a bit of strength I added bands on plastic packing tape ( the type of plastic strapping that binds big parcels) made to the exact measurements they stopped any sprawling that enthusiastic stuffing caused.
Is there a way you could cover the dummy with a better looking fabric? Or is the duct tape to thick to sew a fabric onto?
I made one of these back in college 6 years ago (fashion design student). i wore a turtle neck and my mom wrapped me with duct tape, it looked SO good. we wrapped my legs so could fit shorts on it and also did my shoulders and down my arms to the top of my bicep. it worked out great and we called it my mini me. however about 3 years ago the glue from the tape started to gum up my pins. i couldn't drape final fabric on it anymore b/c it would gum up my material. i could only do muslins on it. I sorta stopped using it and threw it away a few weeks ago. just an fyi for all you duct tapers that you'll probably have to make another one one day. but until it gets all messy-it's the best for those who can't afford a dress form!
I have my cloning materials, and am ready to go. I am so glad that I read all of the comments first. Very helpful.
Consequently, I am planning to to dress my form in a form fitting turtleneck tee shirt so that I will have something to pin to. I will let you know how it works. Thanks.
I didn't wrap snugly, I wouldn't have been able to breathe. It got snug as we wrapped because the tape stretches as you unwind it and cut it. I did the cross your heart method just out of common sense. That was before I saw this page. It works! Glad to see the idea here.
We left the very bottom area until the arms were done, so I could sit down while the arm area was done. I needed the rest. This is an exhausting process for the wrappee, especially if you have any health problems, but it works. I have never had such ease in making garments fit.
Now all I need to do is figure out a way to make one for making slacks!
I saved up old pillows for a while before making this project. Every time I bought a new pillow, the old one went to my sewing room. When I had enough we got the tape and other supplies.
By using pillows and scrunched up disposable plastic shopping bags to stuff it, I didn't need as much batting to fill it. I used a very heavy wooden hanger, and padded the shoulders with foam before hanging my hollow un-stuffed DTD form on it.
We cut PVC pipe for the stand and notched it for the hanger to fit into the top, and got the hanger well secured on the pipe before hanging the hollow form on it. The form was left unattached so we could adjust it later on.
We stuffed it lightly so it would be fairly stable so we could work on the plywood bottom.
We took lots and lots of measurements first with a yardstick to get the depth from front to back and width from side to side as accurate as possible, then traced around it to make a pattern to cut the plywood. We measured in from the outside edges to guesstimate where the pipe would need to be, then we cut the hole for the pipe.
After stapling the plywood bottom on, we stuffed it some more from the armholes and neckline, while it was laying on a table.
When we were done stuffing we put it on an umbrella stand.
When mounted, it needs to stand the way you do when you are relaxed. Measure from each shoulder, right at the joint - to the floor, to see which shoulder is higher. Duplicate this on your DTD. Also get someone to check the angle of your stance from the side, so it doesn't lean forward or backward too much. It needs to stand the way you normally do when relaxed, so your clothes will hang right.
Take some digital photos or compare it to yourself in a full length mirror to know if you have it "standing" the way you do. Check all directions.
Because we left the DTD unattached at the hanger end, we were able to shift the whole thing as needed to get it to hang right, and match my stance and height.
After adjustment, you can add more stuffing to make it stay in that position, and permanently attached the hanger/pipe contraption at the neck and shoulders. If stuffed tightly it won't budge. Voila! You're ready to sew!
PS. I covered my finished DTD with a knit fabric slipcover so I could pin pattern pieces and fabrics to it. I made a simple top, with a very snug fit and did elastic casings in the neck, hem and short sleeves so it would stay put once it was on. I slipped it on over the finished DTD, and then pinned on black twill tape to mark the center lines, waist, etc. The tape really should be glued on once you know you have it centered properly and the cover can be taped or pinned in place or you could use some spray adhesive so it won't shift.
Good luck!
Costume_Witch, Don't have anyone to do the wrapping either. Would love to know if you figured out how to do it by yourself.
I just finished making a duct tape dress form almost entirely by myself. It took four hours and 3 rolls of tape. I wasted a lot of the tape when it got stuck to itself when I was putting it on my back. I am sure it would have turned out better if I had more help, but I think it will be fine.
I found that putting the tape on in strips worked best and gave me more control. Wrapping continuously got too tight.
Putting the tape on my back was the difficult part, but the vertical direction was easier than I expected. I took a long strip, with one hand, dropped one end over my shoulder and grabbed it with my other hand before sticking it on.
To get the tape on my upper back horizontally, I stood in front of a tall mirror, stuck one end of the tape to the mirror at the height of where it would go on. While keeping the tape taut, I stuck the other end to my back and rotated backward into the tape so it attached to my back.
Because I made the the dressform myself I few things went wrong. The t-shirt got bunched up in places from bending around to put the tape on. The duct tape got creased and lumped at my waist as well. I put some more tape over this part and it helped to smooth it out.
If I make another one, here is what I would do differently. I would use two t-shirts. With one t-shirt on, I would do all three layers on my upper body, above the natural waist first. Then I would cut off the part of the shirt the it sticking out. Next, I would cut off the top part of the second t-shirt to leave a skirt. After putting on the skirt I would complete the part below my natural waist, leaving a gap of an inch or two. The part at the natural waist gets bunched up from bending over. The last step would be to finish the natural waist part.
I was able to get my husband do the final layer on my upper back. He marked the center line on the back and cut it off of me. I did everything else by myself.
I haven't made one yet, but I am going to try one on my 90 year old mother who has a severe "douger's hump," in her spine, that way I don't have to keep running to her house to make sure things fit. It is going to be an intresting project.
@taysrag
Duct tape definitly gets tackier as it ages and then leaves all of your pins sticky. For a few dollars more you can purchase Gaffers tape. While related to duct tape, it differs in that it can be removed cleanly. Therefore not goopy sticky, but holds just as securely! It's also a pretty black color.
I haven't made my Dressform yet because I'm moving overseas soon, but am super excited to try this out using gaffers tape.
Thank you everyone for all of your great tips and ideas!
I want to be a fashion designer someday, but right now I make most of my clothes (I usually dress in Japanese street fashion, and it's hard to find clothes here in the states unless you want to pay a lot to but them online) So this will come in VERY handy! Though I will be getting my mom to help me, I don't think I could do it myself lol.
Along with swing and crafting I also do home improvements. There is a product available at the hardware store that would be perfect for filling a custom dress form. It is pressurised spray foam insulation. It comes in a can about the size of a typical spray paint can. You would need to make the foam as before and make sure the tape around the cardboard at the bottom and arms along with the back is secure. It would probably help to follow the suggestion regarding the dowels through the middle. Then just spray the foam in from the top. It will take at least a day to dry but will be a hard form that shouldn't loose shape. I'm going to give this a try over the weekend and will post again with the results.
I made one for my daughter following similar instructions from "Sewing Clothes Kids Love," which includes taping the crotch and upper legs. Remember to invite the little one to use the bathroom before taping - we had a mad rush to cut her out of the duct tape form, which made the process quite a bit less fun for her!
i made a stand for my form out of PVC tubes and joins from a regular hardware store. it pivots and adjusts just like a real form stand. you can find all the instructions on how to make it here http://lulushion.blogspot.com/2011/06/making-of-form-part-3-stand.html and the best part is that is very inexpensive. Enjoy! :)
Has anyone tried that spray foam MnkyWife spoke of?
Thinking how to tape myself:
Put on nylons and thin tight fitting long sleeve shirt with turtle neck.
Tape only one vertical half of body at time (front then back), extending tape about an inch beyond halfway mark (at side of body). When done (with one half) mark side vertical line with sharpee cut off clothes beyond tape.
Repeat exact as above and do second vertical half of body.
Cut two pieces on marked line and join.
Stuff, etc.
I think it will work. I can intuitively feel where my vertical line would be to accurately mark with pen. When joing the two halves I can compare with real measurements of my body.
When using mannequin I can use tape to hold fabric to mannequin since pins won't pierce tape.
Will let you know if I succeed.
To suchpae...I wonder if you have pictures of you depth technique. I can't quite picture it.
Love all of the comments. Getting ready to make my own.
Hi everyone!
These articles on Threads were very helpful to me! I created my own dress form out of paper tape. I found it very successful- I'm sure it will aid my future fitting endeavours greatly!
I created my own tutorial that goes into a bit more detail about the process, and blogged about it here:
http://makingitwell.blogspot.co.nz/2012/03/i-made-my-own-dress-form.html
Please do visit, I'd love this to help someone! I'll do my best to answer any questions too :)
Good fitting luck everyone! :)
I created my own duct tape dressform following these instructions. Very easy and very inexpensive. If anyone out there is considering buying your dressform I suggest you make your own first. It's true to size and it is fun to do! Read my blog post about mine here,
http://shanniloves.blogspot.com/2012/03/duct-tape-dressform.html
I am planning on making one of these tomorrow for my granddaughter so I have been watching one how to video after the other. This one is interesting but I am surprised how tight the tape looks. It is so tight that it looks like a dress made using this form would not fit that lady. Help? What are others thoughts on this especially if you have already made one?