


by David Coffin
from Threads #75, p.40
The best thing about the poured-foam form that you make from a surgical-plaster cast or mold is that the mold makes a very accurate copy of your body contours, complete with distinct collarbones and shoulder blades. It’s more accurate in this regard than the other methods (duct-tape dress form #1, duct-tape dress form #2, paper-tape dress form). Plaster is also better at molding to and preserving concavities, so this is a good approach if your body has distinct hollows that tape might simply fill over. But the downside of the poured-foam process is the foam itself, which is expensive, somewhat toxic, and hard to find.
Gail Gosser, an artist and art teacher from Schwenksville, Pennsylvania, likes the accuracy of the plaster mold. Her method solves the foam problem by replacing it with ordinary papier-mâché. Use paper-pulp insulation mixed with wallpaper paste (both from a building-supply store) to make the mâché, and cut the plaster mold from the body along the sides instead of in front and back as is usual when pouring in foam. Don’t miss other Threads techniques like this one by purchasing a print subscription which comes with FREE access to our tablet editions.
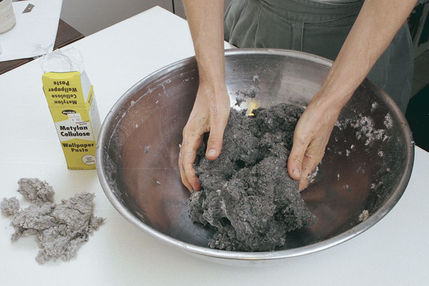
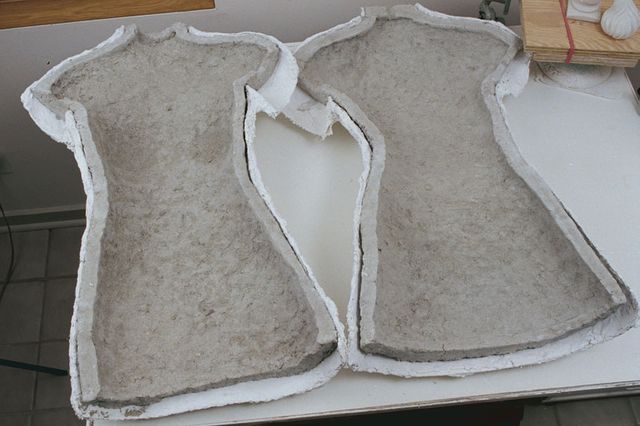
1. Use paper-pulp insulation mixed with wallpaper paste to make the mâché, and cut the plaster mold from the body along the sides, not in front and back.

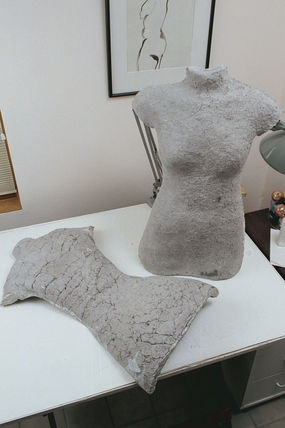
2. Line each half of the mold with paper towels to keep the papier mâché from sticking to the plaster.
3. Then build up a 1/2-in. layer of mâché, forming a smooth, wider edge along the mold’s edge where the two mâché halves will be glued together.

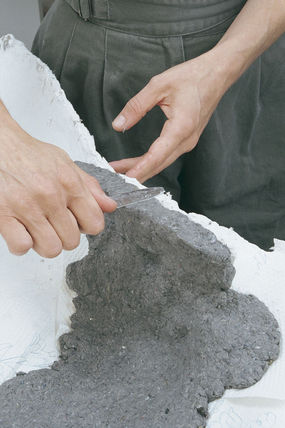
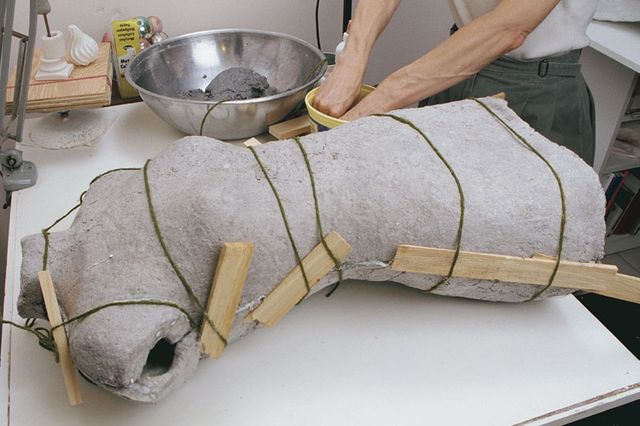
4. When both halves are filled (above), let them dry (helping with fans and hair dryers if the weather is damp).
5. Then smooth the surface texture by spreading more thin mâché over the cracks (right).
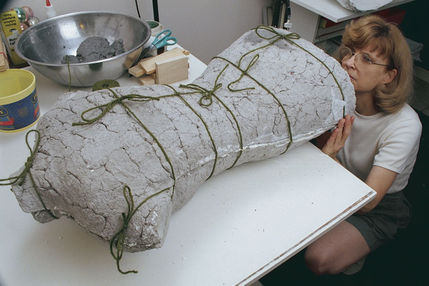
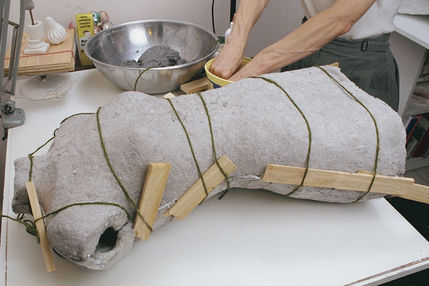
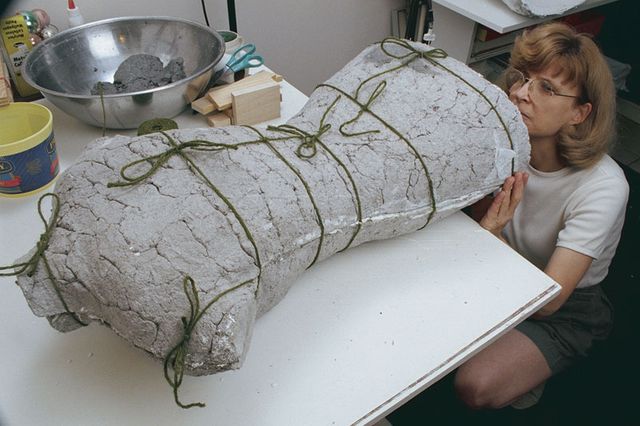
6. Join the mâché halves with white glue spread thickly along the widened edges, and tie them together firmly,
7. Slide shims under the cords to tighten them as the glue dries.

![]() Here’s a swiveling stand you can make for any dress form from easily purchased materials.
Here’s a swiveling stand you can make for any dress form from easily purchased materials.
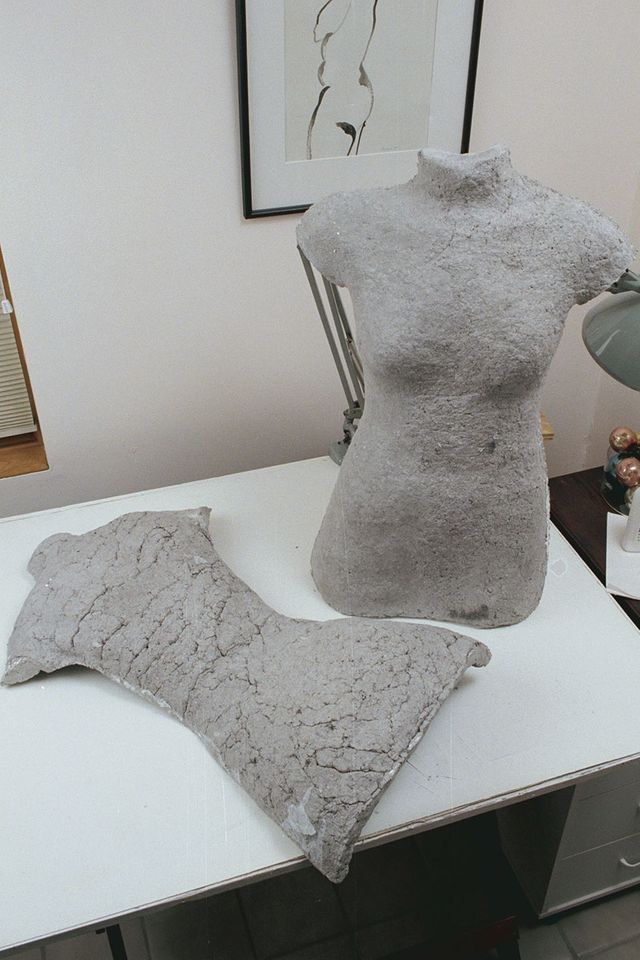
When the glue is dry (and at any point in the future, if needed), reinforce the join and edges with more mâché in pulp or traditional strip form. Finally, cover the form with knit fabric (the mâché is too hard to pin into directly) and mount it on the clever dress-form stand shown at left.
This method is time-consuming (drying time can add days) but very accurate, and it suits Gail’s training as a sculptor. One further advantage: you can make neck-and-shoulder-only molds to create anatomically correct coat hangers for finished tailored jackets and works in progress.
More dress forms:
Introduction
Duct-Tape Dress Form #1
Duct-Tape Dress Form #2
Paper-Tape Dress Form


Impressive Thank You lauralee22
Inspiring! I am *so* going to make myself a dress form! I already have the plaster for the cast, but have been waiting for my body to become the "right shape." I didn't know the spray foam was hard to find, so I'm glad to know there's a reasonable alternative. Thanks!
Just wondering, do you think that you could create the molded papier-mache by first creating the paper-tape dress form using the method described by coco1,then covering the inside of the paper-tape form in saran wrap or paper towels as described in the original instructions, and then molding the papier-mache over the paper-tape form?
This might make it a bit easier to obtain a mold without having to go through the plaster method which seems to be pretty involved. Anyone, please let me know if you think this idea would work. Thanks, csukel
I doubt that paper-tape mold is suitable for papier-mache modelling paste, because of high water content. It will soak paper tape and glue up and whole thing would fall apart.
I'd better give a try to duct-tape, which takes no water in (and adhesive tolerates water as well). Nevertheless, you would like to have precise tool for your future fitting, but duct tape shell would be too thin and soft to support quite heavy load of paper pulp, there is too big risk for distortion (considering that you have to halve the shell). Duct tape is watertight and exess humidity cannot evaporate, making drying time much longer.
Plaster mold would give best support and it tolerates water. It inhibits exess water from pulp and enables evaporation. This time it's best for purpose.
I posted this in the other Dress forums as well.
The expanding foam is available at most DIYs and Big Box stores, like Home Depot/Menards/Loewes (sp?) used to fill in around door and window frames, vents, anywhere that there're air leaks into the home.
rkr4cds1 writes: I TOTALLY agree with DARKSSYDE about using the expanding type of insulating foam inside of the Duct Tape Dress Form; however I partially filled the center with crushed & balled up newspapers first. The foam had room to expand inwards into the paper and outwards into the shell: I didn't need as much foam and its expanding action was more controlled as it filled.
Suchpae brings out the MOST valid point as well, that one must be conscious of the depth and width of the form: just making up the complete circumference in inches isn't the same as replicating a body's exact shape as the true dress forms do.
I made a second foam-filled form, and using the dowel idea, pushed the marked-depth-dowels through my duct tape form from front to back in the exact spot that they needed to be for my body, leaving approx 1" on the outside and then taped them in place, before stuffing in the newspaper (they helped hold the balls in place!) and before squirting in the expanding foam.
After the foam had cured I sawed off the ends that projected outside the form and sealed the spots over with duct tape. Now it truly is an exact replica of my body, with NO distortion from just stuffing it with polyester batting.
Thanks for your input & tips, Ladies!!
rkr4cds
I can't wait to try the plans, I think I'll try the duct tape one first and see how it goes, then when I have more time and it warms up a bit, I'll try the plaster one.
I think I've got a better idea for the base, if I can get it working I'll sumbit pictures if it's possible.
I'm really excited about making my own dress form. I'v been trying to sew my own clothes for ages and while they come out pretty well, a dress form my size would make it more accurate. Since sewing dress forms are ridiculously expensive, i'v been trying to find ways to get around buying a brand new one. I'm just confused about the cast. how do u do it?
I know I am a duh, but could someone tell me the best way to attach knit fabric to the finished model?
thanks!
what is the form made off; i mean before u fill it with that grey stuff..
please post the link for making the plaster form-- thanks!
the "My Twin Dressforms" link isn't working -- can you post the instructions for making the plaster cast directly on your site?
Has anyone tried using the Rigid Wrap plaster gauze strips to make the plaster mold? I think I will have to give this a try after Xmas.
use a tightly fitting tshirt over glued on batting to cover it its so perfect why didnt I think of it before cut pieces of thin batting or flannel something like that and spray glue it on then take a tight fitting tt shirt one with a high neck line and maybe 3/4 sleeves if you are going part way down the arm like me and put it on the form them before you finish the ends of arms waist and neck off with wood pieces cut to fit tuck in the ends of shirt then screw capping pieces into inner support beam
hello, i would love to know what type of plaster you used.
crazy idea but i wonder if it would be possible to "soak" an
old shirt in plaster of paris, put it on and let it dry? I'm thinking a very form fitting cap sleeve T would work?
You could always add plaster tape after cutting the shirt off? I'd think it'd be way faster than multiple layers?
I see some comments about using plaster of paris, and am concerned that someone might try that. Mixing plaster of paris with water creates an exothermic chemical reaction--meaning it generates LOTS of heat. If you try to cast yourself in plaster of paris, or even put on a t-shirt and cover it in plaster of paris, you will burn your body. Please don't do that. I don't know what kind of plaster is the correct kind, but it isn't what you find in craft stores!
You get special plaster-embeded bandages that are used to make the casts for broken bones and are formulated to not produce much heat, not actual craft plaster.
I am wondering, though, if anyone had an idea of how I could calculate HOW MUCH I'd need of the bandages/paper mache. I found a good source for them both in bulk online but have no idea how I'd go about calculating the ammounts I need to maximize savings.
I made a plaster form of myself. You can find all the instructions and tips here. http://lulushion.blogspot.com/2011/05/cast-yourself-or-making-of-dress-form.html
Enjoy :)
Read all about my version of Molded Papier-Mâché Form here. http://lulushion.blogspot.com/2011/06/dress-form-or-making-of-dress-form-part.html
the stand post is coming soon.
i made a stand for my form out of PVC tubes and joins from a regular hardware store. it pivots and adjusts just like a real form stand. you can find all the instructions on how to make it here http://lulushion.blogspot.com/2011/06/making-of-form-part-3-stand.html and the best part is that is very inexpensive. Enjoy! :)
I finished a cover for the dress form. check it out here http://lulushion.blogspot.com/2011/07/making-of-dress-form-part-4-of-4-cover.html
Instead of using the medial tape, I was thinking of using one of the kits that pregnant women use to make plaster casts of themselves. They're cheaper than than the medical bandages, come with instructions, come in about the amount I'd expect to need, and everything is made for making a body cast. I'd still need to the bandage scissors to cut them off, but other than that I think it would work. Has anyone else tried this?
Hi everyone!
These articles on Threads were very helpful to me! I created my own dress form out of paper tape. I found it very successful- I'm sure it will aid my future fitting endeavours greatly!
I created my own tutorial that goes into a bit more detail about the process, and blogged about it here:
http://makingitwell.blogspot.co.nz/2012/03/i-made-my-own-dress-form.html
Please do visit, I'd love this to help someone! I'll do my best to answer any questions too :)
Good fitting luck everyone! :)
I made my own dress form using instruction booklet from mytwindressforms.com
I didn't do papier mache because I worried that I would not be able to trim down the abdomen where there would be some expansion from breathing.
The plaster bandages never got "hot" just ended up clammy. My blog has info http://sewnotwork.wordpress.com/
Husband is still putting stand together...
Does anyone have an idea on where to find an experienced person who is willing to help wrap me in these bandages? Or maybe somebody who lives in Michigan that wants to try this? Thanks!