
No-Mark Quilting
Learn a quilting method that lets you create complex patterns without leaving a mark.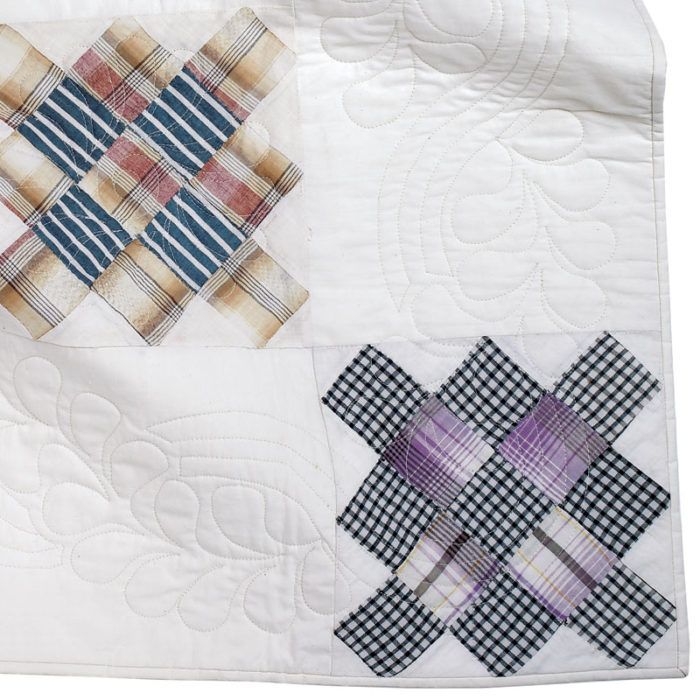
If you’re a machine quilter, you’ve probably wished at one time or another that the stitching pattern in your mind would jump directly onto the quilt. Then you could stitch without chalk, water-soluble markers, or any other marking-method worries—and you’d never again chance ruining a delicate fabric by using the wrong marking method. My no-mark process isn’t as magical as direct-mind transfer, but it may be the next best thing. The no-mark quilting method provides a sure way to see your stitching designs even when working with dark and patterned fabrics used in quilts, garments, or home-decorating projects; and you won’t need to remove the marks from the fabric when you’ve finished sewing.

The idea is simple: Trace your quilting pattern onto a tear-away stabilizer paper; pin that stabilizer paper directly to your project; then machine-quilt right though it. This method works great with all types of continuous-line quilting patterns, whether or not they repeat; it’s also appropriate for any kind of quilting project, including bed and wall quilts, window treatments, garments, pillows, and table runners. You can even use this technique with quilt embellishment designs on ready-to-wear garments.
Make a marking template
To create a no-mark template, first, make up or choose a continuous-line design that will enhance your project. Enlarge or reduce the design on a photocopier, using the formula described below. If your quilting pattern will fit inside a quilt block, plan at least a 1/2-in. margin around the size-adjusted design to avoid any chance of the design spilling over the block’s edge.
Size the design to fit the project
To adjust the size of the existing design to fit a given dimension, divide the desired length or width of the design by its actual length or width, which gives you what’s called the scale factor. Since photocopiers increase and decrease in terms of percentage, multiply the scale factor by 100 to arrive at the percentage to enlarge or reduce the design.
For example, to increase the design’s length from 5 inches to 7 inches: 7÷5=1.4 scale factor, and 1.4 X 100 = 140% enlargement. The enlargement or reduction automatically alters the design’s other dimensions.
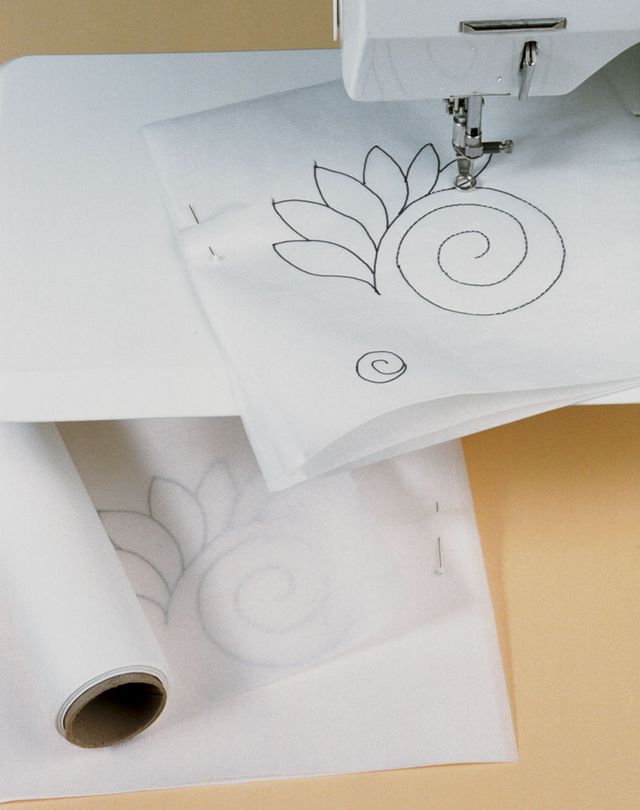
Once the pattern is sized to fit, trace it onto a stabilizer of your choice—almost any lightweight vellum-type tracing paper from an art- or office-supply store, or even wax paper from the grocery store will work, but my favorite is Quilt & Tear, a vellum sold in 12-inch-wide rolls (available from Golden Threads). Quilt & Tear is sheer enough to see through for exact design placement on the quilt, and its fibers are short, so it tears away easily from the stitches, leaving only insignificant remnants to clean up. Use a permanent pen to trace the design so there’s no chance of the marks staining the needle as it passes through the stabilizer and, in turn, marring the fabric.
Stack stabilizers for multiple templates
If you are repeating a pattern on your quilt or garment, stack up to 15 sheets of stabilizer with the traced pattern design on top (you may have to count quilt blocks or divide the available space by the design size first to determine how many template repeats you will need). Pin the layers together to hold them in position while you stitch. Using a large (size 100/16 or 110/18), unthreaded needle and a darning or free-motion quilting foot in your unthreaded sewing machine, drop the feed dogs and free-motion-stitch through the stabilizer stack, following the traced design. (If you need to trick your “smart,” modern machine into operating without thread, read “Fool your ‘smart’ machine.”)


Fool your “smart” machine
New machines with thread sensors often will not sew unless there’s thread in the machine. To trick the machine into thinking it’s threaded:
• Override the bobbin sensor by keeping a full bobbin in position, but do not thread it through the bobbin case.
• Mimic the effect of top threading by inserting a business card in the tension area slot.
• If the machine won’t drop the feed-dogs, cover them by taping a business card to the throat plate, with an opening punched out for the needle hole.
Since you are free-motion-stitching, the stitch length is determined by how fast you move the design through the machine as you sew. Moving slower causes the perforations to be closer together, and vice versa. Keep the orientation of the stabilizer sheets the same by not turning the stack while stitching the design. Once you start sewing, you will create an identical pattern perforated on each sheet, which will be easy to follow when machine quilting. And because stitching through the stack causes the layers to become perforated together, you’ll make a pad of ready-to-use tear-off templates in the process.
Templates simplify pattern play
The no-mark quilting method is the same for any application, but the positioning of the templates for quilts or garments may call for different approaches. In general, you can position the design before taking a stitch and without leaving a mark by moving the templates around on your project until you like their placement. Once you’re satisfied with the design arrangement, mark on each template to help you remember its exact location. Then pin or tape one template at a time and stitch, working segment by segment in order to keep the paper from catching as you work.
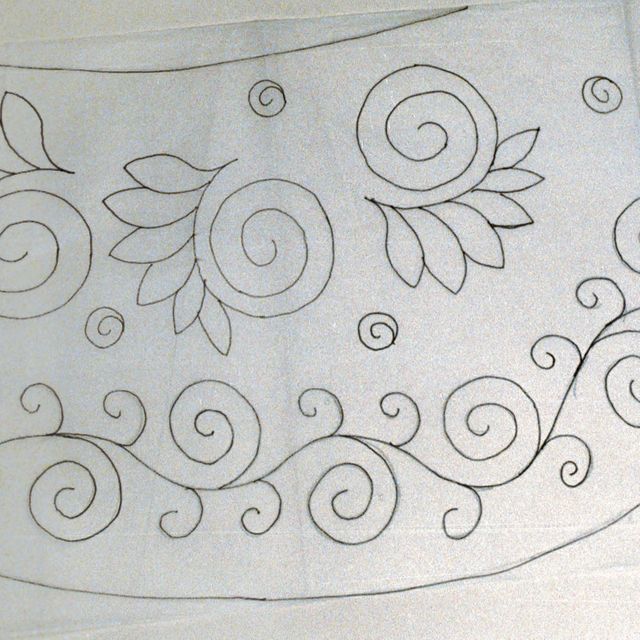
For borders and corners on a quilt, trace a corner design, then stack and stitch four layers of stabilizer to create the template pattern. To fill in the border, trace a design section containing at least one repeat, and make enough templates to go around the quilt. Pin the corners in place and then fit the border by pinning from the corners toward the middle. If the patterns don’t match up when they meet, either insert a motif to eliminate the misfit, or cut the border template and spread or overlap its sections to fill the required space and slightly modify the design.

Combine quilted and unadorned sections in your garment construction. The quilting, above, was sewn following a stitching template made from a copy of the full pattern piece, below.

For a smaller project, such as a garment or a garment section, lay out the design and trace the elements onto a single template cut to match the pattern piece. I do all the marking and experimentation on the stabilizer. And when planning the quilt design layout for garments, I make sure the design goes from front to back across the shoulders in one continuous line.
You can also use a variation of my no-mark method to add quilted embellishment or stitching to ready-to-wear garments: Stitch designs from the garment’s wrong side using the template reversed and heavy decorative threads in the bobbin. I find that just having the paper pinned in place on the garment is enough stabilizer to support the embellishment.
When you’re ready to quilt . . .
With all your design decisions made, change the sewing machine needle to match the fabric and thread to suit your project. Peel off one tear-away template from your stack of multiples—or use your single template–and pin or tape it onto your project where you want the design to be.
If the project is a quilt, start quilting in the center and work out, block by block, to the border. If you’re quilting a whole cloth design, simply break it down into segments and progress segment by segment, placing a template, then stitching. To start sewing, pull the bobbin thread to the top, hold the two threads away from the needle and take five or six stitches in place, and trim the threads closely. Keep the same presser foot you used to create the template, then free-motion-stitch using the holes in the tear-away template as your pattern. To make the perforated holes easy to see, use an adjustable light clamped to your sewing table and position the light horizontally across the surface so each hole casts a pin-dot shadow. After sewing the design on the stabilizer and fabric, take five or six stitches in place, pull very gently on the needle thread to bring up the bobbin thread, and snip both closely. Since both the threads are cut, you can move directly to the next area without worrying about catching stray threads in your quilting stitches.
Tear away the templates as you finish each section, or you can wait until you’ve sewn several or all of them. You’ll find it easy to remove perforated stabilizer, but if a few nubs of paper remain, the Quilt & Tear paper is brittle enough to be scratched away with a fingernail without damaging a thread. After finishing the quilting and tearing all of the paper off, just stand back and admire your work.
This no-mark quilting post, excerpted from Threads #90 (Aug./Sept. 2000), was written by Sara Hochhauser, a designer and quilting and sewing teacher based in Hinsdale, Illinois. Photos, except where noted, by Judith Neukam.


Its really awesome
I love this design.
Love this absolutely brilliant idea! Also, reading this gave me a very pleasant flashback to grade 8 about 100 years ago in the early 70s in Home Ec class when we were practising sewing on an unthreaded machine on pre-printed sheets of paper. I still have the red Duotang binder with all my practice sheets in it. Good times!