

READERS’ QUESTIONS – EXPERT ANSWERS
Q: I want to design and sew leather bags – for myself, mostly, but eventually I might want to sell them as well. What tools and equipment should I consider investing in?
-Kate Gallagher, via email
A: Anna Mazur, author of Handbag Workshop: Design and Sew the Perfect Bag (The Taunton Press, 2014), replies:
Bags made from garment-weight leather require the same tools and supplies as garments. However, when working with heavier skins, it helps to have a few additional items.
Specialized cutting tools, hole-piercing gadgets, rivets, and glues are the mainstay of handbag-making; using them makes the difference between an average bag and a professional-looking one. Scissors and rotary cutters can go only so far in cutting heavy skins and hides. You will not always be able to machine-sew every seam. However, with the proper tools and techniques, you always can come up with a way around the challenges.
To your usual sewing tools, consider adding the following. You don’t have to purchase everything at once, but you can acquire tools and supplies as you need them.
Cutting tools
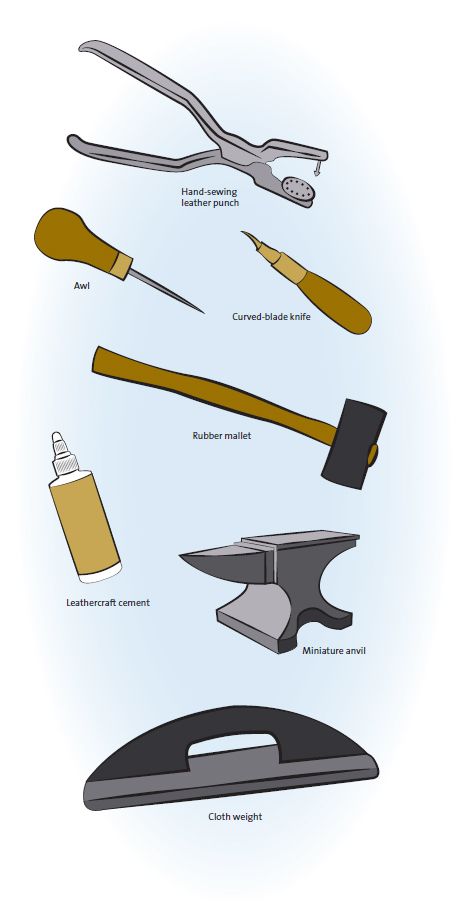
• A utility knife and trim knife with straight and curved blades, plus a protective surface for cutting.
• A hand-sewing leather punch. This little gadget pierces holes in several sizes, from a needle-size hole up to 3/16-inch diameter, so you can hand-sew through layers that can’t be stitched by machine.
• Crop-A-Dile II Big Bite Punch. With its long reach, this punch can pierce holes beyond the immediate edge.
• Scalloping shears. These shears create a decorative finish on nonraveling edges.
• Safety beveler. This thins the edges of heavier leathers.
Cutting aids
• Awl. The awl’s point is handy for marking leather in preparation for cutting, as well as for piercing holes.
• Clear grid ruler with metal cutting edge. The clear plastic enables you to see under the ruler, the grid helps you measure, and the steel edge prevents the knife from damaging the ruler.
• Cloth weight (sometimes called a pattern weight). This tool, used in the tailoring industry, is indispensable. It is the perfect size and weight to hold patterns in place without pins while cutting, and it prevents the work from shifting or falling off the table. I also like to use it as a safety measure on top of a ruler while I am cutting with a knife. It is an extra barrier between my fingers and the blade.
Adhesives
• Double-face tape. This tacky, repositionable tape secures layers so you can stitch accurately. The seam remains flexible.
• Leathercraft cement. This water-based glue has no odor and gives you time to work with it before it sets.
• Glue dots. Tiny scrapbooking dots are good for when you need a small amount of glue.
Stitching substitutes
• Rivets, setter, and anvil. When you can’t machine sew, pierce a hole, then hand-sew and/or add rivets.
• Snap setter and snaps. It firmly sets the snaps without any shifting of the prongs.
Pressing tools
• Rubber mallet. Use this to flatten areas instead of pressing them with an iron. I keep a couple in different weights and sizes.
• Miniature anvil. Lay the work over the anvil and pound with the mallet. Use small rocks to get into tight areas where the anvil doesn’t fit.
• Hard pressing surface. A 12-inch square tile, at least 1-1/4 inches thick, works well; back it with felt so it does not damage your table.
Finishing touches
• Leather paints and gum tragacanth. Finish raw edges with one of these sealants.
• Stainless-steel edge paddle. This is the perfect little tool for applying paints to an edge. One end is square while the other is rounded. The tip shapes enable you to apply precisely without any waste.
Miscellaneous
• Assorted clips. You can’t pin through leather, so use office supply clips, paper clips, and clothespins.
• Glad Press ‘N Seal. I’ve found this plastic wrap with “grip” on one side to be a multipurpose addition to my sewing arsenal. If you don’t have a Teflon presser foot, cover the leather with this film and use a regular presser foot. It also can be used to hold leather layers in place, for example, when sewing a leather patch or appliqué.
Build your confidence in working with leather by practicing: Make a seam sampler to test how your sewing machine handles the materials. Try different needles and threads to sew and topstitch seams. I always begin with a Microtex needle; if that does not work, I experiment with other needle types-not necessarily leather needles. I prefer to use two all-purpose threads through the needle instead of heavier topstitching thread.
This post was originally featured in the Q&A department of Threads #184 (April/May 2016).
Have a Question? Send it to us and we’ll find an expert’s answer.
via mail: Threads Q&A, PO Box 5506, Newtown, CT 06470-5506
via email: ThreadsQ&[email protected]
via the Contact the staff page to submit your entry


Kudos for the article. It's great that you answer user's questions. Now I want to make leather bags as well but I don't know what kind of materials to buy. You guys provided a list of tools, but what about the leather?