

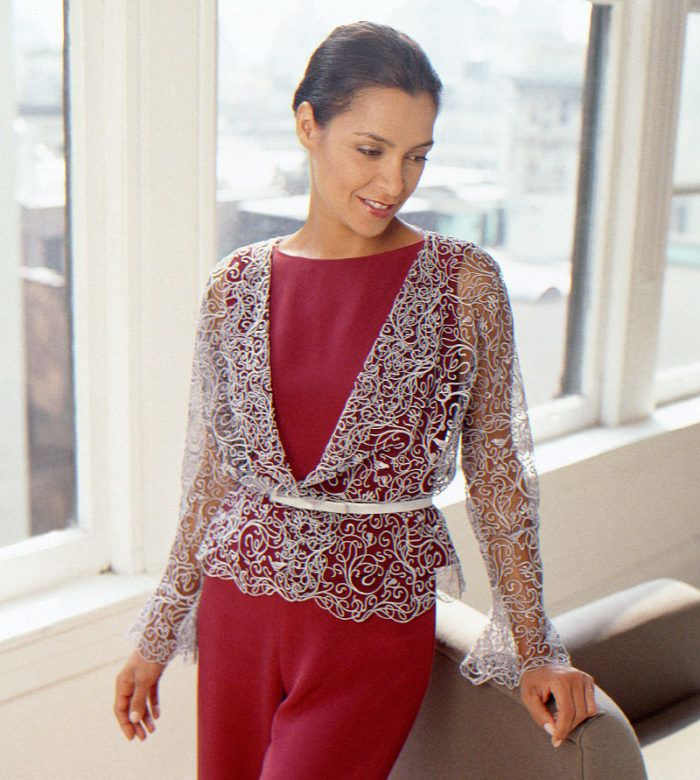
Fine lace has a rich tradition. We don’t know exactly when and where lace originated, but we do know that it was originally produced meticulously by hand and that, in the 17th and 18th centuries, its intricate designs were highly prized and available only to the aristocracy.![]()
The advent of machine production in the 19th century made lace more affordable but did little to diminish its desirability, and today lace is once again very popular, used for both casual as well as elegant, special-occasion garments.
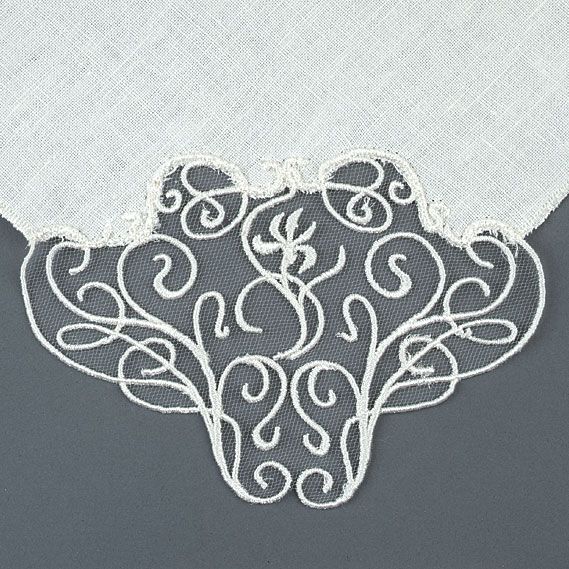
Whether created by hand or by machine, lace is a complex fabric, and the idea of producing allover lace on a home-embroidery machine may seem mind-boggling. But it can be done and, in fact, is easier than you think—it just takes a little time. I’ll walk you through the process, which was introduced to me by Carol McKinney of Pasadena, Texas, and show you how to select embroidery designs that you can combine to create your own unique lace.
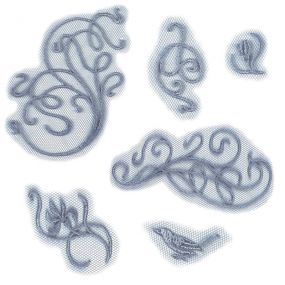
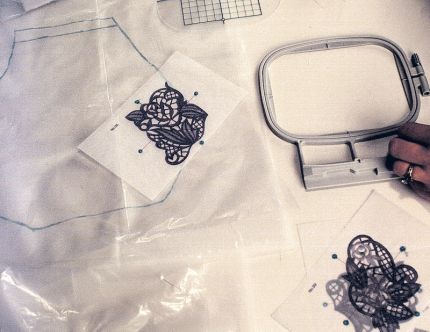
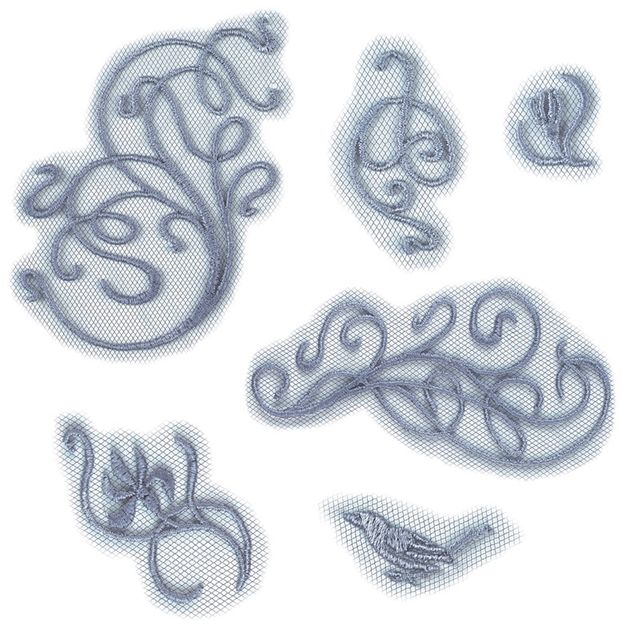
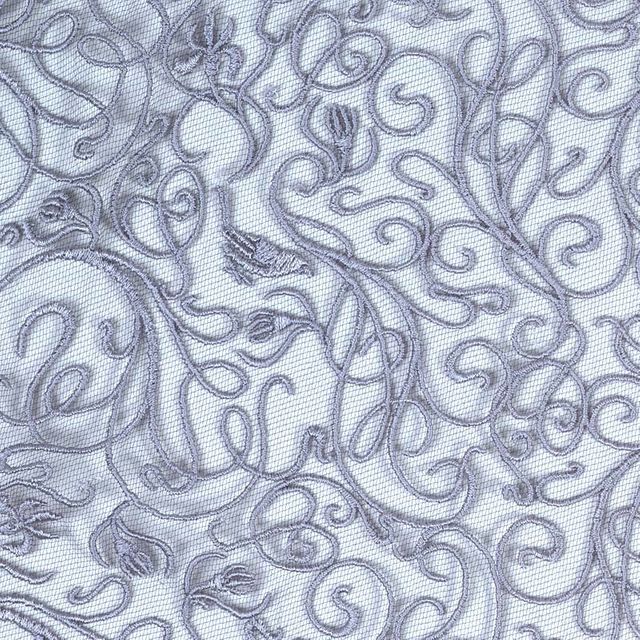
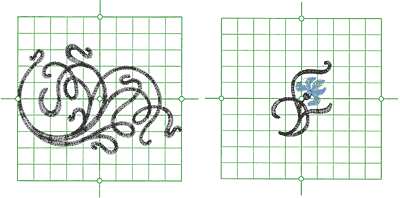
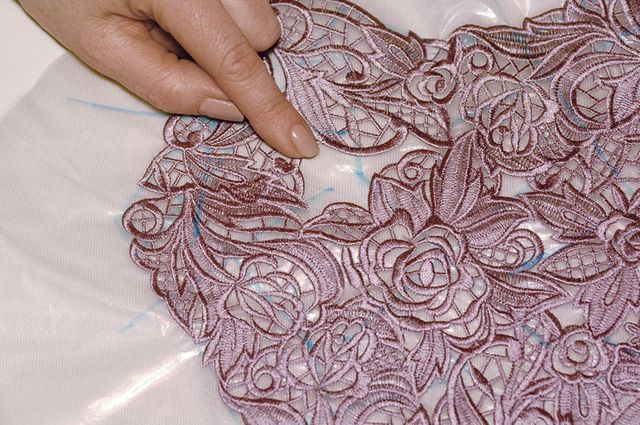
Individual motifs fit together jigsaw-style to create an original pattern. These six motifs at left were used in countless combinations sewn on tulle and sandwiched between water-soluble stabilizers to produce the allover lace shown at right.

![]()
First, choose appropriate embroidery designs
You’ll need an embroidery machine to make this lace and suitable embroidery designs, and there are many such designs available for most machines. If you want to download designs from the Internet , you’ll also need embroidery software compatible with your machine.
To create unique overall lace, you’ll need to use several separate designs in a variety of motifs and sizes. It’s not necessary to use freestanding lace designs per se, although there are many available. Such designs are intended to be sewn on water-soluble stabilizer and create an underlay of thread where needed as the lace is stitched out. These designs are suitable for the technique I describe here, but they take a little longer to sew because of all the extra thread work. Embroidery designs that are simply meant to be stitched on fabric are just as effective for creating lace, because, in my approach, they’ll be sewn onto a layer of tulle sandwiched between two layers of stabilizer (I’ll talk about that in a moment), and the tulle serves as the thread underlay. You’ll need designs with gently curved edges for the outside borders of your project. Although designs with pointed, angular outer edges aren’t suitable for the lace’s outer borders because they tend to curl up when a garment is worn, you can use this type of motif on the interior of the overall lace. In terms of the designs themselves, I think asymmetrical ones produce the most interesting effects; and you’ll also need some very small motifs to fill in gaps between larger designs.
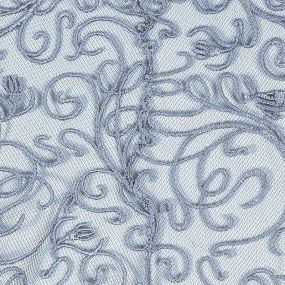
Choosing motifs for allover lace—A variety of embroidery designs can be used for allover lace, whether to create light, airy lace or a heavier fabric. In either case, some designs are more suitable than others, and beautiful lace depends largely on consistently combining motifs of similar visual weight. Note that a given motif may serve doubly for an edge and for interior space.
![]()

For an outside border, asymmetrical motifs with gently curved edges (noted in pink) work well, but pointed, angular edges make poor borders since they tend to curl up.
Asymmetrical designs with sharp curves beautifully fill interior space. Avoid designs that are too symmetrical or that have very large, open spaces.
![]()


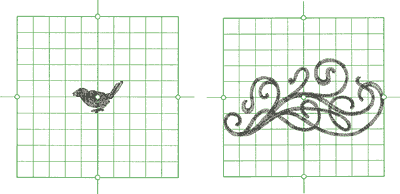
Small, asymmetrical motifs work best for fillers and should be irregular enough to be turned in any direction and look integrated into the surrounding motifs.
Too symmetrical Too round and open Too symmetrical
![]()
Adapt your pattern and make a test garment
Machine-embroidered lace is appropriate for many garments, but keep in mind when choosing a pattern that it takes time to produce. Use patterns with set-in rather than raglan or dolman sleeves, in order to avoid stitching out large pieces. Your pattern can have darts, but because they’re harder to sew than princess seams, I suggest a pattern with the latter if you want a closer fit. You may want to begin by trying small amounts of lace, such as an overlay on the front of a blouse or dress.
To adapt a pattern, eliminate the seam and hem allowances on the outer edges, where the lace will form a finished edge (facings are unnecessary), and keep the seam allowances on any edges where two pieces of lace will be sewn together. For a lace overlay, add an extra 3/4 in. to the length at the center front to add weight so the lace hangs nicely.
It’s always a good idea to make a test garment before investing time and money in the final project. To do this, cut out the major garment sections in inexpensive fabric and/or lace, eliminating seam allowances on the outer edges as described above. For a garment with a lace overlay, make the main part of the garment in muslin or fabric similar in weight to your fashion fabric, then attach the test lace sections to it at the seams. Try on the garment to see how the lace falls and if extra fabric is needed at the bottom and/or center front edges. Transfer any alterations to your pattern, trace a new pattern without the outer seam allowances, and you’re ready to make lace.
Prepare a base and make design templates
The embroidered lace is sewn on a base of nylon tulle, which is sandwiched between layers of water-soluble stabilizer. The tulle should be similar in color to what will be worn under the lace to keep it as invisible as possible, and the stabilizer should be heavy enough to smoothly support the embroidery. I prefer two different weights of stabilizer—one layer of heavyweight Romeo on the bottom and a layer of lighter-weight Verona on the top (both available from Pfaff dealerships or by mail from Universal Sew and Vac). Two layers of Sulky’s Super Solvy will also work, but the designs will “shrink,” or pull up, a little more. The heavy stabilizer is needed to support the lace and keep it from shrinking during stitching. Be sure to check the instructions that come with your stabilizer, and only combine products that share the same method for removal, which I’ll discuss in a moment.
![]()
![]()
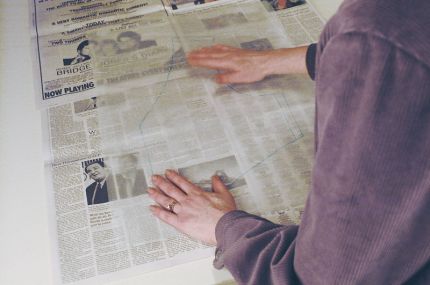
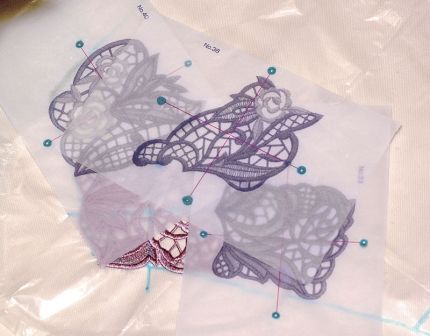
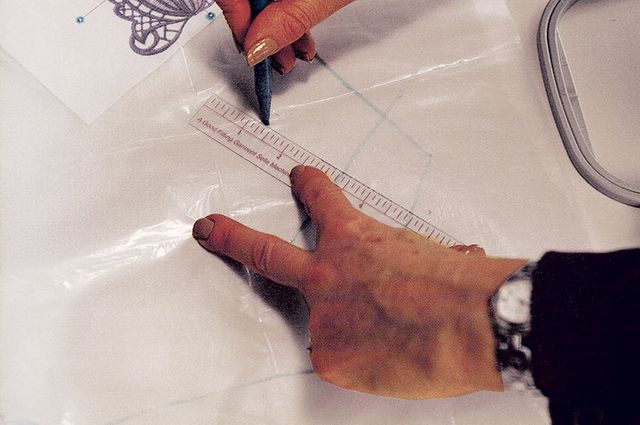
Preparing a base for the embroidery—Cut piece of nylon tulle about 3 in. larger on all sides than pattern piece. Cut two or more layers of water-soluble stabilizer same size as tulle. Place one layer of heavyweight, water-soluble stabilizer on newspaper and spray with temporary fabric adhesive. Place tulle on top and smooth out any wrinkles. Spray tulle and add second layer of lightweight, water-soluble stabilizer. Place pattern piece on top of sandwich, and trace outline with water-erasable (not air-erasable) marker, drawing in seam-allowance lines.
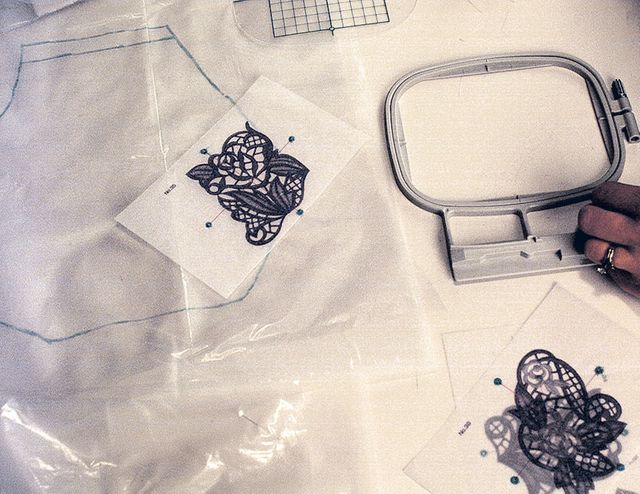
In order to accurately position the design motifs as you embroider, you’ll need to use a template for each design. In some cases, placement templates come with the embroidery cards, but if your cards don’t have templates, you can easily make them yourself by printing the design at actual size with your computer software. (Printing on paper will work, but, for a more durable template, use transparency plastic, available from office-supply stores.) You can also stitch out the design on a piece of inexpensive see-through fabric, like white ripstop nylon.
Templates ensure exact design placement—Positioning guidelines, called templates, are packaged with some, but not all, embroidery designs. If you don’t have a template, make your own by printing out each design motif on paper or stitching out a sample of each motif on see-through fabric backed with tear-away stabilizer that removes cleanly.
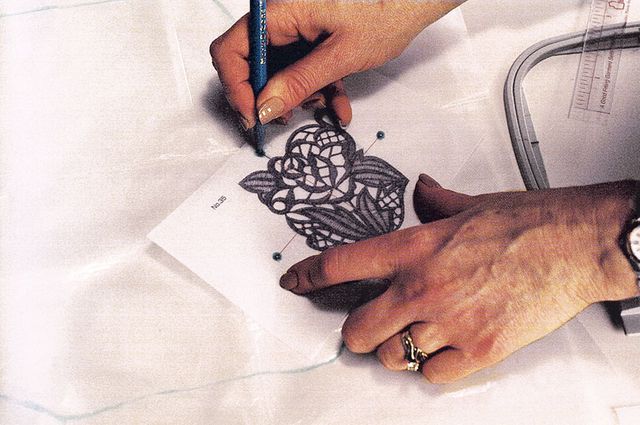
If you print out the design at actual size, it should have a cross-mark at what the designer has determined to be its center. Extend the legs of the cross-mark to create horizontal and vertical guidelines, or crosshairs, and mark a registration dot at the ends of each guideline.

![]()
If you stitch out a design for a template, trace around the hoop’s inside edge and draw horizontal and vertical guidelines that match the hoop’s centering marks with a pen or pencil before removing the hoop. Mark a registration dot as described above, and punch a small hole at each dot.
![]()
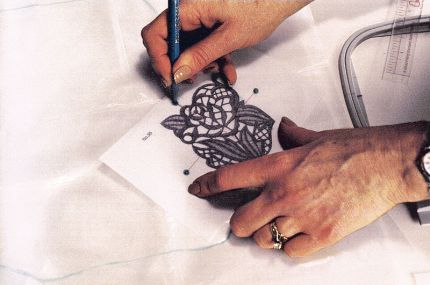
To use a template, place it on the tulle “sandwich” where you want the design to be and transfer the dots with a water-erasable pen to the stabilizer. Then connect the dots to create crosshairs, and mark the top of the design. Place the sandwich in the hoop, and hoop the fabric so the crosshairs align with the appropriate centering lines. If your hoop comes with a plastic grid for centering designs, place it in the inner hoop. Remove the grid if you’re using one before embroidering. Refer to the centering instructions with your machine manual for any fine points particular to your machine.
![]()
Building the lace
Now for the fun part: stitching out the designs and watching the lace grow. You’ll need a large quantity of embroidery thread. I used six to twelve 1,000-meter spools of rayon thread to make a short, fitted jacket, but a good-quality polyester or cotton embroidery thread works as well. (I prefer rayon for its sheen.) Use the same embroidery thread in the bobbin and needle so the lace will be attractive on both sides. To save time and prevent interruption as you stitch, wind several bobbins at once.
![]()
![]()

1. Begin embroidering on an outer edge: Choose point at center front or back and work out from there, mirror-imaging motifs as necessary. Position first design motif using its placement template (see Templates ensure exact design placement). Mark registration dots on tulle sandwich with water-erasable marker, then remove template and draw crosshairs on sandwich by connecting dots. Hoop sandwich so crosshairs line up directly with centering lines on hard plastic grid that comes with your machine’s embroidery hoop. Sew out design.![]()
![]()
2. Position the next motif: Use its template to position second motif to touch or slightly overlap first. Work matching sections at same time so edges are symmetrical. Continue embroidering designs on garment’s outer edges, then work across rest of section, positioning motifs to touch or overlap adjoining designs, fitting designs together jigsaw-puzzle style. Lace shrinks some as you embroider, so periodically check size using original pattern piece, and extend edges as needed. Fill in seam allowances, adding 1/2 in. to each for possible shrinkage when stabilizer is removed.![]()

3. Fill in any small holes between motifs: Use small embroidery designs or decorative stitches on your machine to fill in gaps.
Lay out the prepared tulle sections and determine where to place the first design. Always start at an edge, for example, at the center front or center back. Use the template and position the design on the stabilizer base. Mark the registration dots on the base with a water-erasable marker, remove the template, and draw in the crosshairs. Embroider the first design, then choose the next motif and use its template to position it so it touches or slightly overlaps the first motif. Overlapping is perfectly acceptable and gives the finished lace a more cohesive appearance. If the motifs don’t quite touch at any point, you can fill in later.
Complete the outer edges at one end of the pattern section, then start to fill in the rest of the section, positioning and sewing additional motifs so that they touch or overlap the previous ones. I like to work at the same time on garment sections that match, mirror-imaging the designs as I go so the outside edges are symmetrical. If you own an extra hoop, you can speed things up by positioning one design while the machine is stitching out another. I select the interior motifs at random and fit them together like the pieces of a jigsaw puzzle. I don’t want symmetry on the interior areas because a random selection of motifs makes a lace more unique.
Keep in mind that as you add designs, the section may shrink slightly as the stitching pulls up, although a heavy stabilizer helps to prevent this. Use your original pattern piece to check periodically whether you need to redraw the outside edges of the piece. Be generous at the seamed edges, extending them 1/2 in. or so beyond the normal 5/8-in. seam allowance so you’ll be covered if the lace shrinks slightly when the stabilizer is removed.
When the embroidery is complete, there are usually still some gaps where the motifs did not touch or overlap. Fill in the spaces with very small motifs, or use one or more of your machine’s decorative stitches (any vine pattern works well). Check the stitch candidate by sewing a sample on the excess tulle/stabilizer surrounding the garment pattern outline.
Follow directions to remove the stabilizer
When the embroidery is complete, cut away some of the excess stabilizer and tulle, leaving about a 1-in. border. Check the instructions that came with your stabilizer for the appropriate water temperature required to remove it. This temperature can vary from product to product; if you use the wrong temperature, the stabilizer is more difficult to remove. Rinse each piece of lace, soak it for several hours, then thoroughly rinse it again in running water. If all the stabilizer doesn’t come out, soak and rinse the piece a second time. Blot it gently with a large towel and lay it flat to air-dry. If the lace is sticky or stiff, you probably haven’t removed all the stabilizer, so repeat the process until the lace is soft and supple. Press the lace from the wrong side on a thick towel using a wool setting, steam, and a press cloth. Finally, trim the excess tulle along the outer edges using small, sharp embroidery scissors.
Construct the garment
Before seaming the lace sections, use the pattern to check each piece and verify its size. If there has been shrinkage, you can increase the size of the pattern section by just placing additional tulle and stabilizer under the area that needs enlarging, hooping the area, and then embroidering more motifs.
Lace sections can be seamed together almost invisibly by overlapping sections along seamlines and zigzag-stitching edges in place from both right and wrong sides before trimming the excess.
![]()

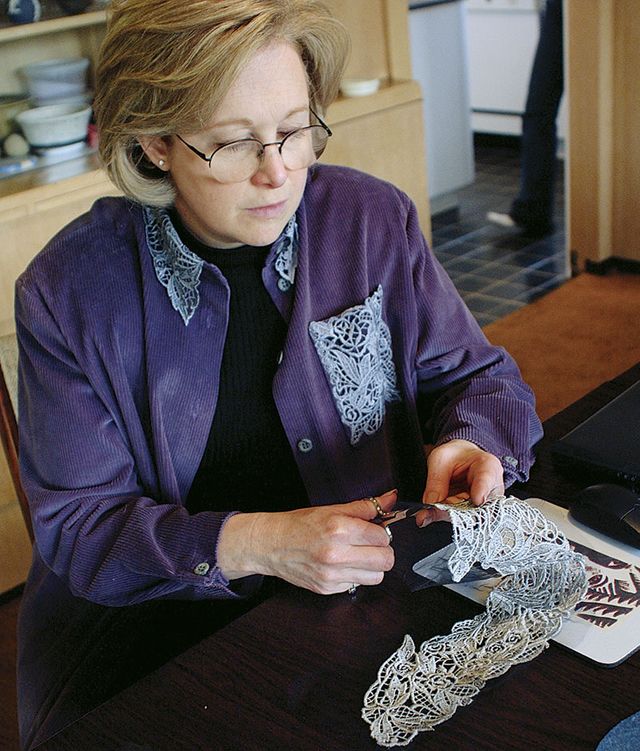
The author trims excess tulle along stitching at lace’s outer edges, using small embroidery scissors.![]()
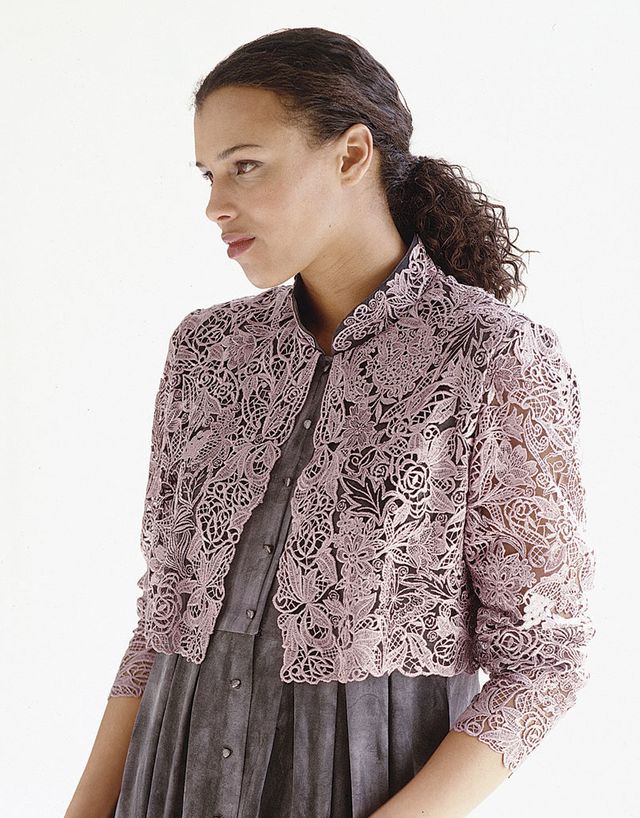
My favorite ways to use this allover lace are either as an overlay over another garment or for an all-lace garment. When using the lace as an overlay, I incorporate the edges where it will be attached into the garment’s appropriate seam allowances and join the two with a conventional seam. I find it helpful to hand-baste the lace to the other garment fabric within the seam allowances before sewing.
To invisibly sew lace to lace, let the motifs extend beyond the seamlines. Hand-sew a marking line along each seamline with long straight stitches, then overlap the sections, matching the seamlines. Baste the sections together with a contrasting thread and remove the marking stitches. Thread your sewing machine and bobbin with embroidery thread, and sew along the edges of the most prominent motifs using a zigzag stitch that’s 1.5mm wide and 1.5mm long. Trim the top layer close to the stitching. Turn the piece over, and stitch along the edge of the same motif from the wrong side. Then trim the underlayer close to the stitching.
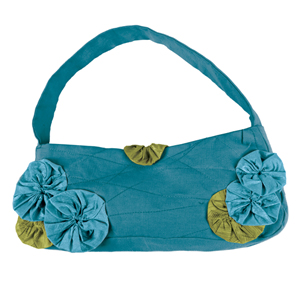
I think making lace is one of the more exciting things you can do with a home-embroidery machine. Whether you use the lace in a garment or an accessory for your home, it looks so great that it’s hard to believe you made it yourself.
Barbara Skimin sews in Huntington Woods, Mich., and teaches at a local machine dealership. She is the author of My Custom Stitch (Sew Spectacular Press, 1999), which is available from Brother dealers.
From Threads #98, pp. 66-71
Photos: Sloan Howard and Mary Ray; drawings: Karen Meyer and Carol Ruzicka


Very nice hope to try onday soon
I have just joined this site and I will be looking at it daily. It is informative and full of beautiful ideas. Thank you so much.
I am baffled. There ought to be a free download of the embroidery design here, according to my hard copy magazine, but I can't seem to find it anywhere!
Please help!
I would like to tell you that this write-up is awesome, great written and include almost all important info btw i have created my own Embroidery Library here you can see creative and unique stuff.Hope you like it.
I'd love to know the sewing pattern used in the first picture.