
Mimic Crazy Patchwork with Your Sewing Machine
Learn how to use your sewing machine's decorative stitches to make crazy patchwork garments.
Today’s sewing machines make crazy patchwork easy to do because many offer an extrawide zigzag stitch, which looks akin to hand-worked stitches. They also provide standard options to simplify and perfect each stitch, like mirror-imaging a stitch pattern or offering quick memory access to a previously sewn pattern. But even if your machine has only a few decorative stitches, you can still have fun with crazy patchwork.
I’ve been fascinated with crazy patchwork ever since I helped with a quilt show in my community a few years ago. Among the treasures brought in for display, two crazy quilts in particular caught my eye. The colors, textures, and memories stitched into these quilts were vibrant. And, after examining the traditional hand-sewing techniques used to create them, I decided to draw on my background in machine sewing to duplicate this work using the many decorative stitches available on my machine.
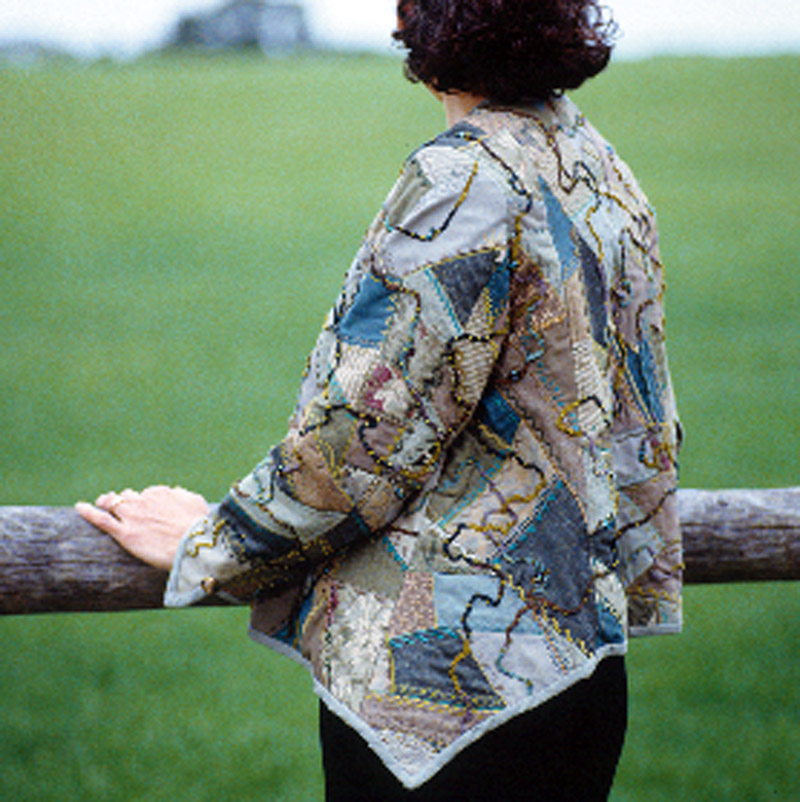
Decorative machine stitches worked in a variety of threads mimic traditional hand-embroidered stitches. The allover patchwork jacket (Vogue 2232) below is a combination of programmed machine stitches and a few hand-sewn touches, like beading, ribbonwork, and French knots.

Choose a kaleidoscope of fabrics or pick a theme
Part of the fun of this technique is selecting the fabrics, threads, stitch patterns, and other embellishments. I’ll talk about thread and stitch options in a moment, but start designing your garment or other project by first choosing the fabric.
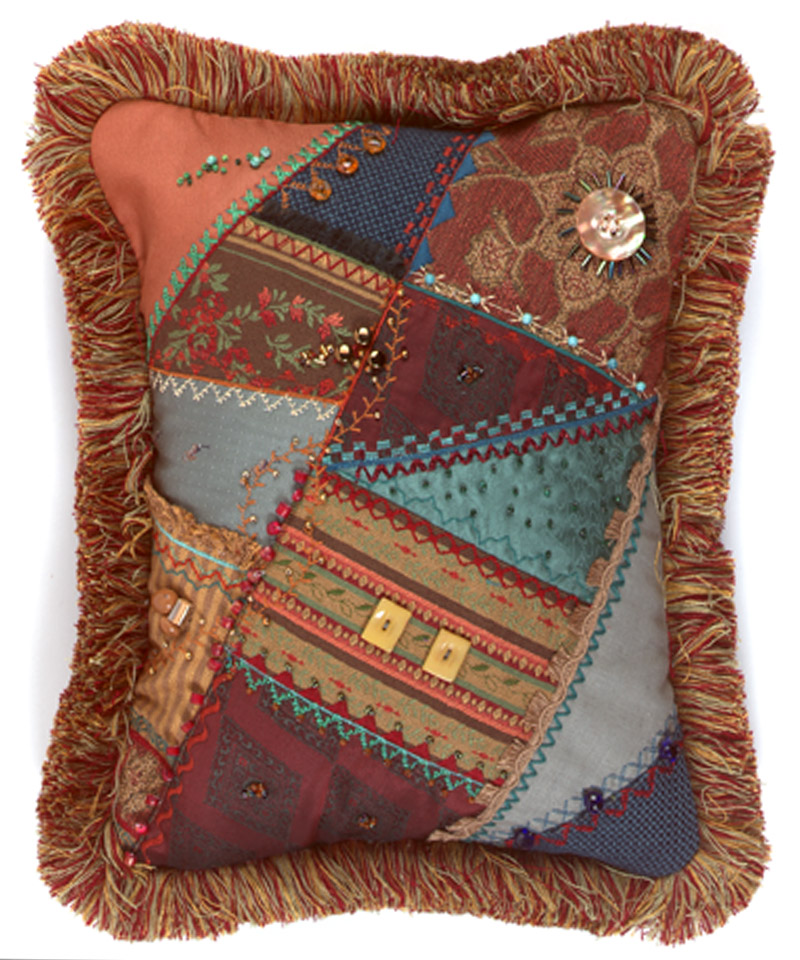
![]() For traditional crazy quilts, choosing fabric often involved a scrap-bag approach—using bits and pieces of fabrics in various colors and types. This method resulted in an assortment of values, intensities, and textures that, although appealing, may not be the look you want in a garment. A more contemporary approach to crazy piecing is to follow a color scheme or choose fabrics that are all similar in type. For example, you might design a garment using only fabric from men’s ties or loosely woven textured fabrics or opulent fabrics, like velvet and brocade. I suggest avoiding heavy or bulky fabrics, because the seam allowances will get too thick and the decorative stitches may fade into the dense fabric. However, when you choose fabrics that are very thin and silky, you may want to apply a fusible-knit interfacing to the wrong side of each one before cutting it out in order to give it more body to support the decorative stitches.
For traditional crazy quilts, choosing fabric often involved a scrap-bag approach—using bits and pieces of fabrics in various colors and types. This method resulted in an assortment of values, intensities, and textures that, although appealing, may not be the look you want in a garment. A more contemporary approach to crazy piecing is to follow a color scheme or choose fabrics that are all similar in type. For example, you might design a garment using only fabric from men’s ties or loosely woven textured fabrics or opulent fabrics, like velvet and brocade. I suggest avoiding heavy or bulky fabrics, because the seam allowances will get too thick and the decorative stitches may fade into the dense fabric. However, when you choose fabrics that are very thin and silky, you may want to apply a fusible-knit interfacing to the wrong side of each one before cutting it out in order to give it more body to support the decorative stitches.
Allover patchwork or just an accent?
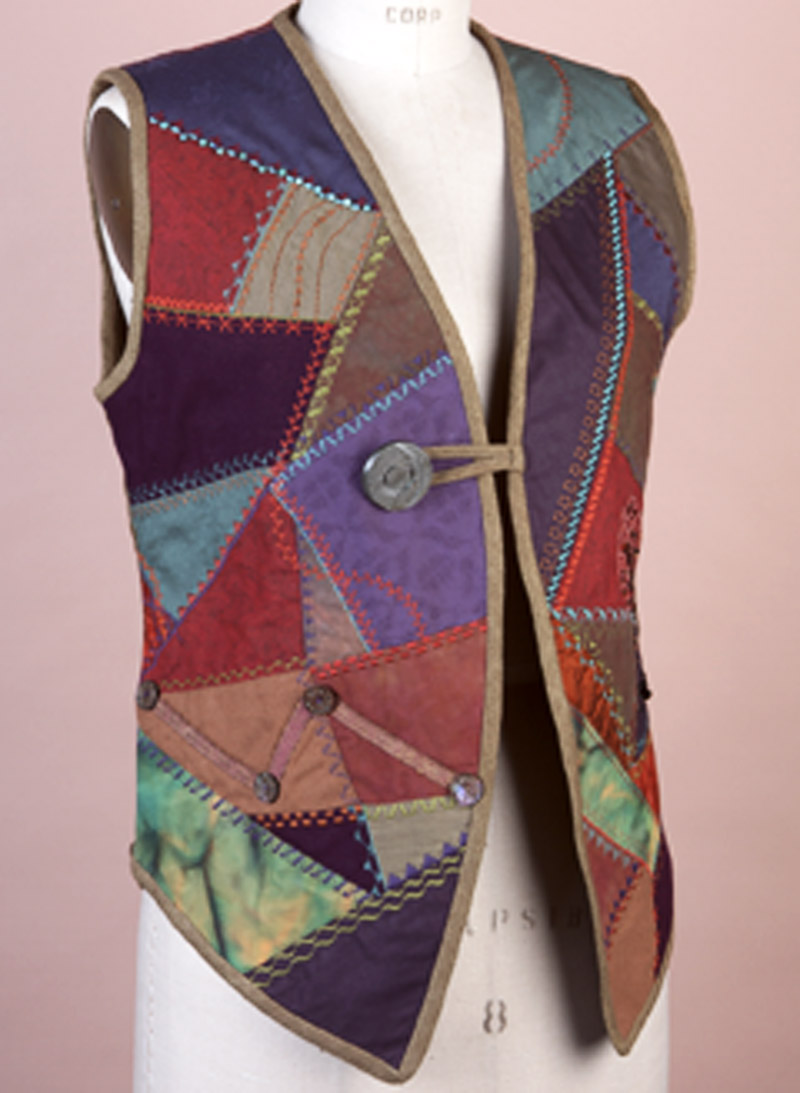
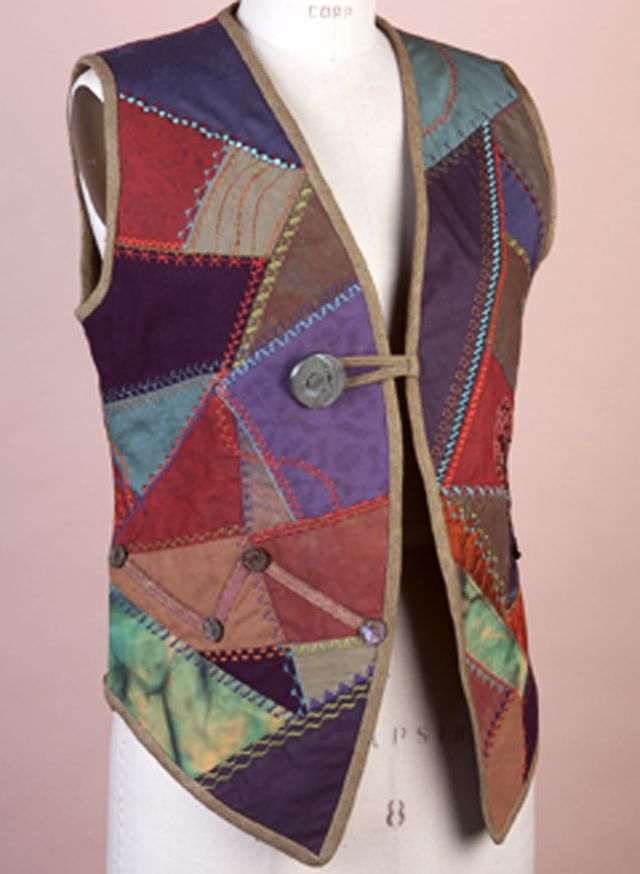
![]() Although making crazy patchwork is faster and easier by machine, it’s still an ambitious project if you piece a whole garment. So you might want to embellish only a small pattern section, such as a yoke, or add patchwork to a larger section, for example, around the neck or down the center front, as I did in the vest here. In this case, I think it’s best to carry the piecing from front to back, over the shoulder and/or around the side for continuity, as I’ll explain in a moment.
Although making crazy patchwork is faster and easier by machine, it’s still an ambitious project if you piece a whole garment. So you might want to embellish only a small pattern section, such as a yoke, or add patchwork to a larger section, for example, around the neck or down the center front, as I did in the vest here. In this case, I think it’s best to carry the piecing from front to back, over the shoulder and/or around the side for continuity, as I’ll explain in a moment.
The best patterns for allover-patchwork garments are styles with dropped shoulders (rather than set-in sleeves), jewel necklines, or shawl roll collars in order to avoid bulky seams in close-fitting areas. Choose patterns with few pieces and simple construction. And, if you haven’t made the pattern before, pin-fit the pattern tissue or make a muslin before sewing the garment.
Straight-stitch machine appliqué speeds up piecing
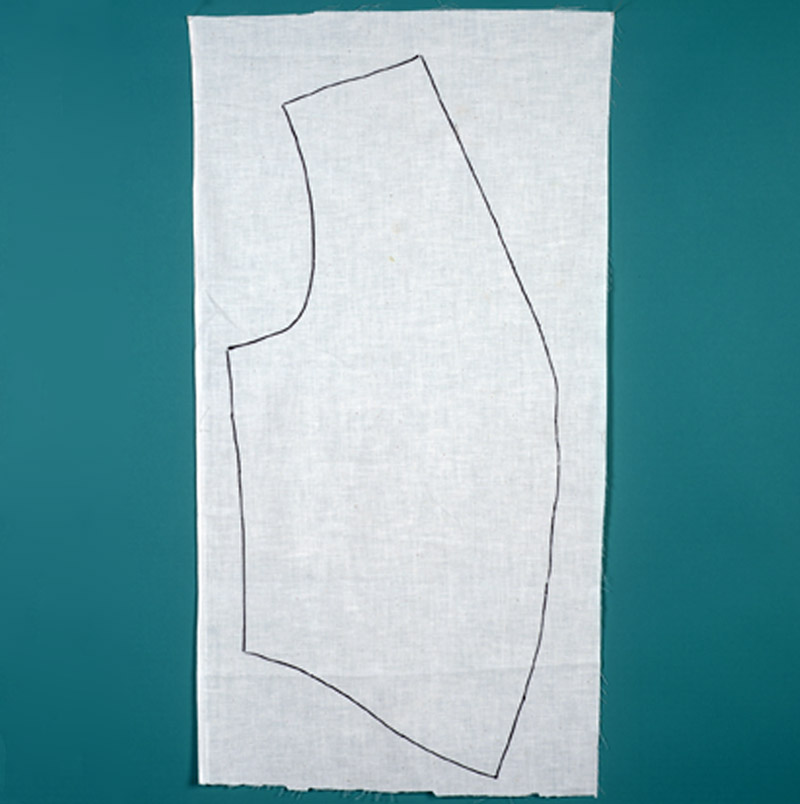
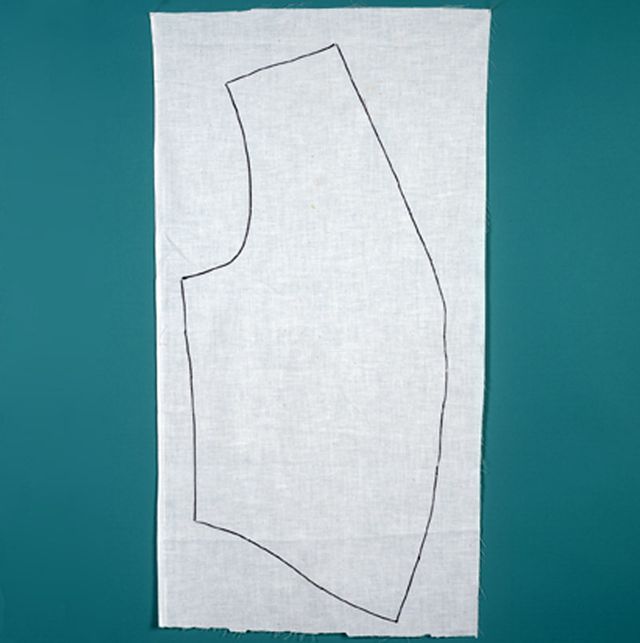
Crazy-quilt patchwork is a marriage of irregularly shaped fabric pieces and embroidery sewn to a fabric foundation. For allover pieced garments, I use a lightweight muslin for the foundation and cut a rectangle of muslin for each front, back, and sleeve, about 1 inch larger all the way around than each pattern shape. I trace the outline of each section to its corresponding rectangle and use this outline as a guide for placing the pieces, extending the patchwork just beyond the lines (see “Create crazy patchwork on a foundation fabric,” below). When I’ve finished piecing and embellishing each area, I pin on the tissue pattern and cut the shape.
Create crazy patchwork on a foundation fabric
After tracing an outline of the pattern piece on a muslin foundation, as shown, crazy patchwork by machine involves a three-step process.
![]()
![]()
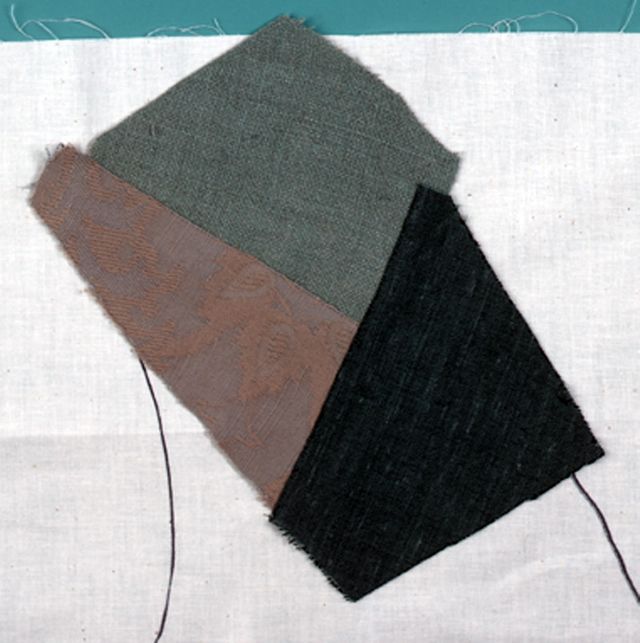
1. With a selection of random, straight-edged fabric pieces, place one piece face up at the pattern’s top corner. Press under an edge on another piece and cover one raw edge of the first piece. Repeat to cover the pattern shape and all raw edges within it.
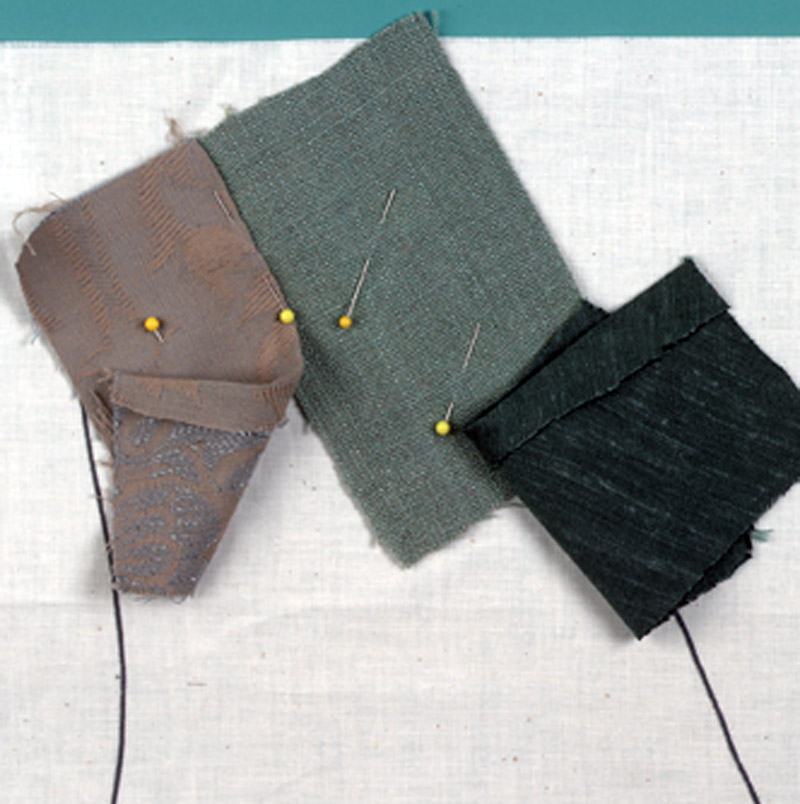
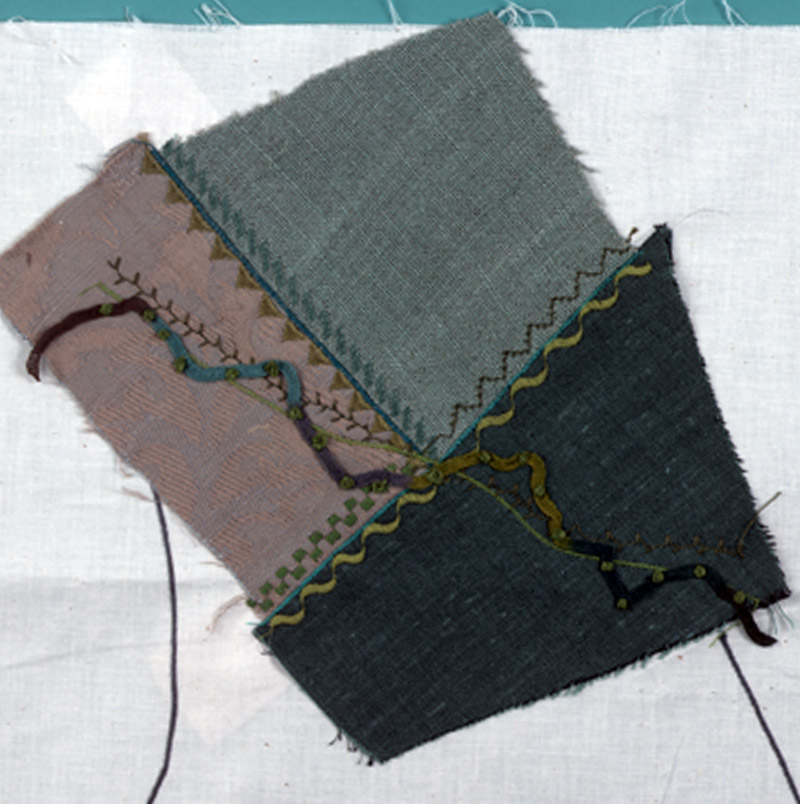
2. Edgestitch along each pressed fold, using thread that blends with the fabrics so it won’t detract from the decorative stitching in step. Trim excess fabric from covered edges to reduce bulk.

3. Embellish the edgestitched seams with a variety of decorative machine stitches, and optionally add hand-stitched embellishments, like ribbon and beads.
If I plan to embellish only a small section of a garment, the actual garment fabric is the foundation. I cut and mark the rectangles in the same way, chalking the area to be pieced on the fabric. But if the patchwork is meant to flow over a seam, as, for example, at the shoulder, I cut the adjoining sections along the shoulder cutting lines only, and stitch the seam as usual. And I always staystitch a neckline or other curved area before I piece to prevent stretching.
To make the patchwork, cut your fabric into random, angular shapes of various lengths and widths, but approximately 2 inches by 4 inches in size. Start at a top or bottom corner of the marked pattern piece and place one fabric patch right side up on the foundation. Choose a second piece, press under a 1/4-inch seam allowance on one edge, and place the pressed edge over one raw edge of the first piece. Pin both fabrics to the foundation. Continue adding pieces in this way until the foundation fabric is covered with pinned patches whose raw edges are all covered. Check under each piece as you go, trimming excess fabric from the covered edges to 1/4 inch to reduce bulk and shadowing.
When all the pieces are pinned in place, topstitch along the folded edges using a straight stitch and regular sewing thread in a color that blends with the fabrics. To press, turn the completed pieced section face down on a soft surface, such as a towel. I add body to the fabric by lightly spraying the wrong side with starch or spray sizing before I press.
Decorative machine stitches define the look
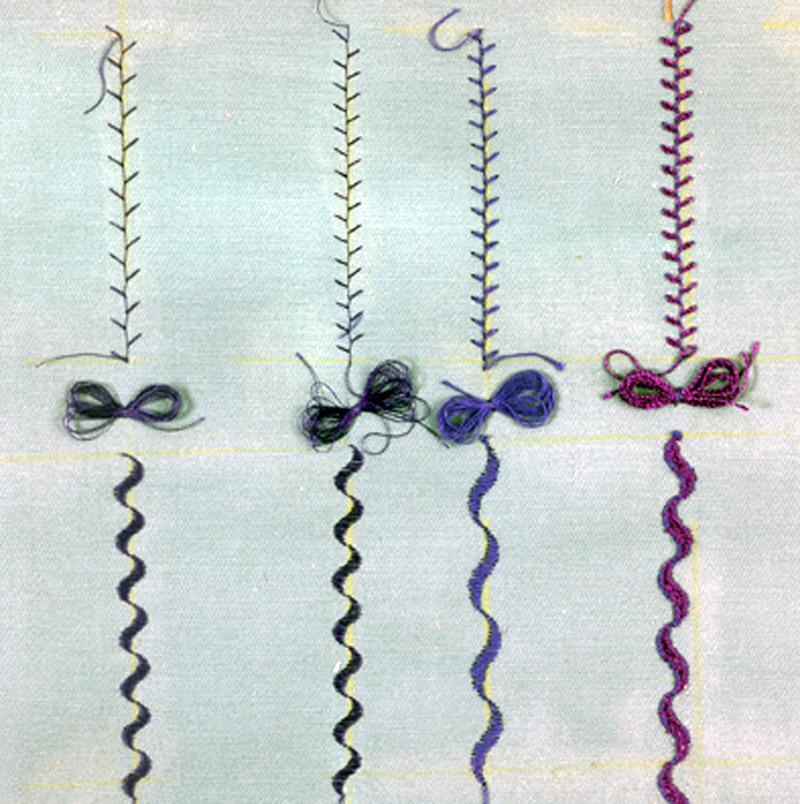
![]() To embellish your crazy patchwork, start by exploring the stitch patterns on your sewing machine. Stitches vary from model to model and are more elaborate in top-of-the-line machines, but even a basic roster of stitches can give you more options by changing the width and length of each stitch.
To embellish your crazy patchwork, start by exploring the stitch patterns on your sewing machine. Stitches vary from model to model and are more elaborate in top-of-the-line machines, but even a basic roster of stitches can give you more options by changing the width and length of each stitch.
I group machine stitches into seven categories:
(1) utility stitches, like straight and zigzag;
(2) traditional embroidery stitches with the look of hand-sewn stitches, like blanket, briar, and feather stitches;
(3) thick, compact stitches, like solid ovals and diamonds;
(4) edging stitches that fall to the left or right of the needle;
(5) multi-motion stitches, like florals and animals;
(6) alphabets;
(7) very wide flora, fauna, and alphabet units.
All of these stitches can be used to embellish crazy patchwork, but I think it’s best to focus on a small selection of stitches for each project (for example, a group of geometric patterns).
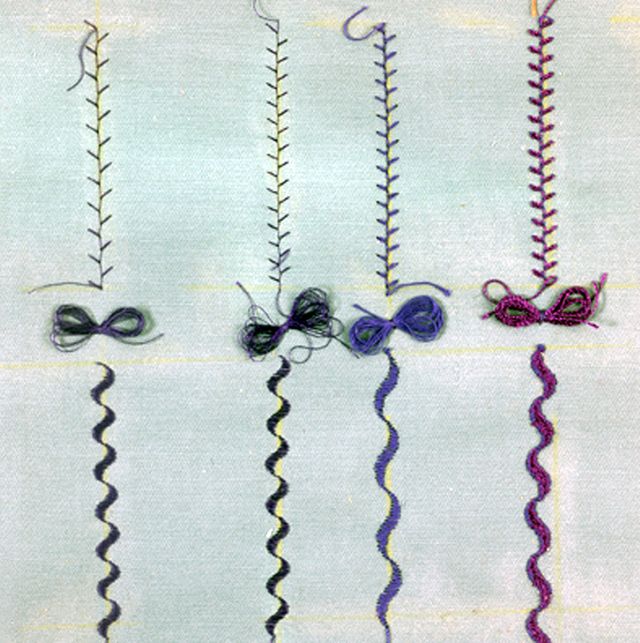
Partner the stitches with decorative threads
Choosing an assortment of threads in colors that blend with your fabric for subtle embellishment, and/or contrast with it for more impact, enhances the variety of stitches. In addition to the array of colors available nowadays, thread comes in many types (see “Choosing Machine-Embroidery Threads” by Sharee Dawn Roberts, Threads #91, Oct./Nov. 2000). Lightweight thread, like cotton and rayon machine-embroidery thread in a 30 weight or 40 weight, is suitable for all decorative stitches, even complex stitches that work with a forward-backward and/or side-to-side sequence. Medium-weight threads, like topstitching and metallic threads, are best for stitches that sew forward in a simple repetitive sequence. And threads and ribbons that are too thick to feed through a needle can be used in the bobbin to create bobbin-work embroidery that’s stitched from the wrong side of the fabric. Just changing the type of thread can add depth, texture, or sheen to the simplest stitch pattern.
Organize the stitching process
To simplify the embellishment, sort your stitch and thread choices into groups, matching threads that require bobbin thread (extrafine, neutral-colored thread designed for use in the bobbin) and the same size needle, so that once you load the bobbin case and have a needle in place, you need only change the upper thread and stitch settings. You can then move across the patches, completing all the stitches in one thread before moving on to the next. Always start with a new needle, taking care to select one that’s right for your thread type, and be sure the machine and bobbin case are free of lint.
The decorative stitches in traditional crazy quilting are sewn along the patchwork’s seamlines. I like to sew a row of stitches on each side of the seamline, and sometimes add a row of satin stitches on the seam as well.
If the stitches pucker as you sew, try lightly spraying the wrong side of the fabric with spray starch or use a narrow strip of tear-away stabilizer under the seam, trimming it away when you’ve completed the stitching. And to secure the stitches at the beginning and end of a row, either lock the stitch by sewing with a zero-length and -width setting for three to four stitches, or leave a thread tail, pull the upper thread to the wrong side, and knot it off. You may want to add additional details to your project, like beads, buttons, or ribbons. It’s best to add them by hand after you’ve completed the machine embellishment.
Binding is the ideal edge finish
To finish the inner edge of a small area of patchwork, you can turn it under and decoratively machine-stitch it in place, or you can cover it with appliquéd bias binding: Right sides together, machine-sew one edge of the binding to the patchwork, using a 1/4-inch-wide seam allowance, then fold under and hand-stitch the binding’s other edge to the garment. To finish an outer edge, bind it with a 1/2-inch-wide bias binding in a complementary fabric. But before binding the edges of a garment, use your pattern to cut a lining, choosing a lightweight, slippery fabric if you’re making a jacket so it slides comfortably over what you’ll wear underneath it. Stitch the seams of the lining; place the wrong side of the lining to the right side of the jacket; pin it in place; and attach the binding. If the jacket needs a button, use a loop buttonhole instead of a conventional one, so you don’t have to cut into the patchwork.
Crazy patchwork is a beautiful way to display your machine’s stitches. I’m hooked on it. If you try it, maybe you will be, too.
This article by Alice Kolb was first published in Threads #96, pp. 40-43. Alice is the author of Crazy Quilt by Machine (American Quilter’s Society). Model photo by Jack Deutsch; other photos by Sloan Howard.


Great instructions. Beautiful result. I might have to revisit crazy patchwork again. You've inspired me :-)
Birgitte
http://www.SewDanish.etsy.com
Scandinavina Textile Art, Unique Handmade Supplies
I have done jackets similar to this with a sewtshirt foundation or a man's shirt, but any foundation will do.This is a wonderful addition to what I have done. I am wondering if anyone could custom make these jackets and be able to make any money doing it. I notice the t-shirt quilts with the shirts supplied by the customer are being posted on Ebay. Does anyone know if there is a market for the jackets, maybe under the same idea? Customer makes a down payment, selects the fabrics and sends them to me. It could also be a memory thing with favorite clothes, baby clothes, wedding fabrics etc. I don't want to reinvent the wheel, could use some extra money, but will not volunteer my time if there's nothing to be made. I will volunteer sewing at a shelter or something. Let me hear of your experiences.
While I don't have any direct experience selling custom clothing, I do have with quilts. My husband and I owned a tourism resort. I decorated the cottages with quilts, wallhangings etc. of my own making. Regularly had inquiries for custom work. When I quoted the cost of the fabric only, without any of my time included, the one common remark was "I didn't know it cost so much".
People who can, do, those who can't try to buy as cheaply as possible. You might like to try making something for yourself. Keep track of the time involved and cost of materials, then you'll have a rough idea of what you would have to charge and if you have a market for such a product.
Another point to consider is people's reaction to the finished product. If you work from a provided selection of materials and don't use them in the way the customer thinks they should be used, how does one deal with complaints of the "you ruined my expensive fabric.. ". I learned an interesting lesson when I once made a queen size quilt as a wedding present. It was received with a thank you and only several years later did the now divorced "bride" comment that she had taken up quilting and only now realized how big a project such as her present had been. I offer these as points for your consideration before you invest your time.
I just love clothing tutorial that show how it is easy to make you’re your own dress style!