


Stencilling is an incredibly easy and open-ended embellishing technique. It can be used to add detail to, help harmonize, or totally transform any sewing project.
by Diane Ericson
from Threads #73, pp. 64-69
If I had to pick a favorite embellishing technique from the many I love, I wouldn’t hesitate. Stenciling would get my vote every time. It’s both incredibly easy and totally open-ended: just cut any shape out of a thin sheet of plastic, then sponge fabric paint through the hole to print the shape onto your fabric or garment. There are so many variations to this simple formula that I can’t imagine running out of new ways of using it to add detail to, help harmonize, or totally transform any sewing project, as I did with the garments shown here. Since I’ve already written an introductory stenciling article for Threads (No. 28, pp. 68-73, reprinted in Taunton Press’s book Techniques for Casual Clothes, 1994), I’ll just recap the basics so we can get right into the stenciling ideas I currently find most interesting.
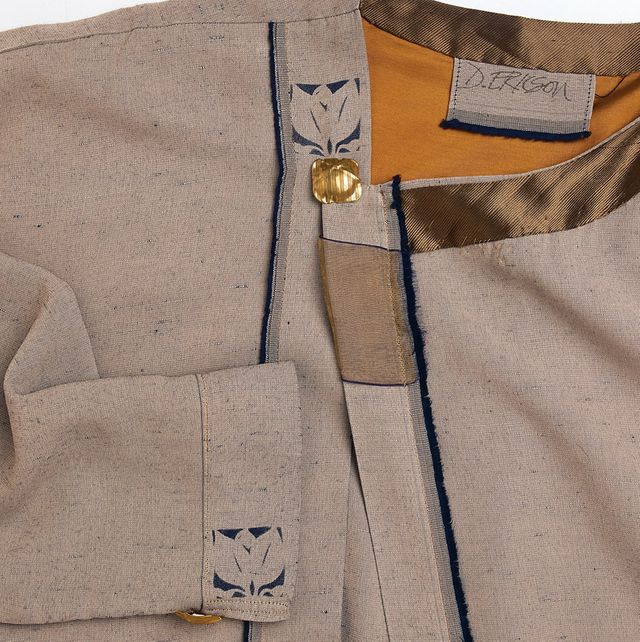
One or two well-placed stencils can create emphasis and focus rather than texture or pattern (pattern: The Sewing Workshop’s Japanesque Top, 800-466-1599).

Fabric paint, sponges, and a stencil or two
![]()
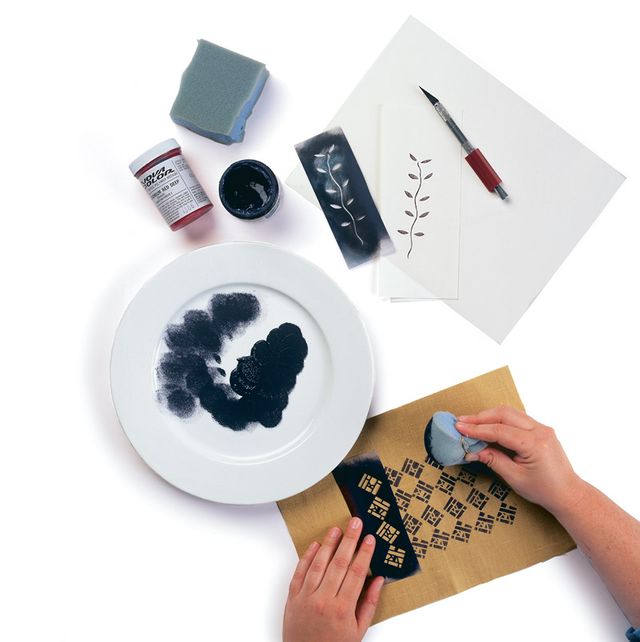
 Simple, quick, endlessly versatile, cleans up with water, and fits in a shoe box— what more could you ask from a fabric-printing process? Stenciling requires nothing more than a few sheets of inexpensive acetate for cutting stencils, fabric paints, and a few sponges. The tools you need are almost completely summed up in the heading you’ve just read, and they’re all easy to come by. You can see them in the photo at right. I mostly use any of three brands of water-soluble, iron-to-set fabric paints, Createx, Novacolor, and Versatex (see Stenciling resources), which are sold widely; applied thinly, they won’t stiffen your fabric. The best sponges are made from dense foam (good sources are pillow forms or scraps from an upholstery shop) so the textures they make when printing are smooth. My favorite stencil material is a thin, clear sheet of inexpensive acetate, available from any art or drafting supplier; specify a thickness of .005 mm (clear report covers from an office supplier work well and are inexpensive). Thicker sheets interfere with the printing and thinner sheets curl up when dampened.
You’ll also need an X-acto knife to cut the stencil, and something to cut on. I prefer a small, thick piece of glass with smoothed edges (from your local glass shop), but a cutting mat or even a stack of newspapers will do. Add a few plates on which to mix your paints, some water and paper towels, a fabric or garment to work on, and you’re ready to design a stencil and start printing.
Designs to copy are everywhere
So, what will you print? First of all, there’s no reason to design your own stencils (unless you want to), since there’s so much excellent copyright-free material available for copying and tracing (see Stenciling resources). But surprisingly, it almost doesn’t matter what shapes or images you choose to make stencils from, because it’s so easy to get a wide range of interesting and surprising results from very basic shapes and by combining virtually any two or more stencils, using techniques I’ll be showing you. So don’t be too concerned about what images you start with. Just pick (or draw) a few simple black-and-white shapes that appeal to you and make photocopies of them.
The most important thing is that your images are shapes with distinct outlines that will translate well into holes you can cut out of your stencil plastic, because the holes in the stencil will be the positive, printed shapes in the design. The uncut part of the stencil material will be the background, or nonprinting portion, of the design.
The other key thing to remember is that you can’t have any unconnected nonprinting areas floating inside other shapes (like the hole inside a donut), because nonprinting areas are actually the stencil material, which has to be all one piece, no matter how complex. Take a close look at each of the stencils shown here and you’ll see what I mean. When you start printing, you’ll discover that the shapes you leave between cut-out areas are just as interesting as the holes, so think about the design of these “bridges,” or boundaries, between holes as you cut, too. Boundaries can be thick, thin, simple, or complex, and they usually look best if they’re not all the same width.
Stenciling in a nutshell
![]()
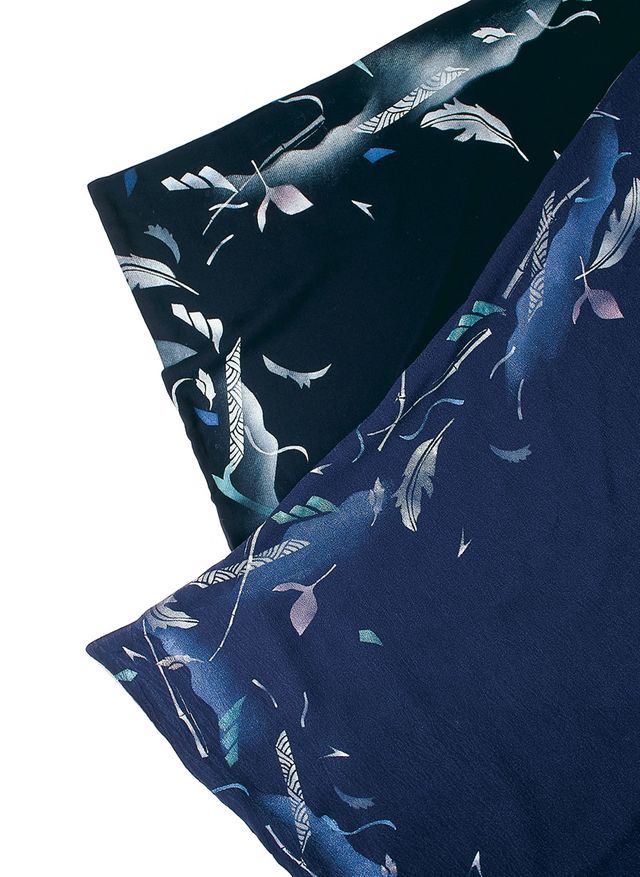
 Cut a few curves from paper or acetate, then sponge along the edge to make the one-side-sharp, one-side- soft, light- over-the-hills patterns you can see in the background of these two scarves. Okay, you’ve got your materials and a few images to cut out. Start by taping a piece of acetate about 2 in. bigger all around than your image on top of a photocopy of it (so you don’t cut the original), then put the pair on your cutting surface. Cut right through both layers to your cutting surface, cutting away from any corners so you don’t overcut. If you do, just put a piece of clear tape over the miscut and recut the lines you want. When all the positive shapes, or holes, are cut away, the stencil is ready.
Stenciling takes very little paint. Spoon just a bit of each color you want onto your plate, wad the sponge into a ball and touch it to one or more colors, then dab repeatedly onto a clean part of the plate in order to mix the colors and cover the sponge evenly. (If you’re working with heavy fabrics, you may want to slightly dampen the sponge beforehand, but be sure to squeeze it in a towel until it’s almost dry.) Holding the stencil gently but firmly on top of the fabric or garment (you might try pinning it down if you’re covering a large area), pat firmly through the holes, leaving a light layer of paint behind. Notice that you can easily build up more paint in some areas than others, which can create exciting variations.
Smooth fabrics print the sharpest outlines and clearest details with the least paint, but for best results, always print lightly, building up multiple layers if you want more coverage. To get the brightest colors on darker fabrics, try printing first with white paint, letting it dry, then adding colored layers. Try printing over both wet and dry layers of paint, and adding more or less water to both thin and soften the colors and blur the edges you leave.
When the paint dries, set it with heat from an iron so it can withstand washing or dry-cleaning, as described in the instructions that come with the paint. Most of the paint will lift off the stencils after soaking in warm water (pat, don’t rub, between paper towels), but they don’t have to be spotlessly clean before using them again. That’s it for instructions! Everything else is just variations and imagination, as you’ll soon see.
Layering stencils for effect
The focus of my current approach to stenciling is exploring how wide a range of effects I can get as I apply paint to fabric. Layering and the other techniques I’ll discuss are a few of the most provocative ideas I’ve come up with. I hope you’ll enjoy experimenting with them as much as I have.
![]()
 Use one stencil to frame another for endless varied patterns from a few stencils. Photo: David Page Coffin. Over the years, I’ve amassed a large collection of stencils, but I still use some of the very first designs I cut. One thing that keeps these old images fresh and interesting is the idea of printing through more than one stencil at a time by layering one stencil over another, so that the shapes of one stencil “frame” the shapes of the other, creating new shapes.
The easiest way to start layering is simply to place another stencil over one you’ve just printed through, before you shift the first one, then printing again with a contrasting color, as in the example in the photo above. Print lightly each time, so the resulting layers don’t build up excessively. If you want to plan the framing effect beforehand, you can hold the framing stencil up to the light and move other stencils over it until you like the effect. Then lay both stencils down together and print. You can either print through each stencil successively, as described above, or print through both layers at once, which will show just the cut-off or masked version of the stencil with the smaller holes.
As I caught on to the possibilities of layering, I began to assemble a collection of basic shapes, which I use to frame or mask other, usually more complex, stencils.
Masking
![]()
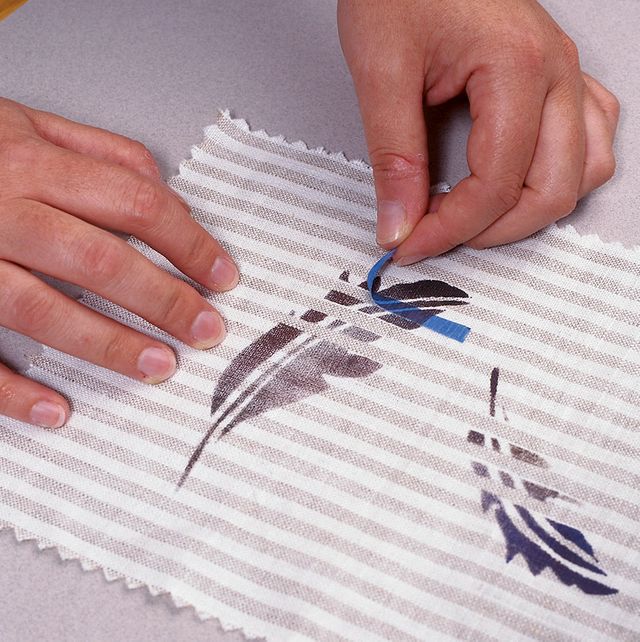
 A few strips of tape on the fabric can mask areas you don’t want to print. Tape over stripes to give the effect of motifs behind them. Photo: David Page Coffin. There are lots of other ways to use only part of a stenciled shape that all come under the loose heading “masking.” You can simply cover part of a stencil with one or more strips of tape, paper, or plastic to eliminate portions of the design. If you just cut a straight or curved edge from paper or plastic, you can print a feathered edge that’s masked on only one side simply by fading out the paint as you print away from the sharp, masked edge, as you can see in the border designs below. Plastic is, of course, more durable and a better choice for shapes you want to repeat or use again later, but paper works fine for one-of-a-kind inspirations. A torn paper edge can provide a soft, organic printed edge that’s difficult to get any other way.
Masking also describes the technique of covering parts of the fabric, perhaps with tape, before stenciling over it, so that, again, only a portion of the design prints. This can work very well when printing over already patterned fabrics, such as the striped example above, in which strips of tape allowed me to give the suggestion that the stenciled design is peeking out from behind the fabric’s stripes.
Stenciled bands and patches
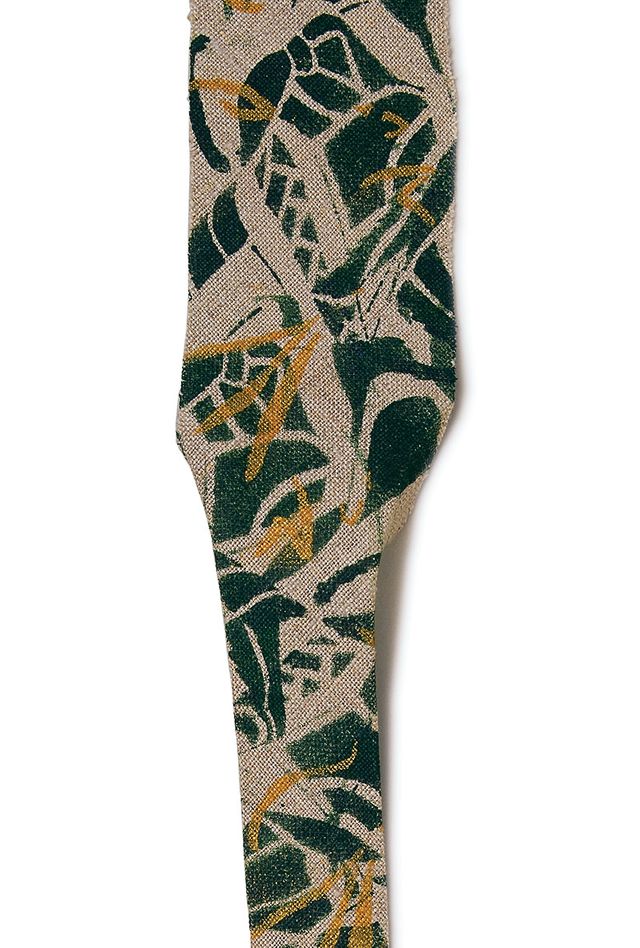
Another way to transform images from existing stencils is to fold or seam across the fabric they’re printed on, revealing only portions of the stenciled design. The band in Fading below, which will be used to bind a garment edge, and the inset patches at top right are both good examples. You can, of course, print the fabric all over, then cut bias or straight strips or patches from it, but I sometimes prefer to cut the strips or patches first, with plenty of seam allowance, then lay them out together. That way, I’m more conscious of where my printed images will fall on each piece and can control the density and position of the individual motifs.
Fading
![]()
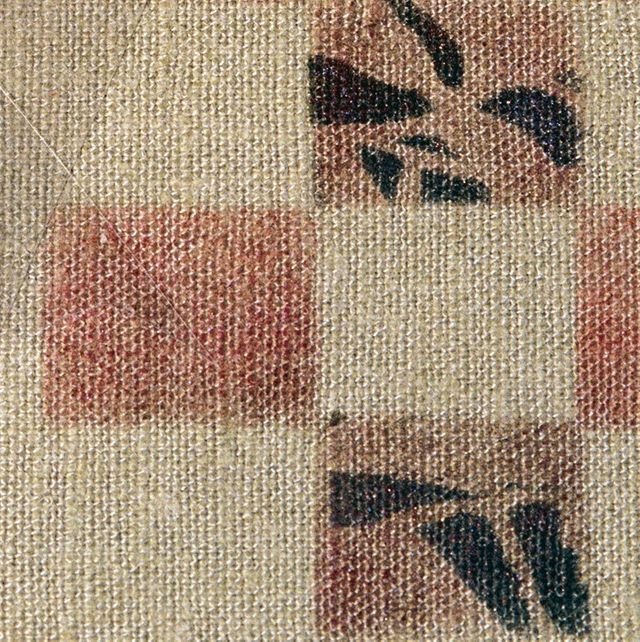
 Stenciling on narrow bands is a good way to rework old motifs, since only a portion of the design appears on the band. This is also a good way to complement motifs printed more clearly elsewhere in a garment, as the band retains the visual “feel” of the design without actually repeating it. The way you print through your stencils is as much under your control as where and how you arrange the printed images on your fabric. For example, if you want a feeling of old, faded prints, as though you had used a tablecloth or curtain fabric from the ’40s or ’50s, you can print very lightly, concentrating your sponging around the edge of the stencil so the center of the design looks washed out. It helps if you use colors that already look soft, muted, and old. Try mixing a touch of the complementary color to the one you’re using to dull its intensity (for example, add blue to orange, green to red, or purple to yellow—and vice versa).
A second approach that can produce very interesting results is to actually wash the printed design before you heat-set it, rubbing gently to eliminate some of the paint. Print a little heavier than usual before washing, and be sure to test the results before you embark on a big project.
Floating shadows
![]()
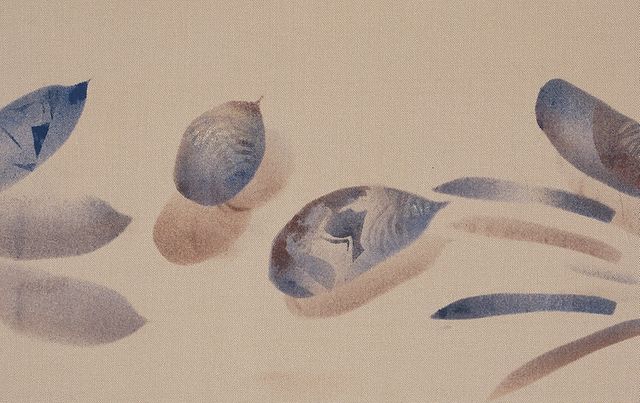
 Floating leaves casting soft shadows— an easy stenciled illusion, made by repeat-printing beneath each shape with a muted, shadowy gray. An interesting variation on printing soft, fading colors can provide a 3-D effect by suggesting shadows. All this involves is printing the same image twice, offsetting a softer version slightly from a stronger one, as in the example at right. I print the strong image first, let it dry, then lay the same stencil over it, but a little to one side, so that some of the first image shows through the cut-out opening. Then I print a second color, fading out where the images overlap, so the “shadow” doesn’t show on top of the first image.
To get the most shadowlike effect, print the second image using a pale gray tint, then repeat other prints using the same shadow tone and offsetting the shadow in the same direction for each one. Printing the shadow tones sometimes closer, sometimes farther away, and sometimes at slightly different angles can give the effect of objects floating at different heights above a shifting background.
Images:
Dover Publications
31 E. 2nd St.
Mineola, NY 11501
516-294-7000
Sells a wide variety of design books and clip art images.
Fabric paints by mail:
Dharma Trading Co.
PO Box 916
San Rafael, CA 94915
415-456-7657
800-542-5227
www.dharmatrading.com
Dick Blick Art Materials
PO Box 1267
Galesburg, IL 61402-1267
800-447-8192
www.dickblick.com
Also sells .005-mm acetate sheets.
ProChemical & Dye Co.
PO Box 14, Dept. T
Somerset, MA 02726
508-676-3838
800-2-BUY-DYE
Rupert, Gibbon & Spider
PO Box 425
Healdsburg, CA 95448
707-433-9577
800-442-0455
Diane Ericson offers garment patterns (including Design & Sew patterns) and precut stencils. For information, send an SASE to PO Box 7404, Carmel, CA 93921.
Photos, except where noted: Scott Phillips


Diane's technique is easy and fabulous. So much better than using stencil brushes. I just finished up a retreat with her and got to do this myself.
nice art work
Thanks for sharing
Really great effort.....
amazing work mate
Friends now you can share you ideas with someone on