

It looks quite elaborate, but the basic knotting pattern is easy to do.
In my travels I purchase things that intrigue me, and make me want to know, “How’d they do that”? This particular belt is one such object. It looks quite elaborate, but the basic knotting pattern is easy to do.

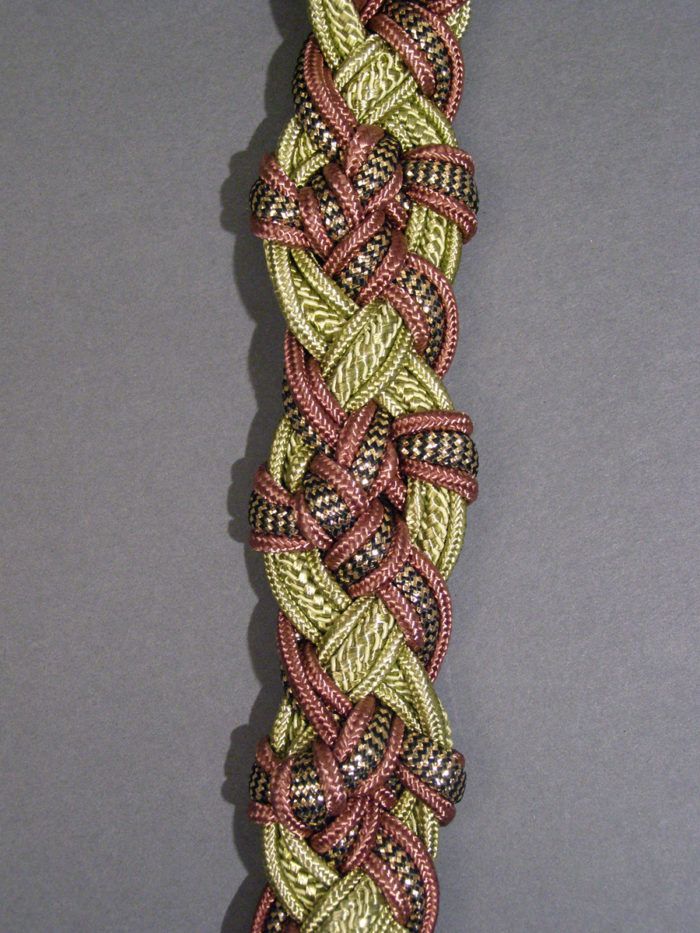
In the detail photo, you can see two main “cords”, and two smaller “cords”. These “cords” consist of three smaller cords, which is why this belt looks so complex. 
To demonstrate, the black cord represent the main “cord”, and the green and orange cord represent the smaller “cords”. I have pinned these to a padded board, which I find makes this process easier to do. 
Step 1. Cross the two black cords, right over left, as shown. 
Step 2. Pull the orange cord over the black cord and to the right.
Step 3. Pull the green cord over the orange cord, and place it off to the left.

Step 4. Bring the orange cord under the right black cord, over the black cord, and under itself-as shown in the arrows. 
Step 5. Pull this knot closed, and push it tightly up.

Step 6. Now, take the green cord, pull it to the left, and lay it over the black cord. Pull it up, and push it under the black cord, then off to the right. Last, direct it under the orange cord. 
Pull this knot closed, and push it tightly up. 
Step 7. To begin the next unit, cross the two black cords, right over the left, as shown. 
Step 8. Pull these cords together and tighten as shown. 
Step 9. Repeat the pattern outlined above. This is shown in the eight photos below.


Step 10. When you get to the end of the belt, pin the end, and stitch it to tie it off. And you’re done! 
Here is a photo of the finished piece.
Start your 14-day FREE trial to access this story.
Start your FREE trial today and get instant access to this article plus access to all Threads Insider content.
Start Your Free TrialAlready an Insider? Log in


Ken, you've done it again! I have never met a more creative and inspiring artist than Kenneth King. He is mostly self-taught in the field of fashion, which is why I think he brings the most innovative methods I have seen in my 50+ years of sewing and crafting. Thank you again, Ken, for being who you are!
Thanks for the beautiful example of the corded belt. I am eager to try it. However, what is the proportion or ratio of the lentgth of cording needed to the finished or desired length? Thanks.
Great Belt and I'm glad that now I will be able to make it for my granddaughters for Christmas1
I love the belt. What length of each cord is needed for a 26" belt?
What I see of the belt is wonderful, but I know this is probably a stupid question but I would like to know how or what do you use for tying or buckling on with?
Thank you.
This is an excellent example of how to give directions for something so elegant and intricate as these belts can be. For those of us who are visual learners this is wonderful!I too, would like to know how to calculate the yardage needed for different sizes. Thank you.
I absolutely love this belt, and I definitely want to make it. My questions are similar to everyone else. How do we determine the amount of cord needed, and I'd like to know what kind of cord works best? Did you attach a buckle? Thanks for the clear, visual instructions.
I'll jump on the bandwagon and would like to know how to figure the amount of material needed for each of the four strands. Also, agree - a great Christmas gift for my granddaughters.
Wonderful diagrams! As everyone else, how do you figure length of raw cords. I sure it varies due to width of cords, but is there a generalization?
How do you find answers to these questions. I would like to know about the buckle.
The belt is really cool
I love and like everyone else would like to now how to determine the lentgh and type of cord to use and do you add a buckle to it. I would like to make this for my grand daughters for Christmas.
Kenneth, my dear one! What a delight to see your wonderful work here and to see that you are living in NYC!! I took a number of your marvelous classes when you were teaching at the College of San Mateo and will never forget your kindness, humor and love of design. You are a true delight and genius as a designer and artist. With 2 friends, I visited your studio in San Francisco and, as usual, was amazed by your creativity and charmed by your hospitality.
I hope all is going well for you and that your talent leads to great success!!
With every good wish,
Mary
Lots of posts asking about length of cord--anyone answering? I am wondering if the orange and blue cords are longer since they are doing more knotting. Hope to see a post answering these questions soon.
Would really like to know the amount of materials neede to make this belt and how to complete it with a buckle. It looks like a really nice project to complete.
Thank you
This is a beautiful belt that would be perfect for dress pants of jeans.
I would like to know how to determine the length of the cords too. Also, how do we get an answer to our questions?
Love your work Ken!
Sandy
What a lovely belt, I would like to know the weight/ diameter of the cord used and the method for entwining the thinner cord. Forgive me if the answer to the question seems obvious from the diagram but this is a very new idea to me.
Thank you so much for the opportunity to ask. I look forward to the making!
What a great project! As with every other comment, there are
questions to be answered before one begins: length of strips
and finishing ideas. Also, I would like to see other projects from the author. If he has a web address or any other means to see his idea.
I love this idea because it is always so hard to find an appropriate belt. I'm thinking of experimenting with 3-4 times the waist measurement. If the cords are each marked with a thread at intervals according to the waist measurement (i.e. 26" waist, so mark a length of cord every 26 inches before braiding), when it is finished that should give me an idea of how much cord would be needed for future projects.
As far as buckles go, you can look online, but I went to different thrift stores. Belts go for very little, and while you might not want the belt, the buckles are often different than any you can find in a notions store and often in very good shape.
Hello!
First of all, thanks for the kind words--I blush!
I am reticent to give yardage, as I find that the different diameter cords make up into differing lengths--meaning that a really thick cord will yield less length for a yard, than a thinner cord.
When approaching a project such as this, I'll buy extra cord, and mark a yard increment with thread on each one I'm weaving with--then when I get to the thread marks, I know for sure what finished length I get per yard of cord.
When working with cords or ribbons, I find that 8 times the finished length, if I'm estimating before buying yardage, will give sufficient material to do the job.
As for the question of what to do to fasten it: On the example shown,they sewed all the cord ends together, leaving one of them long enough for a loop--then, they wrapped the stitching with a length of rattail cord to cover all of the raggedy ends and stitching. On the opposit end, they put the loop end through a brass hook before sewing it down.
You could also make a leather "sleeve" somewhat cone-shaped, and put the ends inside that, and stitch across to close.
I hope this is all helpful....
By the way, for those not familiar with my web site, it is: http://www.kennethdking.com
A great idea of 'how to make a wonderful knoted belt'. I have to try it again and again, by step by step. Thanks a lot.
How do I print this? It comes out blank.
Thanks, Anne
could you just end the belt by stitching across, but let the rest of the cords just hang loose, so you would tie the belt on by the hanging cords???
Just came across this in time to make a belt for my grand-daughter for Christmas. Thank you.
Hi ....
Thanks a lot. Now I know how to do very nice belt and bracelet. I love to do that. I try to do very nice things for me and my friends.