

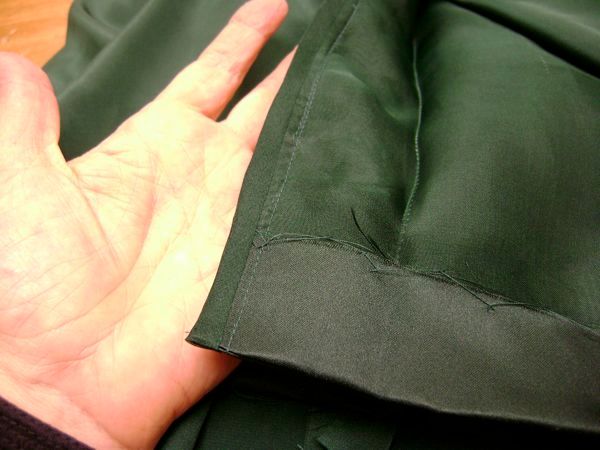
A student in a recent class needed to hem the skirt of her garment. Nothing particularly challenging there. But, the skirt had a pleated panel in the back, and I suggested a slightly different approach for hemming the pleated area.
Normally, we fold up the hem allowance, and sew it in place. That can be done with pleats, too, but the area around seamlines becomes very lumpy and takes away from the crisp definition that we look for in a pleated hemline. So here’s what we did:
This is the back of the dress; you can see that there’s a pleat to either side of the center back seam.
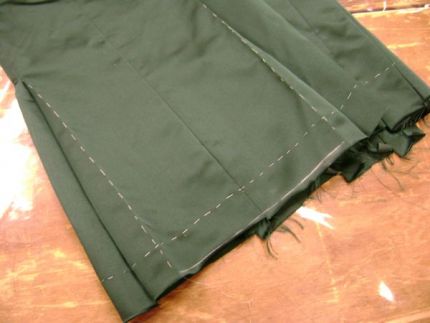
The seamline just above the hem has been opened up, and the hem allowance has been turned up into place.
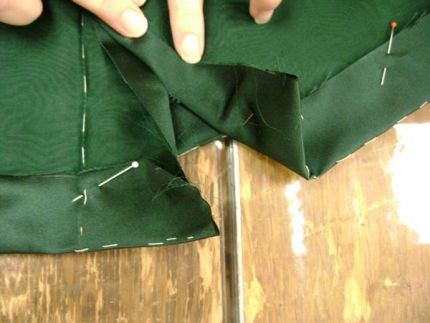
The hem allowance has been stitched with catch stitches, and the seam has been re-sewn. The bottom edges have been carefully lined up.
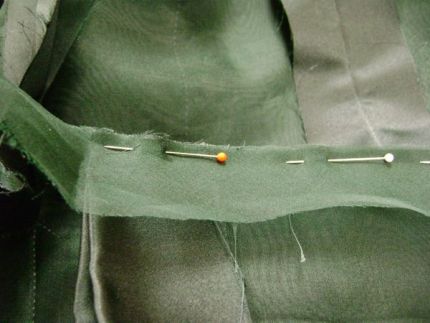
There are two raw edges to deal with, though–one at the back of each pleat–and bias strips of silk organza have been prepared.
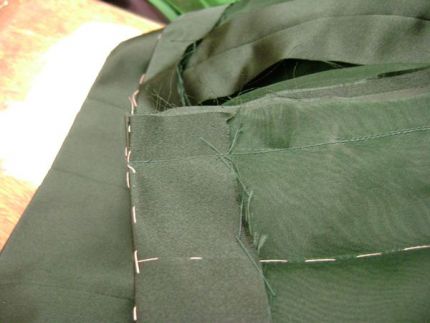
The bias strips have been pinned into place along the lower part of the vertical skirt seam (the back edge of the pleat, in fact); they’ll first be sewn in place by machine.
The raw edges of the strips have been turned under and will be sewn into place by hand.
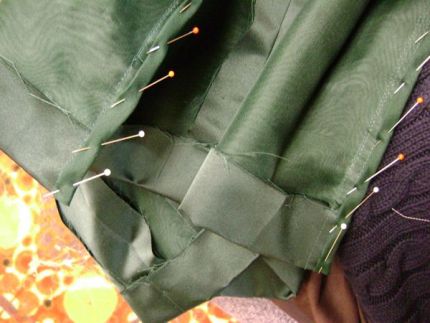
The inside of the finished hem.

Start your 14-day FREE trial to access this story.
Start your FREE trial today and get instant access to this article plus access to all Threads Insider content.
Start Your Free TrialAlready an Insider? Log in


i presume this is a straight skirt.
If so i am very proud of my self i decided the last skirt i made i would only cut the lining to just above the kick pleat.
Then what to do i thought and this is exactly how i finished off my skirt.
As no one ever replies to this area i will never know whether this is a pleated skirt all the way around or just a kick pleat
I am also confused. If this is a kick pleat finish, please say so -- otherwise the finishing technique does not follow the previous picture of the hemming technique. We see a pleated skirt that needs shortened and where, but this seam finish is without context. Are there pictures that were supposed to be in this demo that were left out? If this is supposed to be the finish for the raw edges of the center back seam, a distance shot for clarity would be useful, as would an explanation for why a previously unfinished seam would now need enclosed due to shortening.
Nice technique, and yes, this looks like a kick pleat. I always have trouble with the finishing of that pleat.
See here how to hem real pleats: http://www.burdastyle.com/techniques/hem-pleats
Hi Julie -
No, it's not a kick pleat - it's simply a hem with pleats. And when you hem that sort of skirt, the area at the back of the pleat - that back fold - can get awfully when it's hemmed, when there's a seam along the back edge of the pleat. And with any sort of a pleated skirt, there's got to be a seam somewhere, even if there's only one seam in the whole skirt. So, folding up the hem allowance and dealing with those seam allowances can get a little bulky - they're hard to fold with the seam allowances inside the fold. So this is another way to deal with that. Basically, the seam(s) are open, the skirt is hemmed, then the seams are sewn, sewing through the turned-up seam allowances as well.
I hope this makes things more clear!
Susan
I got lost at the third from the last photo. It appears the bias strip is covering the hem edge horizontally as it crosses the vertical center back seam yet in the final photo, the two edges of the pleat trimmed with bias strips are vertical. Will the two bias trimmed seams (final photo) be joined verticaloly or left open as in the last photo? It seams leaving these vertical openings on either side of both pleats create a loose "flap" from pleat to pleat across the back panel of the skirt. Wouldn't that technically be a kick pleat?
Susan, I am sorry to say that I could not understand your instructions for this technique.
I am very surprised as I have some of your books, I also took one of your on line class and really enjoyed it. I find that 95% of the time I capture what you write but you lost me on this one after the second instruction "The seamline just above the hem has been opened up, and the hem allowance has been turned up into place."
Could it be as some of the other posts suggested that something was left out of this instruction?
I love your teaching and your books. Also, your delight in taking the time to do hand work (hand basting - and all that seems tedious) very contagious - THANK YOU, Sandra Taylor
Or you could just do what manufacturers do (check the kick pleat of your winter coat): on the inside, after hemming, start at the hem fold and (backstitch 1st) stitch 1/4" in from the fold of the pleat, angling up to the pleat edge just above the finished hem. It's easy, fast, and keeps the pleat always in place.
Denise, I got the impression that this is not a kick pleat, but a skirt with pleats on either side of the center back.
I'm not exactly following how this helps, apart from using organza to hem to reduce the bulk at the hemline. I'll have to read it again when my brain is fresher (and there are fewer people around so I can read it out loud to myself without feeling foolish).
It IS a kick pleat. They just opened up the furthest back hem of the pleat and reinforced it with strips of silk organza. Which they turned into a sort of halfish hongkong seam. It's difficult to see in the picture. I had to read it three times to get it as well. It's easy to mix up when the writer indicates the horizontal hem and the vertical hem. I yet have to make it this way, to see if it actually makes a difference to me, but it sure looks promising. Susan is certainly very, very, very skilled at what she does. I'm sure she posts for a reason.
Personally I do prefer organza reinforcement instead of fusible. I have yet to come across a fusible interfacing that stands up to my impatience!
Keep up the blogs Susan!!! I am really learning a lot from you down here in Sri Lanka!
I need to add length to a dress,and was wondering how to make boxed or inverted pleats. I've seen them on dresses at stores but not sure How to go about them.
thanks