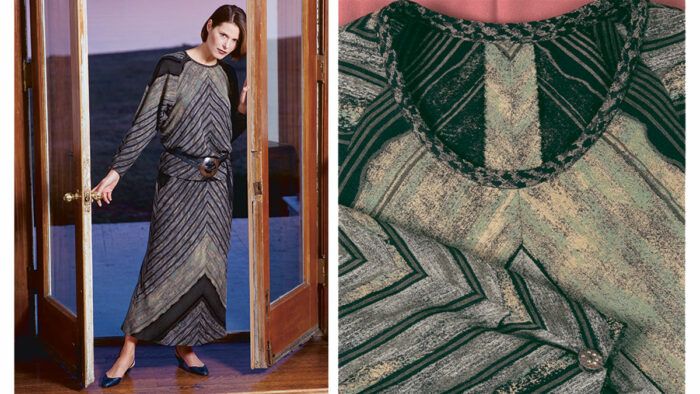
The bias is spoken of in hushed, reverential terms in the fashion world. Only a few designers ever master the bias cut, and very few home sewers dare to take the plunge. But by choosing a stable fabric and a simple pattern (a combination I call my “bias training wheels”), and by following a few step-by-step guidelines, you can be assured of success with bias-cut garments.
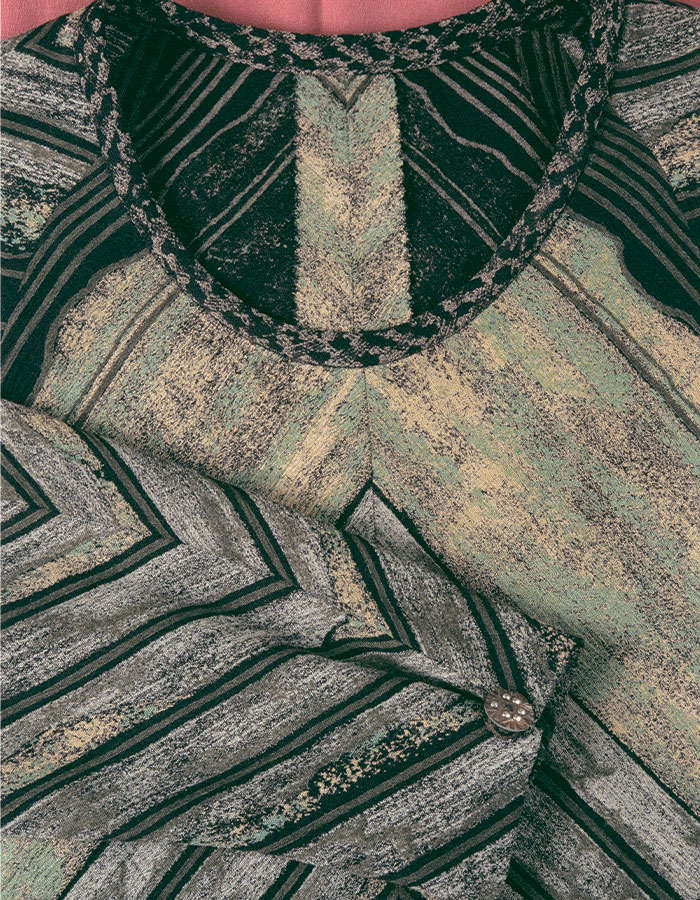
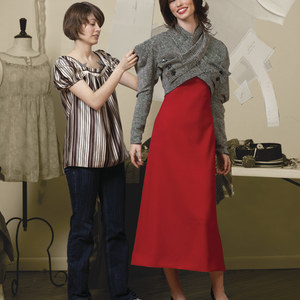
Add drape to fabric by cutting it on the bias. If you start with a stripe, you can also create beautiful chevron effects at seams. Above, bias binding adds a contrasting detail at the neck edge; you can also use a corded piping. Photo: Laura White.
Grain refers to the straight and crosswise direction of the yarns making up a woven fabric, with bias running at any angle to the straight and crossgrains and the true bias running at a 45-degree angle to these grains, as shown in the drawing above. Garments cut on the bias appear softer and more fluid, have more stretch, and are more supple than those cut on the lengthwise or crosswise grain. The fabric also appears “thinner” than the same fabric cut on the straight grain.
Bias garments need more fabric than the same garment on the straight grain, and are best cut one layer at a time so the grain doesn’t distort. Working on the bias requires a bit more time, a careful selection of fabric, as well as some alternate fitting and sewing techniques, which I’ll explain in detail.
Straight grain vs. bias
|
I suggest starting with a simple top or a sleeveless tank or shell. Cutting the top on the bias instantly makes the shape more fluid and gives the fabric a more interesting character. Use a pattern you’ve sewn before, or make it up quickly in muslin to test the fit before you begin.
Bias in fashion
Only a few great designers have truly mastered the bias cut. My three favorites created bias garments by draping fabric directly on a model or a client’s dress form, cutting and constructing one garment at a time. French artist-couturier Madeleine Vionnet is credited with “inventing” the bias cut in the 1920s (see her bias dresses at right, from 1920 and 1932), developing her prototypes by draping on a half-scale dress form mounted on a lazy Susan. Madame Gres, a brilliant and reclusive French designer, worked with clients from the ’30s into the ’70s. Charles Kleibacker, a contemporary American designer turned design professor at Ohio State University, continues the tradition with his total reverence for and mastery of the bias cut. He closed his Manhattan atelier in the late ’80s, but his fluid, bias-cut dresses live on in collections across the country.
—M. T.
Safe fabric choices for bias
Begin at the fabric store by unfurling a few bolts of fabric and folding each on the diagonal to get a feel for the way the fabric responds and feels on the bias. Compare different fibers, weights, and textures. Notice how much the fabrics stretch on the bias, how a plain weave takes on a new texture, a twill weave loses its definition, and plaids and stripes become diagonal lines.
For your first few bias-cut tops, pick user-friendly, natural-fiber fabrics with “tooth” (the layers tend to grab each other), like cotton, linen, silk broadcloth, or wool challis. I look for fabrics with a plain weave and minimal texture, and I love the effect of stripes cut on the bias. Beginners, however, should choose a narrow, 1/4-in. or smaller stripe so it doesn’t have to be matched.
The short list of fabrics to avoid for bias includes most rayons (stretches like crazy), silkies and polyester (slippery and hard to handle), twills (lose definition), and fabrics that are heavy or stiff, like duck or poplin. Silks and sheers like crepe de chine, charmeuse, and georgette are beautiful on the bias, but these hard-to-handle fabrics aren’t a good place to begin. Move up to silky fabrics once you’ve conquered the stable ones.
Start with a user-friendly, natural-fiber fabric with “tooth,” like cotton, linen, and some silks.
Adapt a pattern for bias
You may find a pattern for a bias top, but it’s easy to convert a straight-grain pattern for a simple V- or round-neck top from straight of grain to bias. Choose a sleeveless top, or one with a cap or extended sleeve, drop sleeve, or classic set-in sleeve. Depending on the fabric you choose, you may want to add center-front and -back seams.
Alter the pattern so it’s the length you want and large enough to fit you at the bust and hip, including ease. One of the secrets for making bias tops that you’ll love to wear is allowing plenty of ease, since bias continues to stretch, becoming longer and narrower when worn. Remember the actress Jean Harlow and her white satin gown that fit like wallpaper on a wall? Unless this is the look you want, add an extra 1/2 to 1 in. of ease at each cutting line. You’ll also increase the width of each seam allowance, which I’ll discuss in a moment.
Tissue-fit the pattern (pin the pieces together and try it on) to check the fit, and make any necessary changes. If you’re large-busted, I suggest adding a bust dart either at the armhole or the side seam for a smoother fit.
Change straight of grain to bias
Here ‘s an easy way to re-mark the grainline on a pattern piece. The diagonal fold becomes the new bias grainline.
1. Draw line perpendicular to grainline.
2. Fold tissue so two lines align. Mark along diagonal fold for new bias grain line.
3. Fold and draw lines in both directions.
So you’ll be able to cut the fabric in a single layer and place stripes where you want them, make full pattern pieces for bias-cut garments by eliminating foldlines and/or making separate left- and right-body and front- and back-sleeve pattern pieces. Use the main pattern pieces only and eliminate facings, since piping or binding works better than facings to finish edges (facings tend to “fight” with the outer layer of a bias garment).

Working with a “full” pattern means making separate pattern pieces for front- and back-sleeve or right- and left-body sections. Or, for a garment without center-front and -back seams, eliminate foldlines and make a pattern of the full garment section. Notice the extra-wide seam allowances, needed since bias edges relax and open up.
Change straight-grain markings to bias markings with a 45-degree ruler (available from quilt- or art-supplystores). Or fold the pattern to draw the new lines, as shown in the drawing above.

Yardage and layout
When buying fabric, I “guesstimate” the amounts I’ll need for bias garments by allowing 1 yd. of fabric for each major pattern piece. This means that a long tunic top with sleeves may require as much as 4 yd. of fabric.
After adjusting the pattern, however, you can use a gridded cutting board to help you figure out the yardage more accurately. The amount you’ll need depends on the width of the fabric, the fabric design or repeat, and the size of the pattern pieces. Piecing may be necessary if the fabric is narrow or the pattern pieces are large.
For a balanced garment, I usually cut the pattern on a single layer of fabric with each pattern piece at a right angle to the next one as I go around the body, as shown in the pattern layout below. I lay all the pieces in one direction, as if the fabric had a nap. If your pattern has center-front and -back seams, and the fabric is wide enough, you may be able to cut two layers at once, angling pattern pieces as before.
Sample layout for bias
When cutting out a bias garment like a raglan-sleeve top on a single layer of fabric, slant pattern pieces at right angles to each other as you proceed around the body.
Center seam or not?
Depending on the fabric you select, you may want to add a seam at center front and center back so the garment will hang evenly. On modern wovens, lengthwise threads are stronger and more numerous than crosswise threads. When a full pattern piece is placed on the bias, the lengthwise grain will dominate one side of the garment, and the crossgrain, the other. Unless your fabric is stable, the two sides of the garment may hang differently, with one stretching more than the other, and you may get twisting, rippling, and an uncomfortable tug-of-war.
Adding a center seam allows you to slant one side to the right-angle bias and the other side to the left-angle bias, as shown in the pattern layout below, so both side seams will hang the same. This also lets you create a chevron or diamond effect by matching stripes or plaids along the center seam. I draw a few stripes right on the pattern piece, as shown, to make it easy to match the next piece at the stitching line.
Before deciding whether to add a seam, examine your fabric by raveling horizontal and vertical cut edges to see if there’s a discernible difference between the strength and number of lengthwise and crosswise threads. If the fabric is stable (like many linens, cottons, and wools), with fairly balanced threads, it’s fine to cut the garment center on the fold.
Widen seam allowances
Although bias cuts don’t ravel, the fibers on cut edges relax and open up, so even 5/8 in. away from a cut edge isn’t an accurate stitching line. To your adjusted pattern pieces, add 1-1/2-in.-wide seam allowances, in addition to the extra ease, on center, side, and shoulder seams. Use 5/8-in. seam allowances at the neck. Always mark stitching lines with thread, tracing paper, or chalk as soon as the fabric is cut, before removing the pattern pieces.
Remove excess stretch
To prevent bias-cut garments from continuing to stretch as they’re worn, it helps to press each pattern section to remove some of the stretch before construction. Pressing simulates the effect of gravity and results in a more stable garment. This step is a lifesaver when working with silky, gauzy, or loosely woven fabrics.

After cutting the fabric and removing the pattern, press each piece firmly, gently, and evenly from top to bottom. Now repin the pattern onto the fabric, adjusting seamlines if the piece has grown smaller.

Sewing bias seams
The key to smooth vertical bias seams that won’t pop when the garment is worn is to stretch them as you sew, using a 2.5- to 3-mm stitch. The seam will look rippled after stitching but will press out beautifully. You don’t need to stretch as you sew shoulder seams because they’re not cut on the true bias, and so don’t stretch as much.
To assemble the garment, sew center seams first, then fit at the side seams by pinning along the stitching line, wrong sides together, and adjust to get the look you want. After the garment is fitted and sewn, trim seam allowances to 3/4 in. Since bias doesn’t ravel, seam finishes are optional. I prefer a pinked edge; the serger can cause rippling and seam show-through.
If you need to join a bias edge to a straight-grain edge, sew with the straight grain on top, since it’s more stable. The bias layer will feed in easily, and the straight grain will stay the bias edge.
To stabilize buttons and buttonholes on a bias-cut garment, add interfacing behind them. Use a strip of straight-grain interfacing in the direction of the buttonhole to keep it from stretching.
Construct a corded and piped bias edge
1. After staystitching the neck edge and clipping to the stitching every 1 /2 in., serge close to the stitching, straightening the seam as you serge.
2. Press the edge to the inside (working on a ham if you have one), using the staystitching as a guide.
3. After covering the cord with a bias strip using a zipper foot, remove the cording, serge close to the stitching, and reinsert the cord into the piping with a blunt needle or a loop turner.
4. Hand-baste the piping next to the turned-under edge, overlapping the ends neatly and cutting the cord out of the overlap area, then machine-stitch close to the edge using a zipper foot.
Finish neck and armhole edges
Bias binding or piping gives a fine finish at neck and armhole edges of bias garments. Bias molds smoothly around curves, lies flat, stabilizes edges, and eliminates the need for interfacing.
To bind a neck, I use bindings 1/4 to 1 in. wide. For a neat binding on a V-neck top, I recommend this: Sew the shoulder seams first, apply the neck binding, then sew the center-front and –back seams after the neck edge is complete.
Corded piping likewise stabilizes the neck and armholes and adds a subtle design detail. To pipe a neck, first make sure that the neck is large enough to slip over the head easily. Prepare the front and back separately, before joining shoulder seams, by staystitching along the seamline, then clip to the stitching every 1/2 in. Serge close to the stitching, which makes it easy to turn and press the edge to the inside. If you don’t have a serger, trim the seam allowance to 1/4 in., then stitch the shoulder seams and press.
I generally use a lightweight, 1/8-in. filler cord to fill the piping. Prepare piping by covering the cord, then baste and stitch the piping to the garment’s edge.
Once the neck is finished, you’re ready to try the top on again. Pin the side seams, wrong sides together, and do a final fitting before you sew the seams.
Bias garments don’t wrinkle as easily as straight-grain garments do, but they can “grow” on a hanger, so I always store them folded and flat. Once you become confident about basic bias sewing, cutting, and fitting skills, I know that you’ll enjoy expanding your sewing repertoire to include bias garments. And when you do, you’ll find that the pleasure of wearing them is the best part.
—Marcy Tilton’s is the author of Easy Guide to Sewing Tops and T-Shirts and Easy Guide to Sewing Skirts.
Photos: Laura White.
Drawings: Heather Lambert.
From Threads #76, pp. 34-39





Ever since I read your article, I have been changing lots of pattern pieces into bias. I absolutely love that! If cut generously a bias front on a blouse works wonders for my not so little tummy! Thank you!
I haven't sewn on a bias for years but after I read your article on sewing on the bias I gave it a go again and I love it I have made a couple of tops and I am going to make more and I love the feel of the material cut on the bias.
My projects website has a picture here: http://www.cathysews.com.au/Album/Tops/slides/bias-front.html
i have been looking for instruction on how to cut a simple skirt on the bias. i made the skirt on the grain and it is nice but not 'floaty'. what do i do next?
In a bias cut skirt, are the unseen inside pouch-pockets cut on the bias also?
Threads Editorial Director Sarah McFarland says: There is no hard and fast rule. Pockets are rarely seen on bias-cut garments because they can interfere with the body-conforming silhouette and drape. If you cut in-seam pocket bags on the fabric's grain, the pocket bags won’t stretch, but you will see ripples where you sew the on-grain edge to the bias edge. If you cut the pocket bags on the bias, they will attach smoothly to the bias edges, but the pocket bags will stretch. Pockets are wonderfully useful, but in the case of a bias skirt, you might want to incorporate a jacket or bag into your outfit instead, and save yourself some sewing frustration.
What an excellent post!! I was struggling along with a skirt pattern I just made, knowing it should really be bias cut but feeling a little lost and unsure when I found this. Thanks for the clear instruction!
Very clear instructions. Thanks.
I recently have gotten back into sewing and am enjoying it immensely. This article has me excited to try this on several projects that have been percolating in the back of my mind....thanks for sharing!
It is very nice to see you are given such a nice instructions thanks a lot
No problem ! :D
I can't find the "as shown in the pattern layout below," to show how to add a center front or back seam "to slant one side to the right-angle bias and the other side to the left-angle bias". I read the article a few times, checking each illustration, but I don't seem to understand this slanting. It makes sense to me that it is needed, but an illustration would be immensely helpful. This was an informative article. I haven't don't a lot of bias work other than making neck band facings. This makes me keen to try. Thanks.
I remember this article from years ago, and am so glad it popped up in answer to a question I googled. Your instructions and illustrations were easy to understand after I read and reread the section on turning pattern pieces at angle's to each other, it finally clicked in my brain. Now to dig out my #76 magazine.