An innovative technique for pattern alteration that's simple to understand and easy to do, offering options other techniques don't.
When I was studying pattern alteration in college, I learned that no matter what method you use to alter patterns, when you’re done, all that’s really changed is the outline, or outer edge of the pattern.
As my teachers and I explored this idea, we further proved that the closer you place the alteration to the seam or stitching line, the less distortion to the pattern there will be. In other words, if you alter any pattern right at the stitching line, you can correct it without shifting the grainline, and you can keep changes to the lengths of nearby seams to an absolute minimum. We developed an alteration technique around these discoveries and called it the seam method. As we’ve continued to work with the seam method, it has become clear that in addition to the other benefits, the method allows alterations to be confined precisely to areas where they’re needed and to stay clear of those areas where no change is wanted. Let’s look first at a few basics of pattern alteration as they apply to the seam method.
No special tools needed
Clear a work surface, and gather the tools you’d need for any alteration session: tissue or other plain paper for filling in the cut pattern, scissors, markers or pencils, transparent tape, and a straight and a curved ruler, ideally in clear plastic so you can see the pattern through them. To prepare the paper pattern, press it with a warm, dry iron to remove all creases and wrinkles. For a firmer, more durable working surface, reinforce the pattern with lightweight, fusible interfacing applied to the wrong side. Finally, carefully cut out the pattern along the cutting lines, leaving the seam allowances intact and in place.
Alteration basics
The following guidelines are useful no matter what alteration technique you’re using. A change at any point affects the fit below that point; for example, after the length is corrected, the width may be fine, so begin working from the top of the pattern down, in the following order:
- First, alter for even or equal amounts of change in length (as when both sides need to be changed the same amount).
- Second, alter for uneven or unequal amounts of change in length.
- Third, alter for even amounts of change in width (as when the width needs to be changed the same amount along a full seam).
- Fourth, alter for uneven amounts of change in width.
When you alter just the seamline, you’ll cause the least possible distortion to the pattern and keep your alteration safely away from areas that don’t need to change.
Think through each alteration individually, then as it relates to adjoining pattern pieces and to other alterations, which you may be able to make at the same time. Make notes so that you can more easily make the same alterations on similar patterns, and don’t forget to make corresponding alterations on adjoining pattern pieces so seamlines match.
When you’re finished, double-check these points:
- The amounts of change must be correct.
- The style of the garment must be the same as before the alteration, unless a style change was intentional.
- The grainline must be positioned the same as before the alteration so the fabric hangs or drapes properly.
- Center-front and center-back seamlines or foldlines must be straight, and seams that cross them must still cross (and meet) at the same angle.
- Adjoining stitching lines must match one another.
- Curved seamlines must curve smoothly.
- The altered pattern must lie smooth and flat. If the pattern is puckered or wrinkled, its size will be smaller in that area.
The seam method, step by step
Place the pattern, printed side up, on top of your tissue paper. Locate the stitching line to be altered (the one affected by the figure variation), and identify the pivot points on the stitching line. Then draw a line across the seam allowance at each pivot point. You will need pivot points:
- Where the figure variation begins.
- Where the figure variation ends.
- At the point(s) between: where the figure variation is greatest, where it changes from symmetrical to asymmetrical, or begins to taper into the original stitching line (the greater the curve, the more pivot points may be needed to maintain a smooth stitching line).
- At the base of darts affected by the alteration, on one or both sides of the dart, depending on the variation.
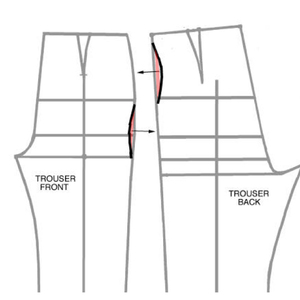
TO INCREASE LENGTH OF PANTS BACK
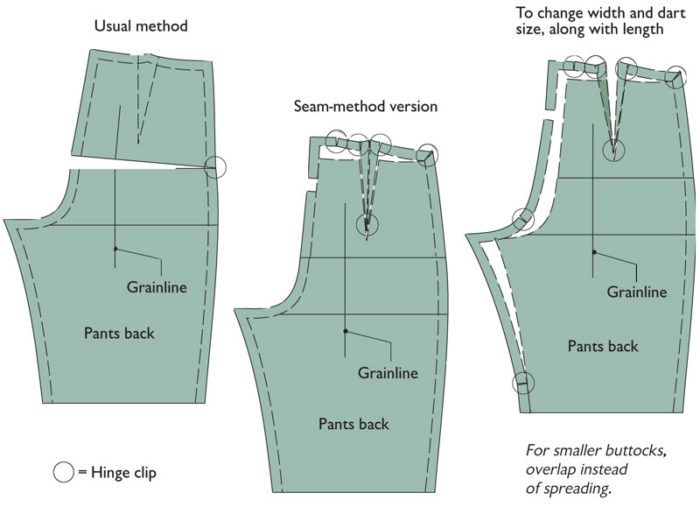
The seam-method version of this frequently described alteration for full buttocks gives increased length without changing the grain, dart orientation, or side-seam shape of the pants back.
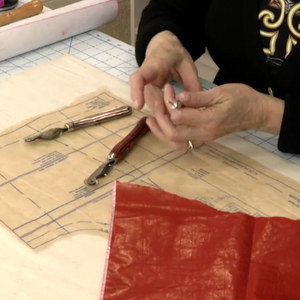
Cut the affected seam allowance from the pattern, carefully cutting just inside the stitching line. On the lines drawn across the seam allowance, clip to, but not through, the pivot point on the stitching line. This creates a paper hinge that allows you to move the seam allowance in or out and to make it lie flat. Tape the unaffected pattern edges to the alteration paper underneath. Then slide or pivot the free seam allowance in the required direction and amount.
To increase length or width, slide or pivot the freed seam allowance away from the pattern. To decrease length or width, slide or pivot the freed seam allowance onto the pattern.
After shifting seam allowances, tape the altered allowance securely in place. Restore dart stitching lines, cutting lines, seam stitching lines, notches, and marks and symbols disturbed by the alteration. Use a ruler and French curve to draw straight and curved lines accurately.
If you’re unsure about dart ends, fold the dart, and turn it in the finished direction. Cut off the dart base according to the overlapping pattern cutting line. This will automatically restore the correct end shape. To test the altered pattern, pin-fit the pattern, or sew a trial- fitting garment in muslin or gingham. I think you’ll be pleasantly surprised at the logic and accuracy of your alterations.
More information about Judith Rasband and her books (Fabulous Fit and Fitting & Pattern Alteration) is available via eBay and other resellers.
Drawing: Karen Meyer




very good I am really itrested in alterations.But I need more time to study this.I find it very intesting
At Last! So-o-o much more sensible than altering the entire width or length of a garment for an adjustment only needed in a very specific place!!
spool
How do you enlarge the hip measurement - or any measurement that is 4" larger.
Anything that makes alterations easier and less confusing is something I would like to learn about. This will take some hands-on experimenting especially for my bust area and bottom half area.
i am in desperate need of advice, i have a big butt, how much can I increase a pattern before it starts to lose its shape, my daughter has inherited my shape and its so hard to make a pair of pants for either of us. They are always far too tight around the butt.
I also need advice on increasing the bust area (counter weight for the butt!), as we have a need of making purchased patterns fit a fuller figure.
I have looked into it but find most explanations are really confusing and difficult. If anyone can help It would be most appreciated :)
The alterations shown on the pants back piece (green diagram) in this very article are for a “big butt”. I have used this alteration and it works well. I am a total beginner at pattern alteration, so if I can do it, you can too!
You may need to try a couple of versions to work out exactly how much to add. Start with half an jnch and see how that goes
I didn’t find that it distorted the style lines but I was making a very simple pair of pants.
It works like a charm! The Fabulous Fit book by Liechty & Rasband describes an order in which to make adjustments, and describes which style trends are best. http://www.amazon.com/Fabulous-Fit-Speed-Fitti…/…/1563673215
Fitting and Pattern Alteration by Liechty, Pottberg-Steineckert & Rasband offers even more ways to accomplish necessary adjustments.
http://www.amazon.com/Fitting-Pattern-Alterati…/…/1563677830
I attended the January 2015 Conselle Fabulous Fit week-long workshop led by Judith Rasband and Lorraine Henry. If working directly from a book is daunting, then it is well worth the investment to have these 2 experts assist you in determining the adjustments YOU need.