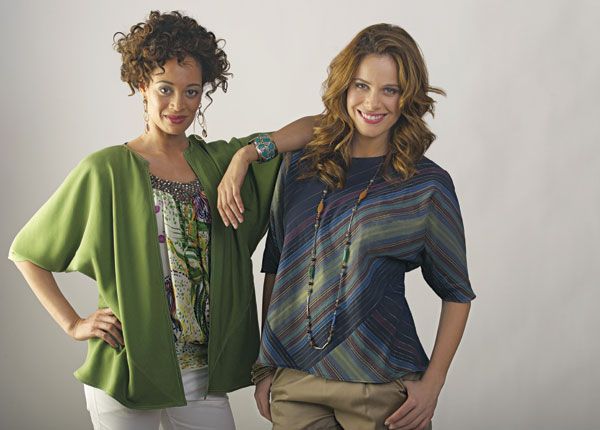
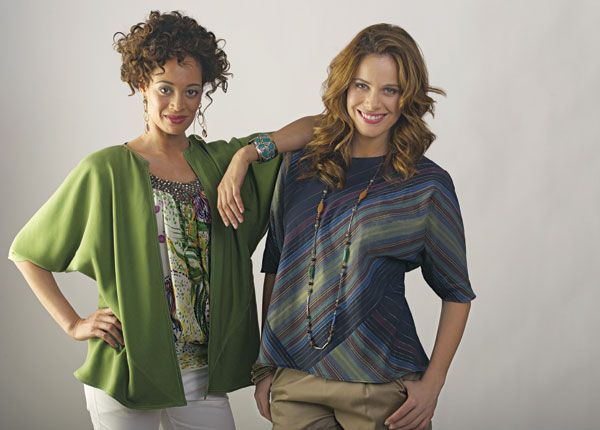
Create a top in an hour with this easy technique.
In the #143 June/July issue of Threads, we showed you how to make a bias top from two simple fabric squares. However step one was labeled incorrectly.
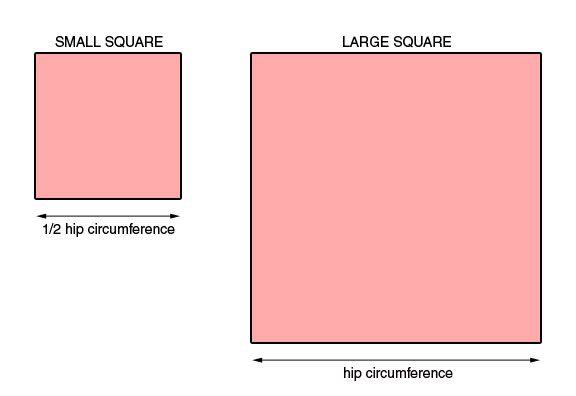
We at Threads strive to make every issue as perfect as possible, and we apologize for the error. Here’s the corrected text for step 1 using the new diagram above:
1. Determine the size. Measure the fullest part of your hips and divide that measurement in half. This is the side dimension of the smaller square as shown at left above. The large square’s side lengths are equal to your full hip circumference as shown above at right.
If you have any further questions regarding the steps, please comment below.




Thank you for the correction. However, when adding 1" to these measurements as in the next step, it seems there is no allowance for ease. Is this due to the stretch inherent in bias?...or should one also add a couple inches for ease? Thank you.
Hi AnnaRae,
Because you are using your hip measurement to draft the sides of the square, the square's diagonal will be much larger than your hip circumference. You won't need to add any more ease because of the diagonal's size and the stretch from the bias.
This pattern seemed like so much fun to try - I made one out of a lightweight silk. I found it was far too small and too short. The shape of it was beautiful though! I used a very large silk scarf that had a border all the way around and I cut it out in a way that made use of the design. Should I try it again but increase the size of the squares by an inch or two? Should I increase both squares the same amount? Thank you!
Hi. please disregard my previous comment. I wasn't able to see the correction - which answered my question! Thanks. I'll try it again.
In the passed issue, "Get Biased" by Nicole Smith, I have made this top, but it was to short for me. It fits good everywhere else. I added a two inch band all around the bottom and it seams that is what I need. How do you make this blouse longer and not wider? I also did get confused on the directions. In step number 5, you stated,with wrong side together stitch the rest of the large square, but the picture shows the wrong side up. I used the picture and not the directions. I tried wrong side together but it did not work. Please get back to me, ASAP
Thanks,
Penni
One of the beautiful things about making your own clothes is that you can play with the dimensions to get the fit you really want. I found that the small square made the top too big, so I used half my high hip measurements. I then measured across my shoulders and down each arm to my elbow and added 10" (for the cut off to create the arm openings). This resulted in a top that fits at my hips, rests just below mid hip and has sleeves that are long enough and do not bind under the arms.
I would not use my full hip measurement for the big square as I would end up with a shirt that was too loose across my chest...but I prefer a more fitted shirt. I highly recommend that you play with the measurements to get the fit you like.
I have made 5 of these tops using various fabrics from a madras plaid to a shimmer satin to a light weight knit. All of them fit nicely and each has its own personality...I even made a sundress using the square construction, perfect for the beach of pool.
"Dying" to try this out and glad to see the correction before I cut into any fabric but if I may make a suggestion? How about referring to the second piece of fabric as a "rectangle" and not a "square"?
What a waste of good fabric. It would have fit our 6 year old ganddaughters. Two of us on the Annual Tahoe retreaat tried it. Thinking the first had made a grevious error, my friend,an ex high school, semi-pro sewer tried it. Ha!
Now it seems we are to change the sides of the first and second squares, if so then why would we call them rectangles? Is there another correction? As for measuring shoulders, armpit etc., the original design becomes something else altogether and needs a larger, more detailed set of directions. We just wanted a fun simple project.
Let me know what to do, and I will get some 15 cent a yard
material, and try again.
Lynn Groh
I, too, found the instructions lacking. Take for example a very thin woman with 20" hips. If she makes the side of the small square 10" (half the hip measurement), the diagonal will be approx 14", making the diameter around the hem 26" (allowing for 1/2" seams). With my hips much larger than that, I could camp a troop of boy scouts under my coat. And the "correction" doesn't help. Please go back to the drawing board on this one. The only good thing is that too big is easier to correct than too small.
I made this within the hour of buying the magazine. It turned out terrible because I cut the neck opening to large. I decided to try again. It turned out Marvelous!!! I am now working on a third, it is finished but I want to add embellishment to the neckline. When making your squares you need to go back to basic algebra and calculate based on the triangle formula. A^2+B^2=C^2. A and B are equal and C = your widest body measurement. Now you get 2A^2=C^2. Find the measurement for A. Divide A by 2 and now You will have a small square the correct size. Add SA. The large square is 2x the size of the small one without SA and then add seam allowance. Hope this helps. I have been messing around with bias for a while now and so I knew how to figure my square sizes. I like the idea of adding a band around the bottom for a longer length. I want to know how you got the length for the sundress???
hi
am new here,just got my copy and cant wait to try it,I understand the ammendmants mean the measurement for the small square is now measured along the lenght of the square not accross the diagonal,my computer is well away from my sewing room is it posible to print out the comments to take accross there please
bundle
When I first read the article, I rushed to my sewing room and grabbed my measuring tape. After a few minutes, I realized that the original instructions didn't provide enough ease, so I added "a bit" to the measurements. My first trial was using a 16" & 32" square. This "fit", but was too short & did not have sufficient ease in the bust (I'm 40-31-40 for BWH (I'm a 36DD, so fitting the bust is always a challenge)).
I then estimated that I ought to try 18"&36" squares. Since I didn't want to waste any more fabric, I created a spreadsheet in Excel showing the estimated length and circumference of the shirt using various sized pairs of squares.
Sample formulae:
* length of sides of small square x -17
* length of sides of large square 2x -34
* hypoteneuse of small square = sqrt(2*((x-1)*(x-1))) -22.63
* hypotenuese of large square = sqrt(2*((2x-1)*(2x-1))) - 46.67
* Length of shirt = 1/2 Hypoteneuse of large square -23.33
* circumference of hem (and much of the shirt) = 2 * hypoteneuse of small square - 45.25
er... just noticed that the "em dash" I used looks like a minus sign...and the tabs evaporated. For each formula, the number at the end is the value I got as a result of the formula.
example:
length of sides of small square x -17
the formula is NOT x-17, but rather this should be read as:
length of sides of small square x (value I got was 17)
thanks runa
bundle
I made this top in a very short time, using the instructions published in the magazine. I used a beautiful sueded rayon, it turned out beautifully. I wear size 22, and the fit is great for me. Thanks for a fun, quick and easy project. Now, i'm going to try the jacket.
I don't sew much and I thought this pattern was too good to be true and I was right! I want it to work. Am I correct in making my squares true squares? (I know, possibly a pitiful question.) And on step 5, my small square isn't visible, it's underneath. What am I doing wrong? Additionally, it was huge. I'm thinking of finding a tutor. Help.
The ladies in my sewing class loved the idea of 2 squares. Each one made at least one top. We figured out the proportions by using the Pythagorian theorem. In other words, By calculating the diagonal of the small square to equal 1/2 of the hip, it gave us the measurement for the small square. We then simply doubled that measurement to get the larger square. By playing around with the sizing and type of fabric, we got some very different looks. All the ladies are really happy with the outcome and most are working on top #2 or #3. The neckline is so easy to use as a way to make the tops a little different. We've used a v-neck style, a boat neck, a keyhole, added a facing, and a bound edge. Any more designs like this?
I too made this using the instructions in the magazine.
The sleeves are VERY SHORT ... I had not expected that AND the length is not as long as shown in the magazine.
I'll retry with the changes that Threads listed, but right now, I'm not very pleased.
I spent over an hour figuring out the first measurement, using high school algebra. I forgot to add the seam allowance, but the darn thing came our really cute and didn't fit too badly. Unfortunately, I made the boat neck to wide and my bra straps show, which bothers my spouse, who is of the opinion that my undergarment shouldn't show. I think I'll try another one. It only took about an hour to make, once I figured it out, and now that I have some hints, I bet I can do it even better. Now, off to the trousers that I have to figure out.