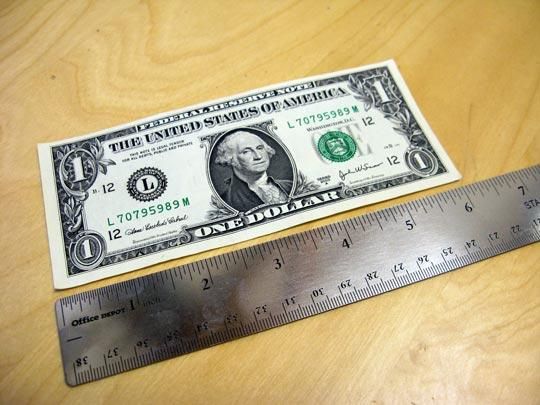
A dollar bill measures 6 inches long. Handy to know - and hopefully always at hand.
A few weeks ago, I wrote a post, “No Ruler, No Problem,” about how I used an Erector set piece to make accurate measurements in a pinch.
Checking back on my post, I found that Threads online community members have left comments with their own nifty measuring tricks. I’ve collected some of their tips here, and added a few more I’ve discovered recently:
Natural dimensions
On average, people measure 36 inches from the tip of their nose (facing forward) to the end of their arm, outstretched to the side (tip of the thumb and forefinger pinched together). I just tried this–and it’s true for me! Check out how close it is for you. It can become a handy “guess-timation” technique for the remains of a fabric bolt or roll of ribbon.
Check out your handspan and hand length. Threads readers suggested these two measurements. I found that my hand measures 7 inches from the base of the palm to the end of the middle finger. My open handspan is 8 1/2 inches–same as the width of a piece of letter paper.
Paper products
A U.S. dollar bill (any denomination, actually) is 6 inches long.
The standard Post It is 3 inches square.
Many business cards are 2 1/2 inches by 3 inches.
Letter paper is 8 1/2 inches by 11 inches.
Legal paper is 8 1/2 inches by 14 inches.
Tabloid paper is 11 inches by 17 inches.
And one for the metric system–a standard business envelope is 24 centimeters long.
All around
Floor tiles in many buildings (stores, schools, etc.) are 12 inches square.
Common pegboard has holes with centers that are 1 inch apart.
Creative usage
My favorite tip from a Threads community member is from miracleworker. Although she recommends a substitute that’s not commonly found, I enjoy her willingness to think outside the box and use a precision tool from her DIY arsenal. She uses a laser level to accurately measure fabric spread out on the floor!
Thank you to everyone who shared their measuring tricks! I look forward to learning and sharing more in the future.


I also use a laser level- not for measuring length of fabric, but for marking hems. I set up the laser at the hem height I want, then have someone pin along the laser line.
Did you know if you have a hand measurement of 7 inches from your palm to your fingertip, you must also wear a size 7 shoe and more than likely a Size 7 Ring. Aren't we put together nicely?
My handiest (pun intended) measurement for one-inch is the first section of my index finger. Looking at the line across the inside of the index finger, measure it to the very tip, excluding the fingernail. Most people's will be one inch. I teach sewing to teen agers and have not seen it fail me!
This is particularly convenient at the ironing board when measuring and turning up a hem. Now check your same finger, second line (the middle one) two inches! This also helps when figuring distance on a map where the indicator key says "one-inch equals a mile"
None of my friends sew and I have to find ways of measuring myself, by myself.
I first turn up the front of a skirt hem to the length I want. Then I use the dining table to mark the hem evenly. It hits my thigh about midway ie. below any part of my body that causes a skirt to pull up or drag down. I rest very lightly against the edge of the table and turn slowly, marking with chalk or pins as I go. I then measure down from the marking by the same amount all round for an even hem.
It's about time someone put a postings such as this online. Apparently not too many people take sewing classes in high school as we did. Those measurements were part of the course. I have used the index finger tip for all my life (70+) and your thumb tip to the first crease is 1" and the second is 1-1/4". And the dollar bill idea is great but people look rather weird toward my husband and I as we string the bills down/around a pair of pants at Goodwill to see if it will fit him.
I would like more info on the laster level. What kindis the best? Thanks
Twice round your wrist is equal to once round your neck.
Twice round your neck is once round your waist.
When sewing Blanket Stitching or other hand embroidery or sewing stitches you can 'mark' the needle holes for accuracy by machine sewing without thread along the edge using a 'Wing' or large sized needle and a long straight stitch.
A Square or a Rectangle have it's diagonals exactly the same length.
A Right angle is formed at the 3-4 corner when the sides of a triangle are in the ratio of 3:4:5. (Pythagoras)
To form a Right Angle Line to a Straight line take a pair of Compasses and draw an arc, having the point of the compasses on the line. Then move the point along the line and draw a second arc. Join the points where the arcs cross with a straight line; the X of the two lines forms 4 90' angles.
Use a Thumb Tack or Map Pin a pencil or chalk, and a length of string to draw large Circles. Secure the pin in the cen tre of the material. Loop the string around it, and join the ends so you have the correct Radius. Into the other loop place the pencil or chalk. Now rotate the marker in it's loop around the pin; drawing your circle as you go!
Great for drawing Circular Skirts as you can spread the fabric out on the floor and do it.
Finally, 4 Gallon Paint Cans, one under each table leg, raise a standard dining table to the right height for cutting out. Place cans on the floor, raise one end of table and slide or kick them into position.
Liz O'the Lake
You know the old addadge "rule of thumb", the first joint
is 1 inch. Someone else signed in before I did. Thanks for
all the hints.
Be careful about using hand length or finger segment length as standard lengths. My index finger is longer than 1" to the first knuckle, and the second segment is shorter. Together they do not add up to 2", but more like 2 1/8".
Also, the length of my hand is considerably longer than 7", but I wear a size 5 ring and my shoes are size 10. I would say to measure your own hands and fingers and mentally tattoo that length into your brain.
I measure fabric length yardage by holding it from my nose to the end of my arm which is a yard exactly! Comes in handy when I estimate how much I need for a jacket, skirt, slacks, blouse or dress. There are times when a yardstick is not available such as yard sale or flea market. Double check YOUR nose to arm measurement. I'll bet it comes close enough.
Another metric measure - The end of your fingers to your armpit is 1 metre (about 4 inches longer than a yard.
Interesting but my hand measures 7" and my shoe size nor ring size are anything close! However, I am put together nicely!
To avoid trying on pants when shopping, hold the waistband at each side, and wrap it around your neck...if the sides overlap slightly, the pants will fit in the waist. Sounds crazy, but it works.