Excerpted from “Gender Bender” by Linda Lee in Threads 150, August/September 2010
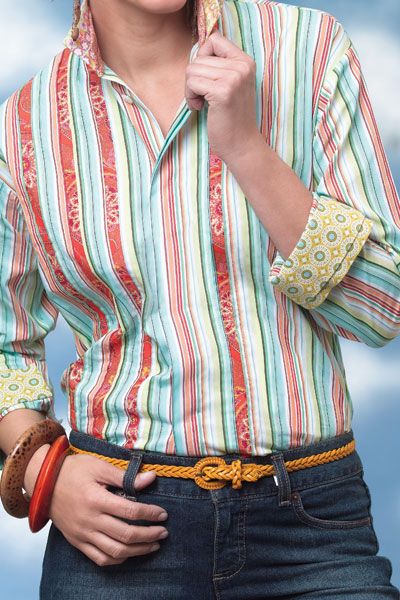
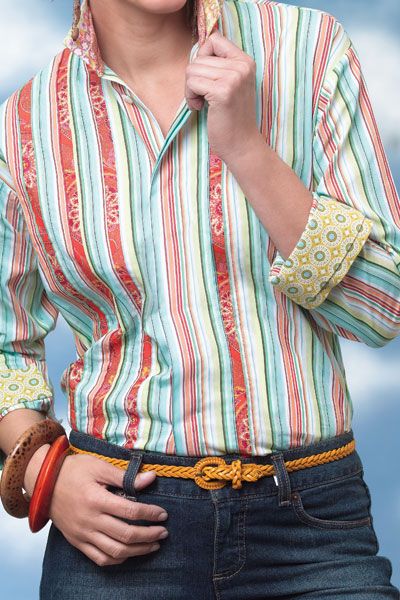
The basic button-up shirt has gone through many reinventions during its lifetime. Men’s and women’s versions have evolved in both silhouette and detailing. The classic men’s shirt in particular has taken on a new look with contrasting details, proving that this conference-room staple doesn’t have to be a boring garment—tiny elements, sometimes hidden, can revamp this classic with personality and design. These narrow inverted pleats with contrasting fabric insertions form three-dimensional stripes on the shirt front.
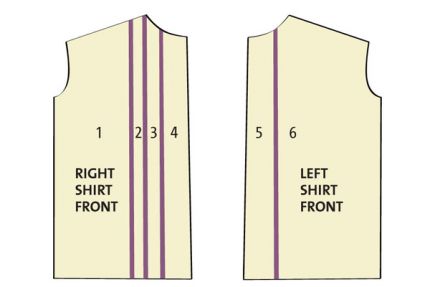
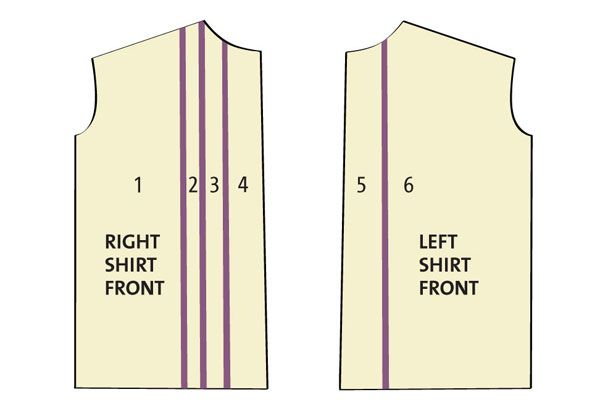
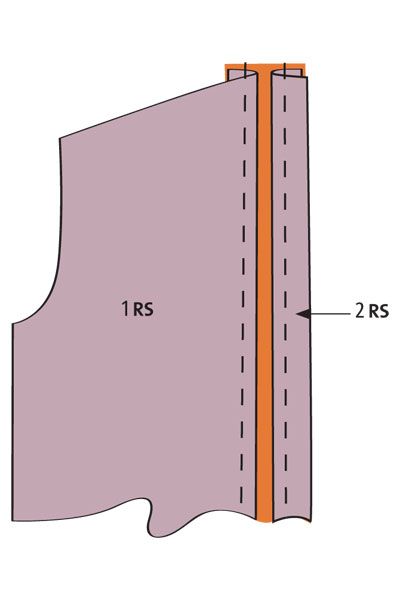
1. Plan the stripes. Determine how many stripes you want on the shirt front (they don’t have to be symmetrical). Make a second front pattern piece so you have both a left and a right side. On each pattern piece, draw 1/2-inch-wide stripes parallel to the center front.
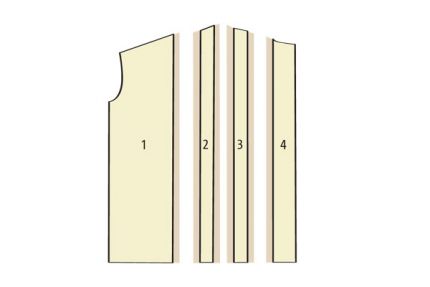
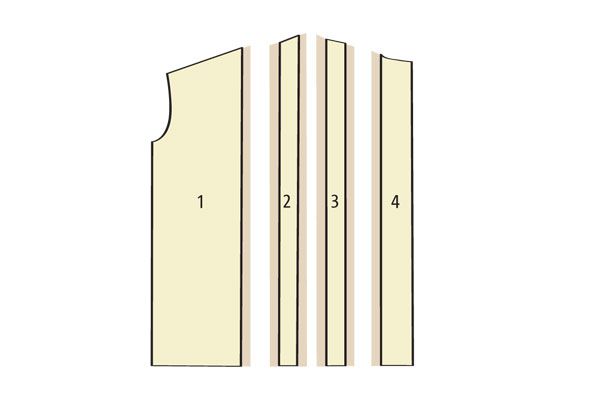
2. Alter the pattern and cut the fabric. Cut the pattern apart along each stripe, and discard the stripe pieces. Add 1⁄2-inch-wide seam allowances to each cut edge. Use these pattern pieces to cut out the basic shirt fabric. Cut lengthwise strips of contrasting fabric 1 1/2 inches wide by the length of the shirt. Cut one strip for each “stripe” insertion.
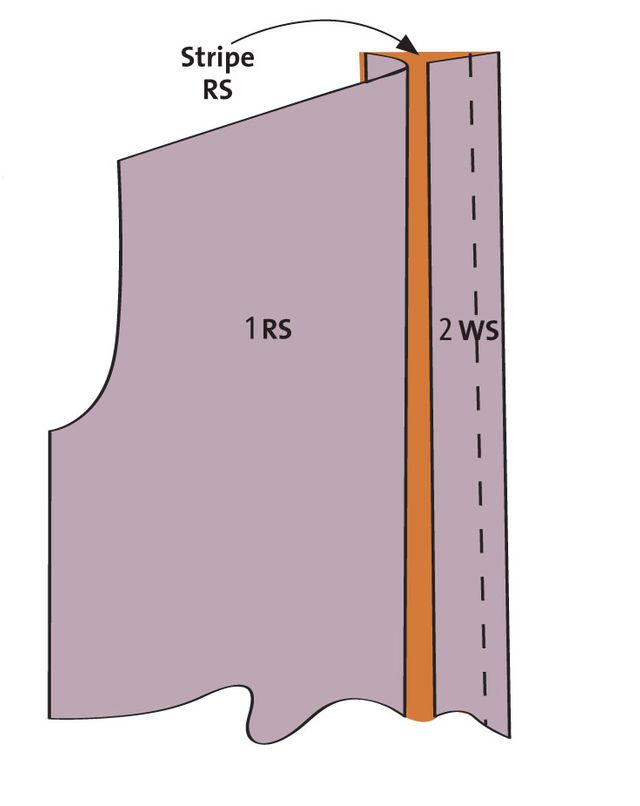
3. Attach the stripes. Press under 1/2 inch on each cut garment edge where a stripe will be inserted. Open out the pressed seam allowance. With right sides together, serge or sew one strip side to each seam allowance using a 1⁄4-inch-wide seam allowance.
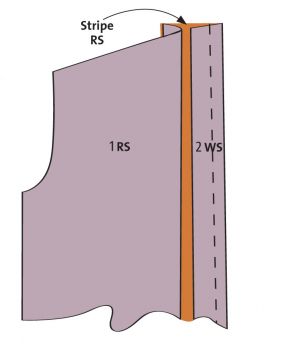
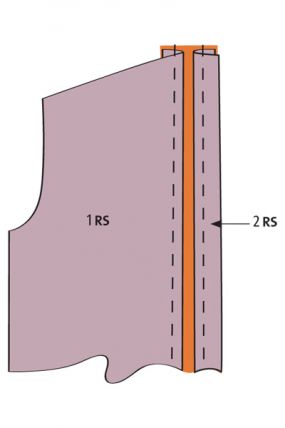
4. Topstitch the edges. Allow the pressed edges to fold under again, exposing 1/2 inch of the contrasting strip. Sew 1/4 inch from each folded edge to anchor the stripe in place. Continue to make the garment according to the pattern instructions.
For more great shirt details, you can purchase the issue for the full article here.






I find it easier to Just sew the fabric stipes together first and then handle it as a single piece I then lay the pattern on it. Keeps the pattern in one piece.
Eileen's idea is great.
Is this the correct photo? I don't see any "narrow inverted pleats".
I agree the idea that create the stripes for a cool pattern.
But my first look without reading the instruction, can see right away to stripes were not balanced especially the collar. For me that was a mistake. With this certain pattern I don't buy it, may be I am a picky person, I would use bias cut and use the same stripes and turn the opposite way for left and right shirt to make them balanced like 1,2,3,4 - 4,3,2,1 ... My opionion :)
I agree with Eileen B. I think it would be easier to piece the fabric first, then cut it out from a single pattern piece. Even if you wanted to strategically place the stripes, you could do it without cutting up the pattern piece. My opinion only . . . .
I couldn't tell from the photo which stripes were inserted. It looks like a single piece of striped fabric. Good job of piecing, I guess . . . ?
I'm totally confused. If this is an example of inserted contrasting stripes, perhaps it would have been easier to see if the main fabric was not a stripe. I'm thinking this is the wrong photo as well, dunker. And I agree w/EileenB that it is easier to just sew the stripes together and treat as a single piece. I do love the contrast back yoke facing and collar stand shown in the photo, but the inserted stripes were a bit too hidden or not there at all !!
I think the folks at Threads just wanted to see if we were paying attention! The stripe is uneven and that's why the collar is different on the front. It would have had to be cut and pieced at center back for the collar to have been the same on both sides. Good job Threads. You got our attention !!
I agree with Eileen. This method makes sewing the garment much more trouble and time consuming. Some designers need to take a page from the quilting world as far as innovation and construction. Even the narrow strip pleats could have been strip pieced and then tailored after the sections had been formed. I wonder why some designers don't look at quilt piecing techniques, especially for more architectural designs.
And the colors look like a hot mess. I would never wear this shirt with this design. Now making a solid color, tailored shirt with different textures and using the strip pleats would be an entirely different and much more appealing look.
I'm totally sure it's the wrong photo. Do you think anybody at Threads is monitoring this site?
Can you imagine how uncomfortable this collar would be with that rick rack trim against your neck?!
I just took a look back at the issue #150, the main photo for the blouse pattern with inserted stripes was a different shirt. The stripes inserted were flower pattern on red color base. And the shirt posted here which was presented for the Zigzag a constrasting inner collar stand.
Hope it helps everyone not to be confused between the instructions and the actual posted shirt in this post.
I like the uneven stripes, but fail to see where they actually pieced anything, I think its the wrong shirt for the example. It should be pieced first, then cut out as one. I don't know who would do it like stated.
Well the new photo makes much more sense. Looks like the Thread's fairies changed it in the night with nary a comment or confession to help us celebrate our "rightness". Keep up the good work all you sewing commenters. Btw, can someone clue me in on how to add a picture to my commentary? I have looked everywhere and can't find where I do it. Getting tired of being a boring female silhouette with a lot of others ! Maybe they're trying to figure it out as well !!
To: ppinnc re uploading a photo: Log in, which should bring you to “My Page”. Click “Edit my Settings”, which is a greenish colored bar near the right side. Over toward the right, where the image shows, click the “Browse” button and then choose a digital photo or other image from your computer. Click the greenish “Upload Image” button and that should work.
Am I missing something? This is already a striped shirting fabric. Then you add 4 more stripes??? I don't get it. It looks like a whole lot of nothing and has no design value whatsoever given the fabric they started with. I agree with EileenB as well. Put the stripes in the fabric not the pattern.
Hate to be harsh but adding stripes to a striped shirt is pretty much of yawn.
I loved this technique, if I topstitched the stripe pieces onto the main body, they looked like afterthought add-ons! This way looks far more integrated. And I wouldn't have thought to add embroidered stripes to the inside collar stand.
What great ideas to incorporate into future projects!
Please continue with these inspired ideas, for those of us who have gone past basics, and need some new inspiration after some forty-odd years at the old machines!!!
Thanks, lizathome. You were more helpful than the Threads folks. I did upload a picture yesterday but I guess it went somewhere else - floating around in cyberspace, I guess! But I'm glad to have finally gotten it right.
Wow! Some people really like to complicate a simple thing and tear up a perfectly good pattern in the process! I agree with EileenB.
The hot trend right now in high end garments is an eclectic mix of fabric, especially for designer men's shirts. I love seeing this new fashion in a woman's shirt, with the addition of the folded edge stripe inserts giving it wonderful texture and dimension. The unbalanced inserts, one and three, gives great motion to the design adding a bit of whimsy. Bravo, I am inspired to make one of my own! Thank you Threads Magazine!
Sewing the stripes together is not the same technique as is portrayed. The technique discussed inserts the strip then folds it back and top stitches it. You would have to allow more fabric anyway if you were going to do this as one piece.