

How to Find the Correct Sleeve Length
Find out how to fit the one measurement that does not change with age
The correct sleeve length needs to be adjusted before cutting out a garment. Dropped or extended sleeves can be tricky, since the armscye shoulder seam hits everyone in a slightly different place. You will not be able to just measure from the tip of your shoulder to your wrist.
You might need a sewing buddy to help with this measurement. But, once done, you won’t need to measure it again. It is one measurement that does not change with age!
Place a necklace on to see exactly where the garment neckline should fall. Bend your elbow and place your hand on your high hip with back of your wrist resting at the side of your waist and your fingers pointing straight down over your hip. This creates a true bend in the upper part of your wrist that you can measure to.
Measure from the side of your neck, along your shoulder line, (put a thumb under the measuring tape at your shoulder point if you plan to wear shoulder pads in the garment) continue measuring down the arm over the elbow, and to the bend in your wrist.
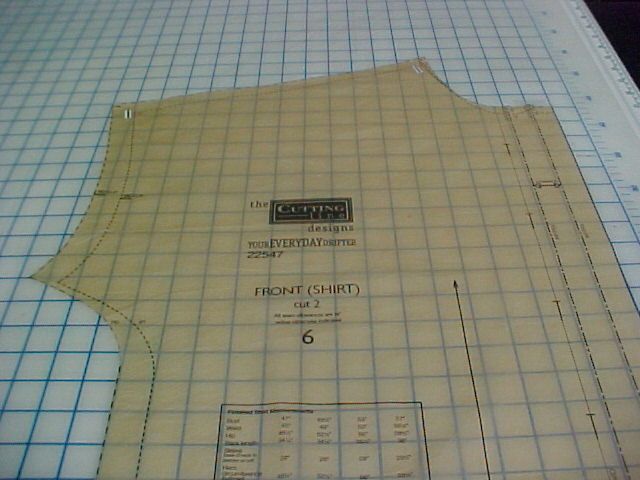
Cut out the tissue pattern in your size for the front, sleeve and cuff. On the pattern front, mark a line at the stitching line for the neck edge and shoulder seam.

On the sleeve, mark a line at the cap and the hem stitching line.

Mark a line at the stitching line on the cuff.

On a flat surface, place the sleeve on top of the front at right angles, making sure the stitching lines are matched up (not cutting lines). Then, place the cuff at the bottom of the sleeve, again matching the stitching line.

This is a close up of the overlap at the shoulder and sleeve.
…
Start your 14-day FREE trial to access this story.
Start your FREE trial today and get instant access to this article plus access to all Threads Insider content.
Start Your Free TrialAlready an Insider? Log in


This was a very helpful tip/trick. I will have to give this a try. I understood clearly what was written along with the photos. Thanks for posting and sharing this.
This looks like it could be very helpful, but I am a bit confused about the arm measurement. Does the line of measurement follow the outside bend of the arm to the inner flexion of the wrist? Mismeasurement could mean a significant difference.
Graph paper...never thought of that! Thanks for the tip!
Thanks for such a helpful tip. I will be using it from now on as I have to extend my sleeve lenghts most of the time in patterns.
Just what we needed, but didn't know it! A brilliant tip and sparkingly clear demonstration. We can always count on you to provide us with much needed information with an intuitive explanation. Thank you, Louise!
What I would like to know is whether there is a particular place on a pattern where a long sleeve should be shortened (or lengthened). Thanks.
JaneInKC.
On the sleeve pattern you will find a horizontal line (nearly halfway to the pattern) that say "lengthen or shorten here"
You must fold the pattern on this line and adjust the pattern ( draw a line and maybe fold the pattern so that the pattern line (seam sides) are straight - follow the line of the seam sides.
Don't just cut the sleeve pattern shorter at the hem line because then the pattern is not correct and the sleeve will not fit properly.
JaneInKC
If you want to lengthen the sleeve pattern you must cut the pattern on this line and then put a piece of paper in the length that you want to lengthen the sleeve. Once again follow the seam sides of the pattern and draw the sleeve pattern so that the seam sides are straight.
My husband is tall and I make his long sleeve T-shirts and I must lengthen the patterns.
I hope my advice helps.
I agree with missmargaret. I am confused about the measureing. Is it to the inside flexion of the wrist or the longer measurement of the outside extention of the wrist. This would make a large difference.
It would have been extremely helpful to have included a picture of someone actually being measured to show where the tape measure was placed, etc.
I think I must be confused about the measuring. Is your arm is bent to measure it? That's what I understand the instructions say to do so why does the pattern need to be 1 1/2 inches longer than the measurement. In my head, that would make for a very long sleeve.
You start out with your elbow bent, the inside of your wrist is sitting at the side of your waist with your fingers point straight down to the floor (the inside of your hand is sitting on your high hip...with fingers straight down to the floor). You now have created a sharp bend at your wrist...this is where most people wear the face of their wrist watch...that is where you will be measuring to...Start at the neckline and measure along your shoulder line, put your thumb under the tape measurer at your shoulder bone if you are planning on a shoulder pad, continue to measure along the outside of your arm, over your elbow and continue down to the bend where your hand meets your wrist.
Adding the extra 1 1/2" is the ease needed so you can bend your arm and the cuffand sleeve won't ride up your arm.
It is useful, but it makes the assumption that the neckline of the garment does actually start at the base of your neck. Most shirts do this. But quite a lot of women's wear does not start there. Necklines can be much more open than that. If a garment doesn't start at the base of your neck you need to know your measurement from your centre back to your wrist, and use that measurement to adjust your pattern I think.
I read in a Vogue Magazine years ago on Tailoring, where you measure from the mid-neck, the shoulder, and on a bent arm over the albow and to the wrist. I could not figure out why measure at the mid-neck; thank you for making that suggestion. It shows the difference between the neck and shoulder measurement on the pattern. I think, Also with the added extra length of 1 1/2 for ease, does that also apply to the suit coat where the shirt cuff should be exposed about 1/2 inch?
I used scotch tape to hold it in place so I could measure it myself, worked great!