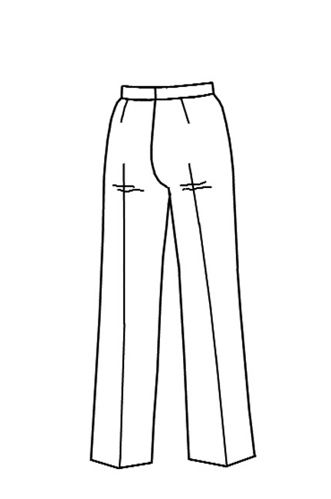
As I was reviewing my Trouser Draft CD for updates, I wanted to revise how I treat a bag under the seat. So, for those who have my CD, and those who don’t, here’s the revised way I treat this alteration.
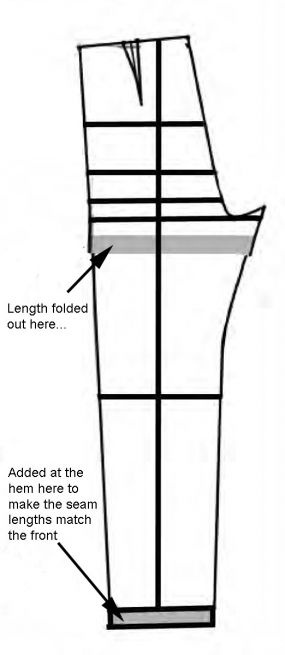
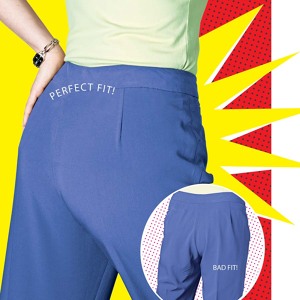
The illustration shows the problem—ripples under the derrière. This occurs for a variety of reasons, but it can be easily corrected.
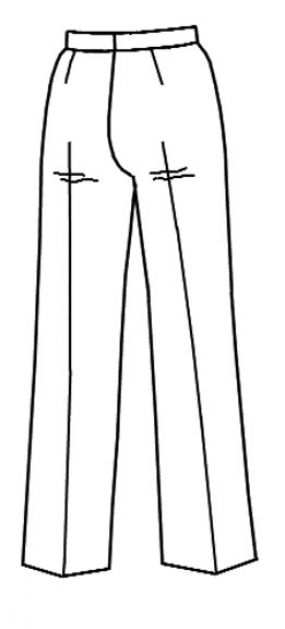
Alter muslin then transfer the changes
Pin the excess out of the muslin, under the seat, so the trouser leg hangs crisply. This will result in a double-ended dart shape. Transfer this shape from the muslin to the paper pattern.
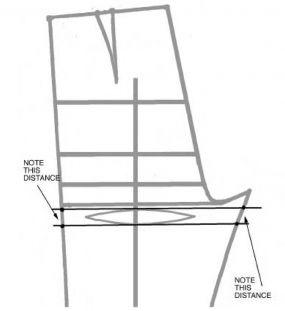
Add lines to the pattern
After the alteration is on the paper, draw two parallel lines, 90 degrees to the grainliine. The distance between these lines, is the deepest part of the dart. Measure the distance between the two lines.
Eliminate excess
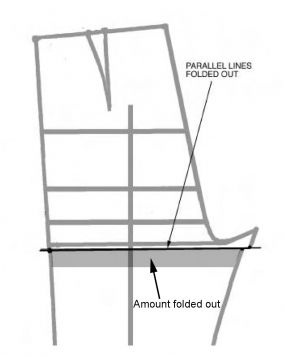
Next, fold out the excess by bringing the two parallel lines together and taping them closed. The shaded area represents the amount of excess folded out. Making this fold causes the inseam and outseam on the back leg pattern to be shorter.
Now comes the revision
To correct the back pant-leg length to again match the front side-seam and inseam lengths, add the length you removed back at the hem of the trouser. The trouser will now sew together correctly without bagging under the seat.
Start your 14-day FREE trial to access this story.
Start your FREE trial today and get instant access to this article plus access to all Threads Insider content.
Start Your Free TrialAlready an Insider? Log in






What a great idea,thank you for sharing.
Great alteration. I have done that baggy seat alteration in the past and it does work!
Thank you! I never knew quite how to fix this.
this problem has dogged me for sooo long. Can't wait to try it! Hope it works...
I'd like to fix this issue in pants I already own.
Thanks so much for this easy to do 'fix'. Once again, your ability to explain/teach shines through. Linda in MD
I, too, would like a fix for pants I already own (ready to wear) that have a baggy seat. Help.
Thanks Mr. King, I can't wait to try it.
Thank you for your expert solution.
I'd like to join the other posters who've requested this fix for ready-made pants. I recently bought two pair that have this issue and unfortunately adding to the hem isn't an option. Thanks!
This fix is a little tricky for pants that are already made but it can be done. You would first have to take the pants apart in the crotch and also take off the waistband. Hopefully the pants have enough of a hem to add to the bottom. If they don't you will have to add hem tape or some type of lining facing after you take out the hem.
You need to shorten the length of the back seam by the amount that would normally be folded together on the paper pattern; typically about 1". You cut off the amount needed from the top of the waist to crotch seam and taper it into the front of the waistband. Then re-sew the crotch seam a little deeper ("1/2 - 3/4") deeper than the original seam, tapering to nothing toward the front of the crotch. You then put the waistband back on and add 1" - 1.5" to the hem. You are basically shortening the length of the back of the pants to compensate for the lack of "filling" that would normally take up that space.
I always have this problem so it would be soooo thrilling to find a fix. But I'm puzzled - the pattern looks quite the same to me both before and after the alteration??? What is there that I can't compute?
I always, always always have this problem, I am a plus size woman and I thought it was because I have very large thighs but small waist and hips (in comparison). On pants I already own my solution is to take up the crotch. I sew from the top of the back seam around the buttocks curve up through the zipper. This usually works and if the slacks are still baggy, I take up a small amount on each side seam from the top to the hip line tapering into the seam toward the thigh. This usually works and the slacks look a lot better from the back!!
Says it occurs for a variety of reasons...? Do tell. I have this problem annnnd the dreaded "moose knuckle" aka as "case of the creepy crotch". My pants, specifically jeans, allllways do this. I'm tempted to jack up the rise in the crotch/thigh, but am scared this will do nothing but give me the otherside of it...the dreaded reverse wedgie...eeek... Suggestions?
RM
Great trick. Thanks, Kenneth.
Okay, okay. Are we talking strictly about a droopy seat, or is the seat just plain too big? Two slightly different problems.
If it's actually both, have a trusted (better yet, skilled) person stand behind you and pin, taking in the center back seam until it's smooth over the hips, then HORIZONTALLY pin each leg where it meets the seat (i.e. the crothline) the amount it takes to make the legs hang straight to the floor. This one is only a measurement. Compare the two; they SHOULD be the same, but if not, split the difference.
Chalk your CB pinline inside, remove pins and stitch, tapering up to the WB. Leaving the CF seam alone, rip the inside leg seams to the knees (typically 12"; often there's a notch).
NOW, measure IN at the BACK crotch from the seamline the amount you had pinned horizontally. Taper a chalkline from there back to the knees, and stitch.
Create a new crotch seam AS HIGH AS POSSIBLE into the seam allowance, matching CF and CB; this may take some adjustments. When you're satisfied, stitch everything again and trim all seam allowances. Now you can walk in public confidently. No one looks good with too much fabric hanging off her backside!
I'd like to add to Kenneth and JDtailor's techniques. The inseam of the back pants leg needs to be shorter than the inseam of the front pants leg. Before stitching the back leg inseam to the front leg inseam, stretch and steam press the back leg inseam approximately 7" to 9" from the crotch seam to above the knee area. The stretching and pressing builds in shaping below the buttocks. You can consult a tailoring book for photos on this technique. Stitch the inseams and proceed with sewing the pants
In response to mercystreet and the problem with "creepy crotch", it sounds like the crotch curve needs to be adjusted. Many times this occurs because the crotch curve is too straight or not deep enough. I've resolved "creepy crotch" by putting my pants on and carefully pinning out the excess fabric at the crotch curve. Its easier to have another person pin out the excess
Sorry so late to comment here, but for those of you who wanted a fix for off the rack pants, JDtialor has it right. I altered clothes for film & tv for umpteen years and this is how I learned to do that alt from all the old school Hollywood tailors,and teach it now in my alterations classes. It's a brain teaser,but once you get the hang of it, it makes a lot of sense.
Abby,
You can always make sorter style pants, capris, clamdiggers, or ankle length which seem to be the latest styles for summer. I have made add-ons with contrasting fabric and shell to match. Get comments about the outfit that is very "custom".
I especially like JDTailor's answer--Since I generally start from scratch, I don't do alterations so much, so having that answer here really completes the information!
Is there a way to apply this to the sweeping drag lines I get in back from my outer seam just below the hips diagonally down to my inner seam at the knee? Thanks.
Answer for "mclones1": If I understand you correctly, the crotch is too high/rise is too short (the distance from the WB to the crotch). Let me guess; does the CB waistband pull down? If flatfelled seams are not involved, it's an easy fix (but tricky to explain). To lower the crotch, you actually have to "take it in" by stitching a deeper "U" and definitely trim the seam allowance. Experiment in small increments so you don't end up with the crotch to your knees.
In church this weekend, looking at the fit on the woman in front of me, I thought of something else: Is the WB actually too big and your pants are sitting too low on your hips? Pull up and pinch in the waist and seat. If you can, take that in.
I love the color. I discovered a few years ago that Orange looks nice with my skin tone. I'm not sure if I will wear it a lot, but I would love to have one or two items in this color.
to mcones1: No--that's a different alteration. This one applies to ripples that are roughly parallel to the floor...
I am having a hard time seeing how this will affect the fit. To me, it looks like the back knee is being raised (relative to the front) and perhaps the back thigh will be slightly narrower, but overall, the pattern seems the same.
In the CD version, the net result was that the back crotch was lowered...basically like pulling up the central area and scooping out the crotch bed. Why is this better?
Confused,
To MakeitfitTrish:
The only way I can explain this, is that it's magic. It changes the relationship of the trouser back leg to the front. I realize it's different than the fix I show in my trouser CD, but over time I've found this to be easier, and work as well as the other way.
If you really look, there is indeed a net loss in that region (based on the area added back at the hem--you could just shorten the front leg a corresponding amount so the inseam and outseam measure the same length), but I refer to it as a no net gain, to eliminate confusion.
I wish I could answer better, but that's all I've got on this one...
This is the only way for me to get my pants back to hang smoothly. Adding to the bottom is definitely better than your earlier method.
Just found this old thread - I hope someone has an answer!
I have always had this problem; I'm an XL to 1X but carry my weight more in my hips than in my derrière.
No matter what size/weight I am, I always put the small darts over my hips rather than the standard position and my slacks and pants always hang straight on the grain and properly hang from the waistband.
But I ALWAYS get long sweeping curved diagonal wrinkles which form from the center of my derrière, down through the inseam and pointing toward the knees. I've adjust the depth of the curve of the front and back crotch seams separately until they both barely skim the body while walking and standing but after sitting in my pants, these annoying wrinkles form!
Help, please!!
I, like many of you have struggled with the various wrinkles that form under my bottom (some of them even on my pants!) I really like Mr. King's trick, I had been pinching at that extra fabric forever but didn't know how to get rid of it without a fisheye dart on my back thigh. Thank you Mr. King. (If you notice when you true up/redraw the inseam on the pattern, you are taking out quite a bit of width at the top of the seam between the crotch point and the knee.) ( on already constructed pants, this ends up being a new curve to the inseam from the crotch to the knee, taking out about half of the pinched width, this doesn't change the length of the pants) The other alteration that I do helps remove the wrinkles that some have mentioned that run from the knee to the outside hip. This one ends up being about the grainline on the back of the pants. I slice the pattern at the knee and move the lower chunk of pattern toward the inseam about 1/2 inch (this will vary for each person)I tape the pattern back together and true up the seams. Now fold the pattern in half matching the two seams from the hem to the knee, this gives the new grainline. I have very long legs (36" inseam) so this new grainline really helps the hang of the back of my pants.
I get the wrinkles in the back of the thigh, parallel to the floor. The butt seems to be fine. Will this method fix that kind of problem?
For me there is only one really correct answer in this comment stream - that is from @hautesewer as follows:
' THE INSEAM OF THE BACK PANTS LEG NEEDS TO BE SHORTER THAN THE INSEAM OF THE FRONT PANTS LEG. Before stitching the back leg inseam to the front leg inseam, stretch and steam press the back leg inseam approximately 7" to 9" from the crotch seam to above the knee area. The stretching and pressing builds in shaping below the buttocks. You can consult a tailoring book for photos on this technique. Stitch the inseams and proceed with sewing the pants'
I have been cutting patterns for industry for 30 years and trousers are one of my specialities. This technique will fix the wrinkles under your butt and the drag lives that run from the inside back crotch to the knee.
Good luck and enjoy!
Btw - @hautesewer Pls visit my blog so we can chat some more. :) http://studiofaro-wellsuited.blogspot.com.au/
I have tried this and it did not work. Later I discovered that my problem with a Baggy Seat was that my crotch depth was too short. Adding the needed amount as a "dart" from the centre back seam fading befort the side seam solved the problem perfectly. Pants problems are so complex.
Would this method work with pants that are tight, like jeans? I tried it and it helps somewhat: the ripples under the seat are less deep but they are still there... Thank you!
Many moons ago, pants patterns had a notch on the back and front pattern piece just above the knee, and again just below the crotch seam. The pattern instructions would say to slightly stretch the back leg piece between the notches to fit the front leg. I was told that it was because the leg front muscle was often fuller than the leg back muscle above the knee, and believed that until now!!
Since when did pattern makers stop using this technique, along with the one for a nice high arm scye to fit the body better by putting a sharper curve at the front armscye to fit the curve of the arm there?
Just wondering.