
Design and Sew a 1940s Hobo Wristlet
Enjoy this free pattern download and project: 1940s hobo wristlet.
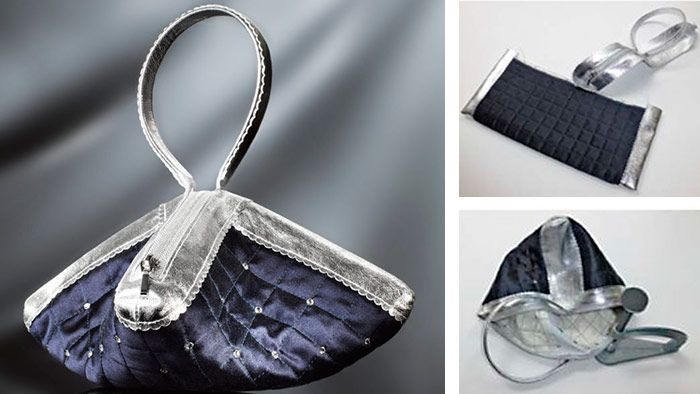
This bag is made from soft Mirabella lambskin, heavy silk satin, and a leather-covered handle. The body is quilted in a grid pattern, and the intersections are accented with Swarovski rhinestones. The starry theme carries through to the lining, which is cut from a silver-frosted illusion netting. The quilting adds stability and beefs up an otherwise drapey fabric. The high contrast between the leather and silk accentuates the scalloped edging on the bands, and box corners define the points. The bag folds flat and, when propped up, turns into a four-pointed star.
Tools and Materials Templates
- Basic leather-sewing tools, including double-face tape, hand-sewing needle, iron, side-cutting pliers, scissors and scalloping shears, tissue paper, and utility lighter
- Pattern
- 1/2 yard lightweight cotton batting
- 1/2 yard muslin
- 2 square feet leather for bands and handle cover
- 1/2 yard outer fabric
- 1/2 yard lining
- Size 12 Microtex machine needle
- Topstitching-weight silk thread for the quilting
- 14 inches of zipper tape, with#5 metal teeth and a #5 slider
- 7-inch zipper, plastic coil, for inner pocket
- 1/2-inch wide plastic headband
- Rhinestone setting tool
- Swarovski rhinestones
- Lining, cut one, 15 1/4-inch square (includes 1⁄2-inch seam allowance)
- Handle cover, cut one, 1 7/8 inches by 16 inches (in leather; includes two 5/8-inch seam allowances)
- Click to download pattern (Adobe Reader required)
Make the Quilting
(Click on the images for an enlarged version in a separate window.)

1. For a 12-inch finished quilted square with 1/2-inch seam allowances, begin with a piece of fabric that is at least 13 1/4 inches. Draw a 13-inch square on tissue paper. Use a different colored ink to draw lines through the center vertically and horizontally. From the center points, draw parallel lines 1 inch apart in both directions. Cut around the paper, leaving a 1/2-inch border. Stack the muslin, cotton batting, bag fabric, and paper template. Make sure the layers are smooth. If they are not, iron them.
2. Hand-baste the layers together with silk thread, which is easy to remove after the quilting is complete. Baste around the perimeter, across the centers, and diagonally corner to corner (2a). Quilt the layers together, starting with the center row. To prevent the layers from shifting, sew the center row and the perpendicular one, then continue sewing from the center out, alternating sides. For pronounced stitching lines, use a longer stitch length (8 stitches/inch), topstitching thread, or two threads through the needle (2b).

3. If you quilted the rows evenly at 1 inch apart, the last row of stitching around the perimeter will be at 12 inches. This 12-inch measurement is important because it is your seamline and the matching points for the bands. Be aware of the finished measurements because the size of your square is related to the dimensions of the bands.
4. Remove the basting lines, and carefully tear the tissue paper (4a). Do not cut the thread tails. Unless you secured the stitching at the beginning and end of each row, you run the risk of the stitches coming undone at the edges (4b).
Make the Side Bands

5. Use scalloping shears to trim the long edges on the side bands, shaving off a mere 1⁄16 inch at each edge. Do the same on the top band’s long edges (5a). With right sides together, fold the bottom corner and sew using a 1/4-inch seam allowance, which is the width of one scallop. Repeat with the other band (5b). Tie all loose threads, thread them on a needle, and bury the tails within the skin.
6. Fold the bag square in half to locate the center point, which will become the bottom of your bag. Match the seam on the side band with the center point on the bag, placing the scallop tip 1/4 inch beyond the bag seamline. Use a small piece of 3/8-inch double-face tape to hold the match points. This line of stitching is being sewn directly on top of the seamline on the bag.

7. Begin sewing at the bottom of the bag, stitching 1/4 inch away from the tip of the scallop. Sew to the top edge of the bag (7a). Return back to the bottom and finish sewing the side band (7b). On the other side of the bag, sew the side band the same way.
Make the Top Band

8. The side bands extend beyond the top edge of the bag. This reinforces the handle ends at a secondary point along the side bands because the extension allows the band to reach up to the handle ends (8a). On the back of the top band, draw a rectangle, 5/8 inch wide by 12 inches long, centered on the band. Cut the window (8b). Cut the zipper 14 inches long (8c).

On the side that you just cut, use side-cutting pliers to snip off a few teeth so they do not interfere with the stitching line (8d). Use a utility lighter to carefully sear the cut edges to prevent the zipper tape from fraying (8e).
Make the Handle

9. Cut the leather strip to cover the headband handle. This should measure three times the width plus 1/16 inch to allow for trimming the edge with scalloping shears, and 1 1/4 inches more for seam allowances. The 1⁄2-inch-wide headband has some depth, so the leather is cut 1 7/8 inches wide by 16 inches long, and after scalloping one edge it becomes 1 3/4 inches wide. Apply 3/8-inch double-face tape all around the outer curve.
10. Align the leather’s straight border with one edge on the headband, peel back the tape’s paper a small section at a time, and run your fingers over the top curve to smooth out the leather. Add another strip of 3/8-inch double-face tape around the inside curve. Peel back the paper and fold the leather over the inside curve. Finger-press.
11. Add more 3/8-inch double-face tape around the outer curve. Peel back the paper and begin folding the leather over the top, aligning the tips on the scallops with the edge on the headband. The leather is pliable, so tug on it until the tip of the scallops meet the edge. When taping on a surface that is not flat, you will need to manipulate the leather a small section at a time, so add the double-face tape in small increments. You can then peel the sections one by one. Do not tape areas prematurely.

12. Insert the zipper slider and mark the center point on the zipper. Center the handle, placing the plastic tip ends 1/4 inch away from where you will be stitching. Don’t sew too close to the plastic tips; you want the handle to remain flexible. Sew the handle to the zipper tape (12a). Apply 1/8-inch double-face tape to the right side of the zipper tape edges, making sure it is far enough away that you don’t stitch through it in the next step. Peel back the paper and insert the top band, centering the zipper within the window (12b).

Using a zipper foot, stitch the band to the zipper tape (12c, 12d). With right sides together, fold the ends and sew using a 1/4-inch seam allowance, which is the width of one scallop. Tie all loose threads, thread them on a needle, and bury the tails within the skin (12e).
Add the Top Band

13. Match the center points on the bag to the seams on the top band, placing the scallop tip 1/4 inch beyond the seamline. This line of stitching will be sewn directly on top of the seamline on the bag. Use a small piece of 3⁄8-inch double-face tape to hold the match points (13a). Stitch the band to the bag 1⁄4 inch away from the tip of the scallop. Start sewing at the seam junction on the band (13b), making sure the handle is centered on the side band. Sew to the other seam junction, then stop. You will need to align the other side of the handle, and this is easier if you remove the bag from the sewing machine bed. If you opened the zipper in the previous step, close it so you can accurately center the handle on the side band and ensure the side bands will end up directly across from each. On the inside of the bag, secure the handle ends to the extension on the side band, butting the edges (trim if necessary) and hand-stitching together. Be careful not to catch the bag.
Make the Corners and Embellish

14. To form the box corners, fold the bag flat to form natural triangles at the corners (14a). The box is 1 inch. Center the seam on the triangle and from the tip point on the triangle, measure up 1/2 inch, and draw a 1-inch line across. Sew the seam following the drawn line and leave long thread tails. To secure the stitching, tie each end. Repeat with the other three corners (14b). Use a setting tool to add a rhinestone at every other quilted corner or as desired (14c).
Make the Lining

15. Fold the lining square in half and sew the seam at each end. Two of the box corners are made at the bottom corners and two are made at the top opening edge, at the center. To make the corners on the top edge, you will need to sew a short seam before making the box. To find the center, fold the edge, matching the side seams. From the fold, sew a 1 1/8-inch seam. Repeat on the other edge. Mark and sew the four boxes in the same way you did on the bag corners (15a, 15b).
16. With wrong sides together, place the lining on top of the bag (16a). Make sure the zipper is parallel to the opening on the lining. Remember that this is a square, so you don’t want to tie the corners just to find out the openings do not align. Tie the corresponding box corners together (16b).
17. Turn the bag so the lining is facing out and pin the lining to the zipper edge. Hand-stitch the two layers together. Turn the bag right side out.
This handbag project was originally featured in Handbag Workshop by Anna Maia Mazur (The Taunton Press, 2014). The book features 18 easy-to-follow handbag tutorials, more than 600 instructional photographs and 90 illustrations, sewing basics, and must-know construction techniques. This post is an excerpt from the book.

Order your copy of Handbag Workshop by Anna Maia Mazur (The Taunton Press, 2014) today to learn how to make 18 gorgeous bags.
![]()
Will you create this 1940s-inspired hobo wristlet? Do you frequently sew handbags for yourself? If so, what are some of your favorite bag silhouettes and preferred materials? Have you ever created look-alike designer bags?


The bag is beautiful. I make my everyday handbags with lots of internal pockets. Every time I make a new one, I tweak the interior a bit, as I am always striving for better organization.
Looks great for when you need to carry just a little bit like when you go formal. Made with less luxurious materials it would be great for even shopping, etc. where a purse just gets too bulky.
Beautiful little bag! I do think this could be made without the plastic headband in the handle. My grandmother used to have single-layer fabric pouches like that, but no zippers, just a small loop that she threaded the bigger loop through to hang it from her wrist. They were used to carry handkerchiefs (cotton and linen washable ones, before kleenex became popular).
wow amazing!