

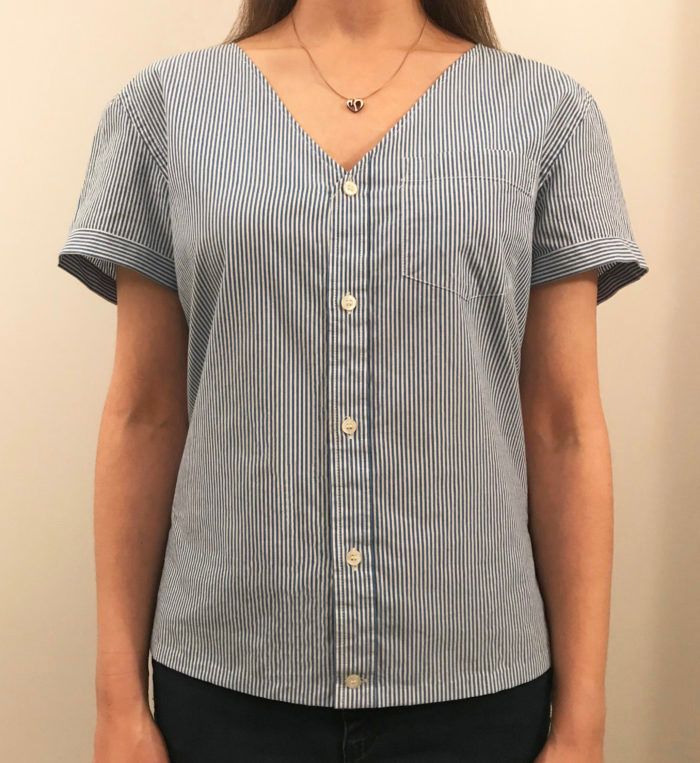
Here’s a quick way to restyle a button-front shirt.
Button-front shirts are a wardrobe staple, meaning it’s likely that you’ve acquired at least a few of them over the years. If you’re like me and no longer need as many, consider transforming one of your shirts into an adorable summer top. This short-sleeve, V-neck blouse is perfect for work, dining with friends, or an outdoor gathering. Plus, it takes only about an hour to make.
This project primarily consists of hemming: first the neckline, then the sleeves, and finally the hem. It helps to start with a shirt that is roughly your size, so it fits at the end. However, feel free to take in the shirt as you go, or shorten it. I wanted to change the shirttail hem to a straight hem, instead, but this is completely up to you. For this reason, I’ve also chosen to make steps 9 and 10 optional.
Materials
• Button-front shirt
• Ruler
• Marking implement
• Shears
Alter the neckline

1. Draft the front neckline. Determine how low you want the V-neck. It helps to first try on the shirt and mark this point with a pin at the center front. Measure 1/2 inch up from the pin to account for the hem allowance and mark this point with a marker. Note that you shouldn’t place this mark too close to any buttons, so they all remain functional.


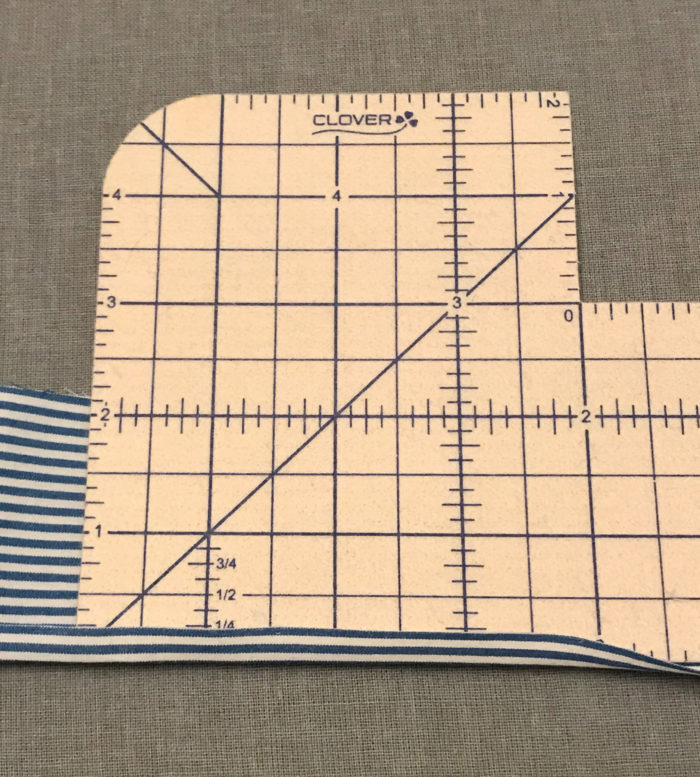
2. Determine the width. Find a desired neck width and mark this point, minus 1/2 inch, on one side of the shoulder seam. Use a ruler as a guide to draw a straight line from this point to the center-front mark. Repeat on the opposite side. Next, carefully cut along the drawn lines. Be sure to extend the neckline all the way to the placket’s outer edge when cutting, as shown above at right.

3. Design the back neckline. Flip the shirt over and make similar markings on the back, based on your preferred neckline depth. First, mark how low you want the center back to be. Be sure to include the 1/2-inch-wide hem allowance. Then, use a ruler to draw a straight line from this point to the shoulder seam mark. Repeat on the opposite side. If desired, use a curved ruler to form a crew-neck style back instead, as I later did (see image below). Finally, cut along the new back neckline edge.


4. Create a double-fold hem. Turn the entire neck edge under 1/4 inch to the garment’s wrong side and press. Repeat this a second time. With the garment right side up, stitch a scant 1/4 inch from the fold.
Shorten the sleeves

5. Mark the sleeves. Try on the shirt again and determine the desired sleeve length. (Keep in mind that a 1-inch-wide sleeve band is added to this length in the following steps. Also note that the sleeve bands are created using the excess sleeve fabric removed here, so try not to make the sleeves too long. Alternatively, you may piece together the excess hem fabric from step 9 to create the sleeve bands, if necessary.) Mark this length with pins. Then add 1/2 inch to this length for a seam allowance and draw a straight line at this level, as shown above. Cut the sleeve along the line. Repeat on the second sleeve.
6. Cut a rectangle. Use the remaining sleeve fabric to create the sleeve bands. To determine the band length, measure the sleeve’s circumference and add 1 inch for the seam allowance. Use this measurement to cut two rectangles of fabric 2 3/4 inches wide. With right sides together, stitch the short rectangle ends using a 1/2-inch-wide seam allowance. Finish the seam allowances and press open. Next, with the fabric wrong-side up, fold up the lower edge 1/4 inch and press, as shown above. This helps prepare the edge for finishing in step 8.

7. Attach the bands. With right sides together, pin one raw band edge to one raw sleeve edge. Make sure to align the band seam with the underarm seam. Stitch 1/2 inch from the edge, and finish the raw edge as desired. Repeat on the second sleeve.

8. Complete the sleeve band. Press the band away from the sleeve. Next, fold the band’s free edge to the sleeve wrong side, aligning the pressed fold along the stitching line (see above). Press, then hand-sew this edge in place.

9. Adjust the hem (optional). If the shirt is too long for your taste, feel free to hem the lower edge. As you can see, I chose to make a straight hem, but this is up to you. Try on the shirt one more time to mark the desired length with pins. Draw a line 1 inch below the pins to account for the hem allowance. Cut along this line.

10. Complete the shirt (optional). With the shirt wrong-side up, fold the lower edge up 1/2 inch to the garment’s wrong side and press. Repeat this a second time. Finally, with the garment right-side up, stitch a scant 1/2 inch from the hem edge.
Are there any other adjustments you would make to this button-down shirt? What other projects have you done that involve transforming a button-front shirt? Please share your comments below.
Related articles
Learn another technique for updating a shirt, in “Spruce Up Your Shirt Hem.”
Threads Insiders can admire a dress made from men’s shirts, in “Upcycled Four-Shirt Dress.”
If you’re interested in replacing the buttons, you might needs refresher in how to sew on a button.


I am a novice sewer. Could someone please explain Step No. 2. I'm having trouble with: "Find a desired neck width and mark this point, minus 1/2 inch, on one side of the shoulder seam."
Why can't I print out these instructions? Reading from paper is easier on my eyes than reading on the computer screen. The article prints, but other wording and images on the page overlaps.
I would suggest highlighting and copying just the article text and images and pasting everything into a Word document before printing. Feel free to adjust the image and text size to save paper.
Step 2 really means that once you decide how far out along the shoulder seam you want the neck width to hit, you still must save an extra 1/2 inch of fabric to account for the hem allowance. So if you decide you want the neck width to be a total of 3 inches on one side, you need to subtract 1/2 inch from this measurement and mark your point 2 1/2 inches away from the collar edge. The extra 1/2 inch of fabric will be turned under in step 4, resulting in the desired neck width of 3 inches. If this is still unclear, please let me know.