


I have fond memories of book covers like this. My grandmother had two. One contained the Bible, the other Walt Whitman’s Leaves of Grass or, sometimes, the latest Reader’s Digest. The soft covers were so nice for read-in-bed books. They protected the book, kept your place with a ribbon, and had a handle for hanging the book from the doorknob, the bedpost, or the nightstand drawer, just before you turn out the light.
I know these are times of Kindles and tablets, but I still have plenty of paper books to read. You can make covers in a variety of fabrics and for anywhere you might need a reference or a good read. I’m thinking of a kitchen version next, in a coated fabric, for my grandmother’s classic cookbook.

Supplies
• Four coordinating fat quarters of cotton quilt fabric
• 9-inch ribbon for a bookmark
• 1/2 yard cotton batting
• 1 package extrawide, double-fold binding
• Quilting spray adhesive
Measure the book
Make a custom cover to fit a beloved book or to “wrap” a gift book for someone special. If you don’t have a specific book to measure, the cover shown is approximately 12 inches by 9 inches, a size to fit many paperbacks.

Cut the pieces
Feel free to mix and match fabrics. I had fun mixing coordinating prints of different scales and motifs, but you may prefer a more analogous look.

Sew the cover
A few easy-to-sew components come together to make the cover. The quilted backing has bound edges. On the interior, it includes a ribbon bookmark and two sleeves to slide over the book’s cover. On the exterior, two straps create handles for hanging the cover.
Quilt the backing
1. Layer the backing pieces. Place the interior piece, right side down, then batting, then the exterior piece, right side up. Use repositionable quilting spray adhesive to secure the layers, all edges aligned.
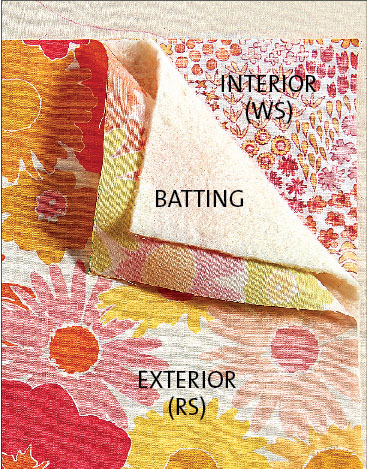
2. Quilt the backing. Stitch through the fabric and batting sandwich in the motif of your choice. The sample cover demonstrates simple channel quilting. I used my presser foot as a guide. For best results, start at the center of the backing, and add stitching rows outward to the edges. If the fabric shifts as you quilt, you’ll be able to trim the edges of the backing.

Sew the sleeves
1. Place two sleeve pieces right sides together and all edges aligned. Stitch along one set of long edges with a 1⁄4-inch-wide seam allowance. Press as sewn. Repeat with the other sleeve pieces.

2. Fold the sleeve right sides out along the seam. Align the edges, press the sleeve, then topstitch 1/8 inch from the seam/fold. Repeat with the other sleeve.

Make the straps
1. Place two strap pieces right sides together and edges aligned. Sew around the edges, pivoting at the corners, with a 1/4-inch-wide seam allowance. Leave a 1 1/2-inch-long turning opening. Press as sewn. Repeat to sew, and press the other strap.

2. Trim the corners on the sewn strap. Then, turn the strap right side out through the turning opening. Push out the corners carefully with a chopstick or point turner. Fold in the turning opening’s seam allowances and press the strap flat. Topstitch 1⁄8 inch from the edges. Repeat with the other strap.

Trim the backing and attach the straps
1. Straighten the backing’s edges where the fabrics and batting may have shifted during quilting. Trim up to 1⁄2 inch from A and B. Pin the sleeve pieces to the trimmed backing’s interior side, aligning each sleeve’s raw edges to a B edge. Trim the sleeves’ short ends to match the trimmed backing.
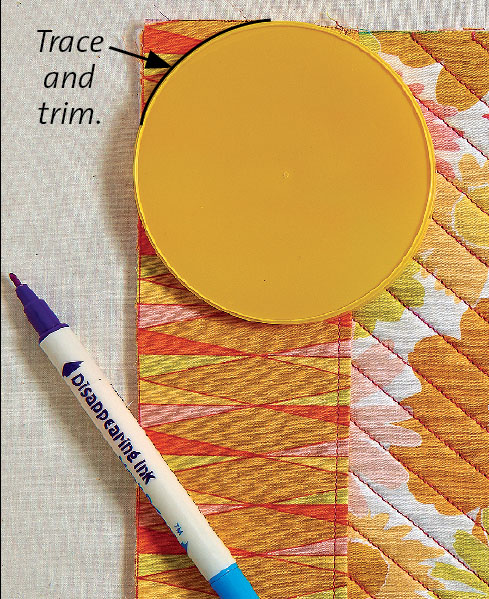
2. Round the backing and sleeve corners. Trace a round edge, such as a cup, lid, or can, then trim the sleeve and backing to the curve. Unpin and set aside the sleeve pieces; you’ll attach them after sewing on the straps.
3. Pin or baste each strap end to the backing’s exterior, about 1⁄2 inch from edge B and about 4 inches apart. Stitch a box through the strap end to attach it to the backing. Repeat with the other strap end, then with the other strap at the opposite B edge. Pin each strap handle to the backing center to be out of the way as you attach the binding.

Bind the backing
1. Pin the bookmark’s straight short end to the center of one of the backing’s A edges. Place it where the book’s spine sits when the cover is in use. Pin or baste each sleeve to a B edge, raw edges aligned.

2. Open the narrower fold on the double-fold binding. Turn in and press 1⁄4 inch of the binding’s short end. Place the binding’s right side on the backing’s exterior, aligning the raw edges. Stitch in the binding’s fold and through the backing. Overlap the binding’s folded end about 1⁄2 inch when you complete the backing’s perimeter. Trim any excess binding.

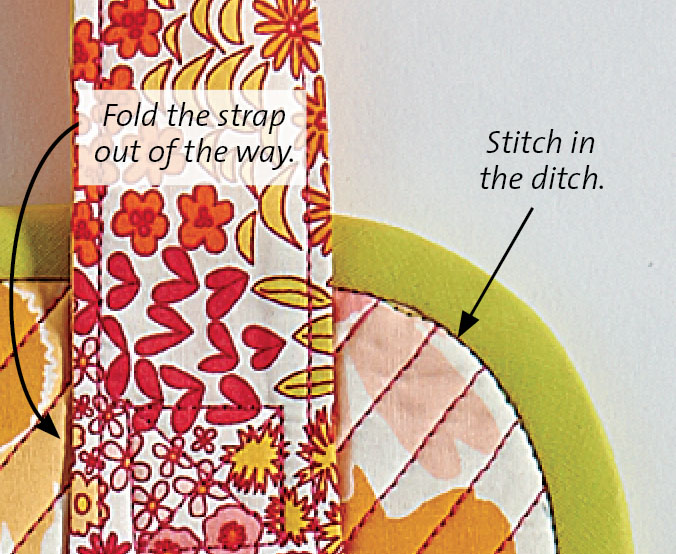
3. Fold the binding to the backing’s interior. Press carefully, and snug the binding around the rounded corners. Change the thread to match the binding, and from the exterior, stitch in the ditch, just catching the binding fold on the interior. Fold the straps out of the way as you pass them.

This article by Sarah McFarland was first published in Quick Stuff to Quilt, Fall 2014.
Photos: Sloan Howard. Location: courtesy of Stockbridge & Berry, Southbury, Connecticut. Stylist: Gloria Melfi. Fabric: Art Gallery Fabrics Dreaming Vintage collection.


Log in or create an account to post a comment.
Sign up Log in