
How to Make Hats from Recycled Sweaters
Turn your favorite pullover into your favorite beanie.
Everyone has a favorite wool sweater or two that has been shrunken and felted in the washer. I’ve used mine to make rugs, mittens, dog sweaters, and—the most versatile gift item of all—hats. Learn how to make recycled sweater hats for the entire family, and everyone else on your list.
Felted knits are great to work with because the edges won’t ravel, they’re stretchy (as opposed to felt), and you’re saving them from the landfill. You can get a second life out of stained or moth-eaten sweaters, too; just shrink them and then cut around the holes or stains.
Supplies
One felted sweater.
Note: You may get two or more hats out of one sweater, depending on the size of the sweater and the hats you’re making. If you don’t have any handy, a thrift store usually has loads of shrunken knits or ones you can felt yourself. Just throw them in the washer and dryer. Most sweaters will felt, as long as they are made from an animal fiber, such as wool, mohair, cashmere, or alpaca. Avoid cottons and synthetics.
1. Measure the head of the intended recipient.
You’ll need circumference (around the fullest part of the head, just above the ears) and height (from the top center of the head down to the bottom of the ears, or however long you want the hat to be).
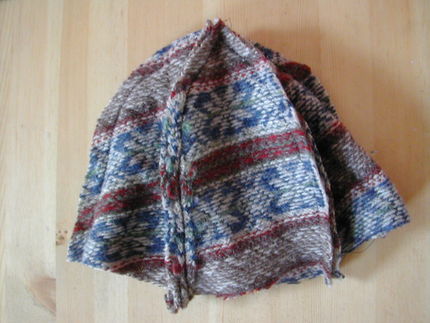
2. Make the pattern from which you will cut five identical panels.
To determine the panel width, divide the head circumference by 5, then add 1 inch for seam allowances (1/2 inch each side). My head measures 22 inches around; dividing by 5 gave me 4.4 inches, which I rounded up to 4 1/2 inches. Adding 1 inch gives me 5 1/2 inches. Add 1 inch to the height measurement. Mine was 8 1/2 inches, yielding a pattern height of 9 1/2 inches. Cut a rectangle out of card stock or paper that measures the height by the width. Fold the pattern in half parallel to the height measurement, and holding it with the fold on the left, trim the upper half of the right-side edge so that it curves toward the fold, ending in a point at the fold. (See the photo below to get an idea of the shape.) Unfold the piece and you should have something like a beehive shape. Use this pattern to cut five pieces from the felted sweater. Since felted knits are stable, you can cut somewhat off-grain if desired. If you want a binding on the bottom edge of the hat, you’ll need another rectangular piece that measures (head circumference + 1 inch) by 2 inches.

Assemble the hat
1. Sew the seams.
With right sides together, pin two sections together along one of the long sides, and sew using 1/2-inch-wide seam allowance. Start at the bottom edge, and stop 1/2 inch from the point at the top. I used a tiny zigzag stitch (1.5 mm long by 1.5 mm wide) to give the seams some stretch. Repeat to connect the remaining three pieces, then sew the first panel to the last.
|
|
|

2. Press, trim, and topstitch
Press open the seam allowances. Then trim them near the top of the hat to remove bulk. Then topstitch the seam allowances from the right side. Use a wide (7-mm) three-step zigzag, or a straight stitch.
3. Hem or bind the bottom edge to finish the hat.
I chose to add a binding. First, sew together the short ends of the binding strip. I overlapped them to minimize bulk. Then fold the strip with wrong sides together, and pin it around the bottom edge of the hat, sandwiching the hat’s edge between the layers. Be sure the inside layer is at least as long as (or longer than) the outside layer so that both can be caught in one seam. Use a wide three-step zigzag to sew on the binding, as this seam definitely needs some stretch.

Variations
There are lots of possibilities for variations and embellishments, so be prepared to get addicted to making these. Try cutting the pieces along the bottom rib of the sweater, and you won’t even need to hem the hat. Make appliqués out of the felted sweater scraps, or make a hat where each panel is from a different sweater.

More Winter Sewing Ideas
12+ Projects for the Winter Holidays


This would make a great chemo hat.