
Sew a Quick Pleated Skirt
Sew a designer-inspired skirt from pleated fabric panels.
Pleated skirts are highly wearable and versatile, and they’re on-trend right now. If you love the look but don’t want to spend ages meticulously folding and pressing pleats yourself, purchase fabric yardage or panels that come prepleated.
Most pleated fabrics are woven or knitted from synthetic fibers and permanently pressed into shape during manufacture. They can be found in some national chain fabric stores and online fabric shops. Choices available include knife-pleated, accordion-pleated, crystal-pleated, or Fortuny-style pleated fabrics, and sunburst-pleated panels that are sold in sets of two. Finished skirts should be dry-cleaned to preserve the pleating.
For the designer-inspired look shown, we used sunburst-pleated polyester panels with a grosgrain ribbon for the waistband. You can make the skirt with an elegant asymmetrical or high-low hem that’s longer in back (shown), or you can make the skirt hem an equal length all the way around. With a pleated fabric, there’s no pattern necessary to get a runway-worthy look.
Supplies
•
Set of sunburst-pleated fabric panels or 2 yards other pleated fabric
•
2 1/4 yards 1-inch-wide
grosgrain ribbon
•
5 sets sew-on snaps,
size 4/0
•
2 strips 8-inch-long by 1/2-inch-wide fusible
interfacing
•
1/2-inch-wide clear adhesive or painter’s tape
•
Hook-and-bar closure
•
Water or air-soluble fabric marking pen
•
Fray Check or Fray Block
Measure and cut
You can cut a pair of sunburst-pleated fabric panels to fit your measurements and to any length you wish. The panels are narrow at the top and wide at the bottom, and the pleats are also narrower at top and wider at the bottom. Sew the skirt’s waistline somewhere near the narrow end of the panels. Decide on the pleat width that is most flattering to your figure, mark its position along the pleated panels’ length, and place the skirt’s waistline at that point.
This skirt has no center-back or center-front seams. Instead, the skirt front and back are cut from two pleated panels and are sewn together at the side seams. A grosgrain ribbon finishes the waistline, and a side-seam snap placket, plus a hook and bar, form the closure.
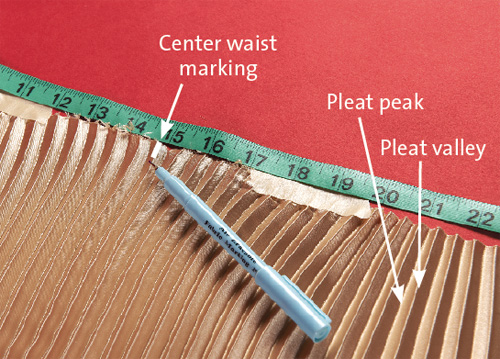
1. Prepare the pleated fabric. Lay the fabric panel right side up on a work surface. Lightly tape the narrow end’s edges to the surface, opening the pleats and flattening the fabric.

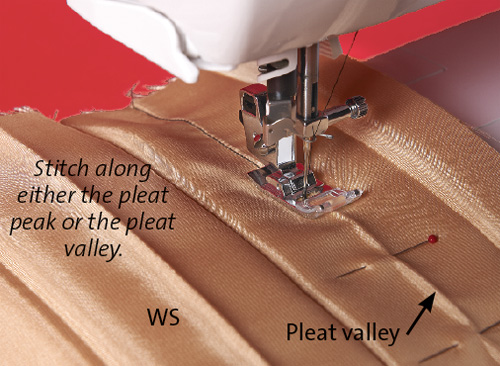
2. Mark the waist center. Pleated fabric has “peaks” that rise and “valleys” that descend. Identify the center point of the fabric panel’s narrow end, and mark the nearest peak with a water- or air-soluble fabric pen. This is the center waist marking.
3. Calculate the skirt waist. Measure your natural waist (the narrowest part of your torso); add 3 inches to this measurement for ease. Divide by 4, then add 5/8 inch for seam allowance: [(Waist measurement + 3 inches) ÷ 4] + 5/8 inch. The result is the width to measure each half of the skirt front and back.
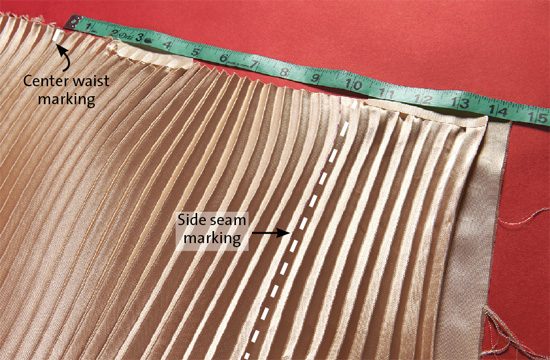
4. Mark the waist. On both pleated panels, measure to left and right of the center waist markings the amount calculated in step 3; mark the closest pleat peak or valley. Make marks down the length of the same peak or valley on both sides of each panel’s center marking for the side seam cutting lines.
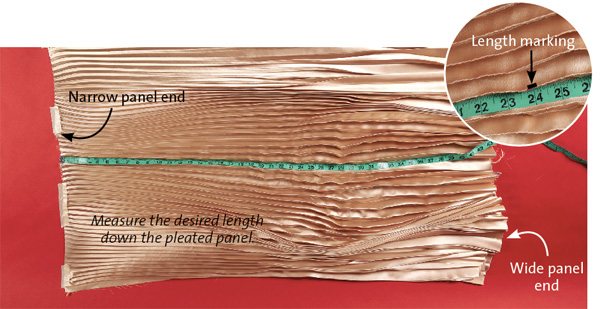
5. Determine the skirt length. Measure from your natural waist to where you want the skirt’s hem to fall. Two hem-length options are given. Choose one panel as the skirt front, and one as the skirt back.
For a one-length hem: Measure the desired length down the skirt center front, center back, and all four side seam cutting lines. Mark the hem length at all points.
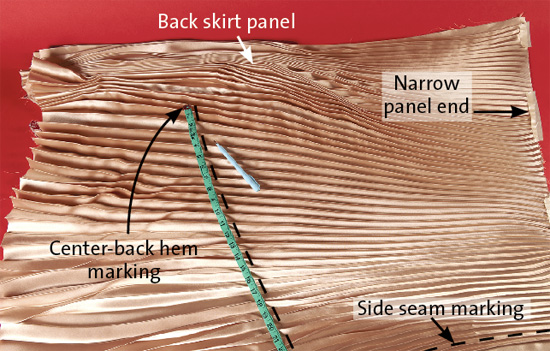
For a hem that is longer in the back: Mark the skirt center front as described for the one-length hem. On the skirt back, measure down from the center back waistline marking the same amount as the skirt front, plus 5 inches. Mark the hem length at the side seam cutting lines 1 inch longer than the center-front length.
6. Draw the hemlines. Add a 2-inch hem allowance. This provides enough width to help ensure an evenly cut hem. For a one-length hem: Draw a line joining the center-front and center-back markings to the side seams. For an asymmetrical hem: Draw an arch joining the side seam markings to the center-front hem marking. For the back hem, reverse the hemline curve, so it scoops downward. Cut both skirt panels.
Assemble and finish
Sewing the skirt is easy; the waistband is a grosgrain ribbon, and the skirt closes with a simple five-snap placket on one side seam. Pleated fabric can be difficult to re-press in a direction contrary to the existing pleats, so the hemming method here requires no turning, pressing, or stitching.
Sew the skirt body
1. Sew the right side seam. Pin the skirt panels, right sides together, along the right side seam, matching the markings. Match either two peaks or two valleys on the seamline. Sew the seam along the marked peak or valley. Matching the pleat folds ensures that the skirt hangs smoothly at the sides and creates a nearly seamless appearance.
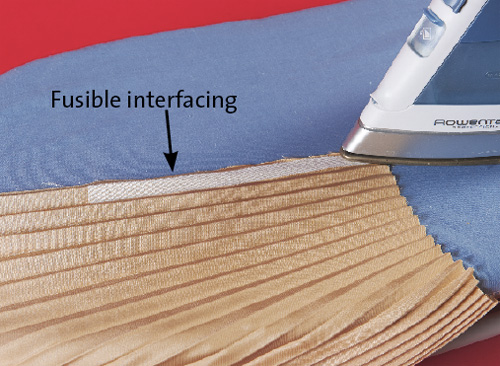
2. Reinforce the snap placket. Fuse one 8-inch by 1/2-inch interfacing strip to the top of each left side seam allowance on the wrong side. Align each interfacing strip with the pleat peak nearest the seamline within the seam allowance.
3. Topstitch the placket. On the front and back placket sections, fold the interfaced seam allowances to the wrong side. Then, right sides up, stitch in the pleat valleys nearest both stitching lines, catching the interfaced seam allowances to secure them. The placket extends 7 inches below the waist seamline.

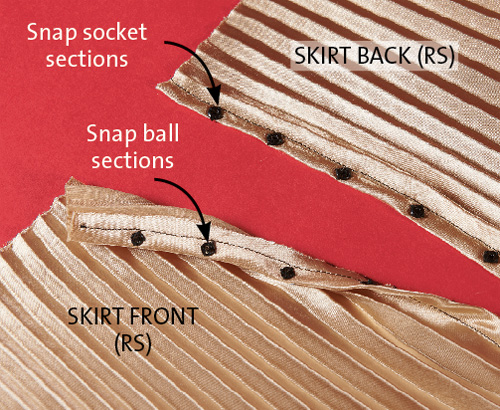
4. Affix the snaps. The placket’s front overlaps the back, so place the snap ball sections to the front placket’s wrong side and the socket sections to the back placket’s right side. Position the top snap 1 inch below the skirt’s waist edge and space the snaps 1 inch apart. Hand-sew the snaps in place.
5. Complete the left side seam. Pin and sew the remaining length of the left side seam, making sure the pleat folds are aligned. Stitch along the peak or valley.
Finish the waist and hem
1. Prepare the ribbon. Fold the grosgrain ribbon in half, and mark the center at the fold. Divide your waist measurement by 2, then add 1/2 inch to 1 inch for ease. Mark this length on each side of the center fold. Align the ribbon’s bottom edge 5/8 inch below the skirt’s waistline edge, on the right side. Match the ribbon’s center fold marking with the skirt’s right side seam and pin.
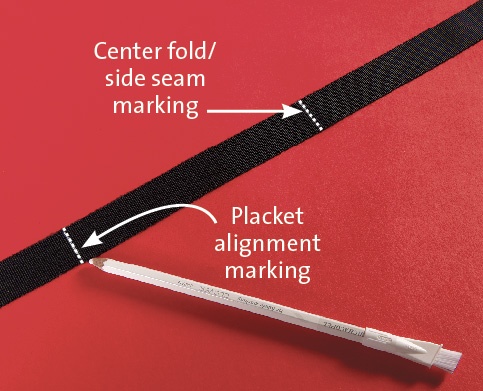
2. Fit the skirt waist. Fold together two or more pleats halfway between the center front and center back markings and the corresponding side seams. Pin the ribbon to the skirt waistline’s right side, securing the folded pleats in place. Align the remaining ribbon markings with the snap placket edges.

3. Bind the waistline. Wrap the ribbon ends around the plackets to the skirt’s wrong side. Extend the ribbon 1 inch beyond the back placket, then fold to create an underlap. Pin the ribbon in place on the wrong side; the waist seam allowance is sandwiched between the ribbon layers. On the right side, stitch along the ribbon’s bottom edges through all layers. Then, sew the ribbon’s top edges together.

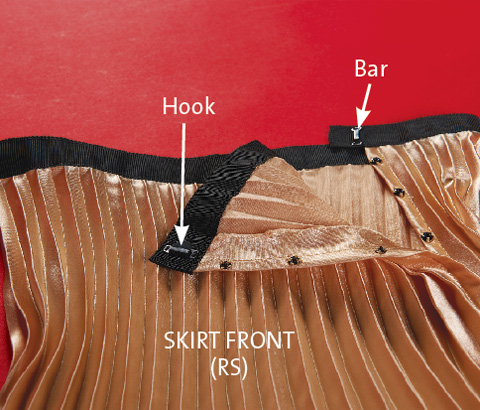
4. Sew the hook-and-bar closure. At the placket’s top edges, hand-sew the hook to the front placket’s underside, and the bar to the back placket’s right side.
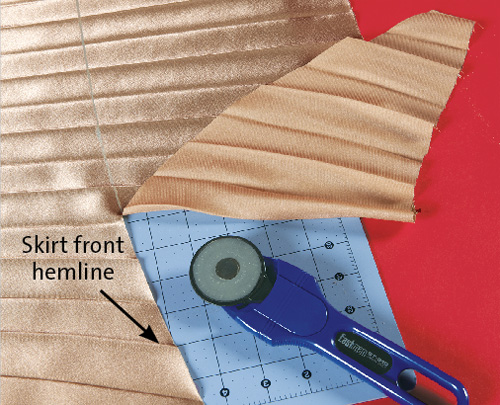
5. Trim the hemline. Double-check the hem length, and make any corrections necessary. Then, cut away the hem allowance as neatly as possible. Use a rotary cutter against the edge of a ruler for a clean, smooth cut.
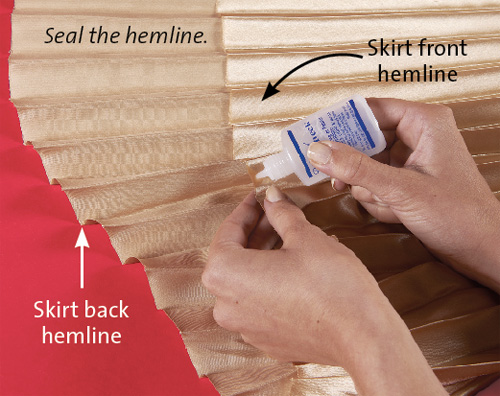
6. Seal the hem. Apply a very thin line of Fray Block or Fray Check along the hem edge. To control the anti-fray product’s application, don’t cut the tip—pierce it with a pin.
This article was written by Ann Vidovic and was first published in the Threads publication Quick Stuff to Sew, Winter 2012. Photos by (model) Jack Deutsch and (all others) Sloan Howard.


It might be easier to use the fabric selvage for the hem and adjust the length at the waist.