Bias Binding for Curved Edges in Chiffon | Video
Susan Khalje devises a method that controls the fabric, avoids distortion, and hides stitches.
Couture expert and Threads Contributing Editor Susan Khalje demonstrates a method for attaching a chiffon bias binding to curved edges on silk chiffon. This is one of the most challenging edge finishes you can attempt, due to the fabric’s instability and transparency. It’s difficult to control the bias strip, avoid distorting the neckline itself, and hide any attachment stitches. The traditional bias-binding technique—while excellent for stable and opaque textiles—didn’t meet Susan’s exacting standards on silk chiffon, so she came up with a refinement that solved her problems. Susan’s approach requires accuracy and patience, but is accessible to anyone who can sew a neat fell stitch.
Prepare the pieces
The first steps include staystitching the garment’s edge; Susan points out that this might take a few tries to get the perfect curve, but removing the staystitching to resew won’t damage the fabric. You’ll also need to cut chiffon strips that are on the true bias. Follow Susan’s tips for ensuring a perfect 45-degree angle; precise marking and cutting with special shears make the difference. You’ll also learn how to test the cut strips to verify that they have been cut correctly.
Attach the binding
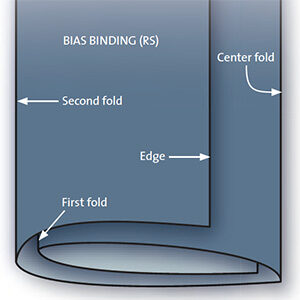
Begin by basting the bias strip to the curved edge, then sew it permanently. Remove the basting so you can press the edge flat. Then fold the binding under, enclosing its raw edge, and hand-sew it to the garment with a fell stitch.
Susan notes that, at this point, the bias binding is nicely attached, but still doesn’t look smooth and flat. Even with careful pressing, it will look slightly rumply. Rather than settle for a less-than-ideal binding, Susan discovered that she could fold the edge in one more time and fell stitch it in…


Thank you for this great video!!! It exactly what I needed to finish the arm slits for my kaftan.
Very interesting. I feel like we missed a couple of key points that seem to have been removed from the middle of the video:
- what preparation did Khalje do of the binding before attaching it -- for instance, did she iron and manipulate it to match the curve? Did she stretch it, as is often recommended before applying bias binding, or does she discourage that practice in this instance?
- did she hand baste the binding? I would infer that from the discussion of removing the basting stitches, but we never saw any previous mention of using basting stitches so that was unclear.
- on the "test" curve she showed at the beginning, the seam allowance looked like a half inch or 5/8 of an inch, but where we skipped ahead to the bias binding having been attached to the curve, the seam allowance was at 1/4". Did she cut down to that 1/4" on the test curve before applying the binding? Did she baste the binding on to the original curve in a staggered fashion and then trim it back? Is the test curve she showed at the beginning unrelated to the actual sewn piece?
Khalje is such a great video instructor, I was disappointed to miss so many key details here.
The double-fold method is interesting and I do expect to try it out at some point. Thanks.