
How to Select and Sew Minky Fabric
Tips for working with this plush fabric
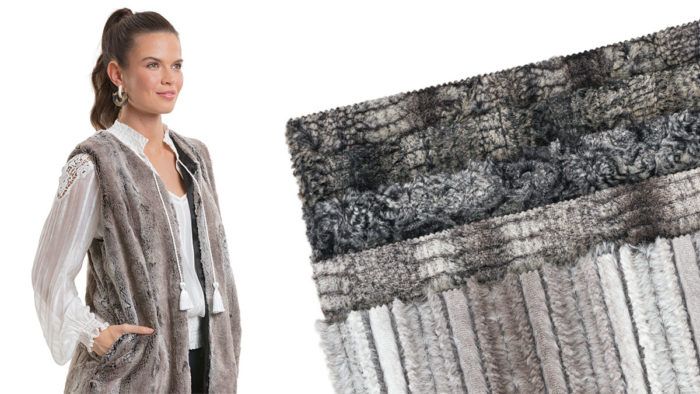
Minky is a soft, 100 percent polyester knitted fabric that feels similar to faux fur. Typically, it features a short pile, sometimes with small raised polka dots. However, it can be found with a longer pile, usually no more than 15.0 mm. The difference between minky and faux fur is in the backing: Minky has a thinner, more flexible backing and has more drape than most faux furs. Minky can be machine-washed with cold water and tumble-dried on low heat.
Minky is most often used for children’s blankets, pillows, and stuffed animals. It is sometimes used as a quilt backing because of its incredibly soft hand. You can also use it for garments such as vests, jackets, and sweaters, as well as accents on accessories such as hats, gloves, and scarves. Its light weight and warmth are additional benefits. Minky’s silky pile makes it somewhat difficult to work with, but this challenge can be mitigated by using the correct tools and techniques.
Preparation and cutting
Minky fabric requires precise preparation. Cut slowly to avoid making mistakes.
Prewash the fabric. Although the fabric does not shrink, prewashing results in better stitch quality. Machine-wash in cold water, then tumble dry on low heat. Remove the yardage from the dryer right away.
Do not press. The heat of the iron can melt the fabric.
Use a with-nap layout. Cut in a single layer and secure the pattern pieces with pattern weights rather than pins.
Cut carefully. Use a rotary cutter or sharp scissors. This fabric sheds when cut, so lay a sheet under the cutting and sewing areas and keep the vacuum handy for cleanup.
Appropriate notions
The main challenges with minky fabric are controlling the slippery fabric and managing the lofty pile. The correct tools improve your results.
Marking: Pins can slide out of this fabric, so safety pins or tailor’s tacks work best. The nap makes it difficult or impossible to use many chalks- or ink-based marking tools on the right side.
Interfacing: Do not use fusible interfacing as minky cannot be pressed. If the design requires reinforcement to install snaps or grommets, add a piece of grosgrain ribbon between fabric layers so the snaps or grommets do not pull out.
Thread: Polyester or cotton threads are appropriate for this fabric.
Needle: Use a 75/11 stretch needle.
Presser foot: A walking foot helps feed the fabric smoothly on a standard sewing machine.
Closures: Sturdy buttonholes are virtually impossible to make in minky, and buttons are difficult to sew onto it due to the pile. Zippers or snaps are better choices.
Technique advice
Sewing with minky is made easier by working methodically.
Secure the fabric layers. Because minky shifts easily, it is difficult to control while sewing. When joining layers, place pins close together. It may also be necessary to add a second row of pins or hand-baste the seam. Double-sided adhesive tape does not work to hold layers together because of the fabric’s pile.
Choose a stitch type. The best seam for this fabric is a four-thread overlock. Seaming with a serger result in less slippage. If you do not have a serger, sew seams with a zigzag set to a width of 1.0 mm and length of 3.0 mm.
Finish seams neatly. Sewing against the direction of the nap gives you the most control. If you are not using a serger, sew the seam, then finger-press the allowances open. Topstitch each allowance with 3.5 mm-long stitches, 1⁄4 inch from the seam. Trim the excess seam allowance. On the right side, brush the nap out of the stitches with a toothbrush or fine-tooth comb.
Sew the hem with a stitch that will stretch. Hand-baste the hem allowance, then stitch with a cover stitch or twin needle.
Sandra Betzina is the author of All New Fabric Savvy (The Taunton Press, 2017) from which this article is adapted.
View the full article by clicking View PDF below.
View PDF


Log in or create an account to post a comment.
Sign up Log in