
How to Sew Shadow-Work Embroidery
This easy, hand-embroidery technique produces exquisite effects on sheer fabrics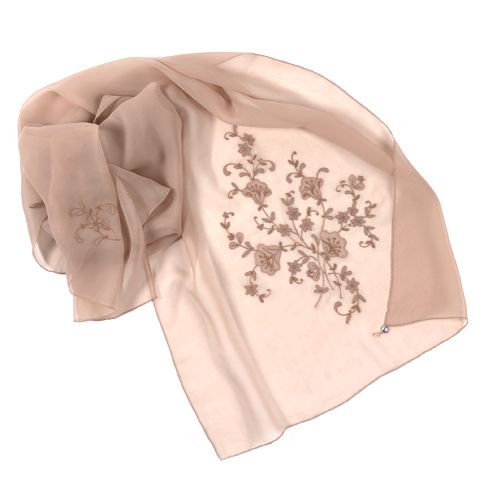
Subtle blossoms embellish one end of a 1920s silk-chiffon scarf, echoed by a sprig of posies at the other end. Worked in cotton floss with a silk sheen, the Madeira embroidery on this sheer fabric includes individual embroidery stitches, shadow work, and pin-stitched appliques. For details on shadow-work embroidery, which is worked on the wrong side of the fabric and shows through to the right side, keep reading.
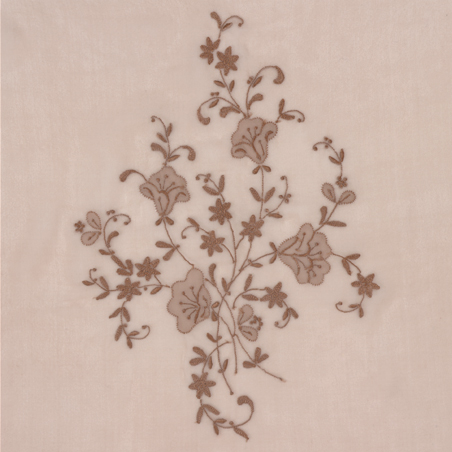
I have a collection of vintage hand-embroidered table linens, garments, and accessories that I’ve acquired over the years. I love learning about the stitching techniques used to create these beautiful pieces, and shadow work, a form of embroidery first popular in the 18th century, is one of my favorites. It’s one of the stitches used in Madeira embroidery, which experts consider the finest embroidery in the world, and it was originally a form of white work, or embroidery on white fabric worked with white thread. At first glance shadow-work embroidery looks like fine applique, but the shaded areas of the designs are actually created by stitches on the wrong side of the fabric that show through on the right side.
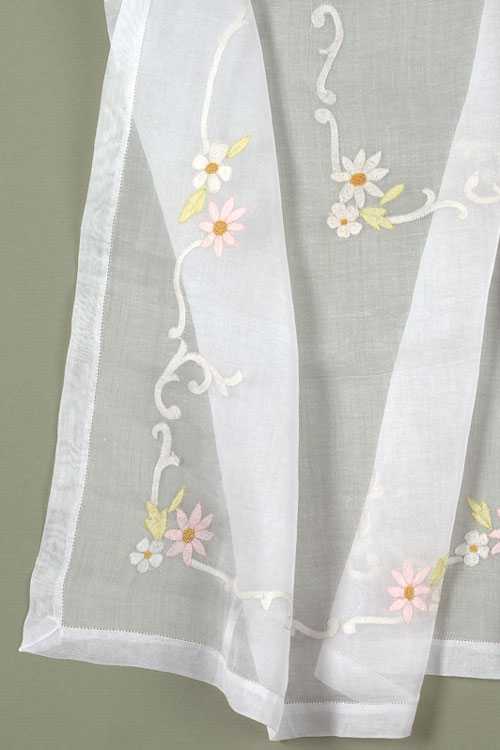
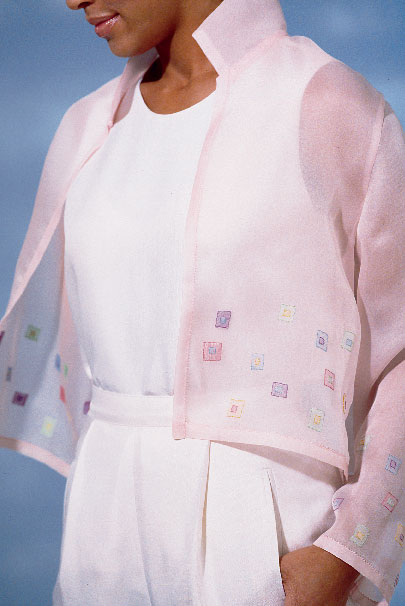
As you can see in the vintage examples shown above, shadow work was most often used in small floral motifs in combination with other stitches like French knots, bullion knots, and satin stitches. But this technique is just as effective with contemporary designs (shown below) whether on soft furnishings or garments. And although it looks very intricate, the stitch is really quite easy and fast to do. So even if you’re a dedicated machine embroiderer, you might want to take a break from your machine and try this hand-stitching technique.

One simple stitch to master
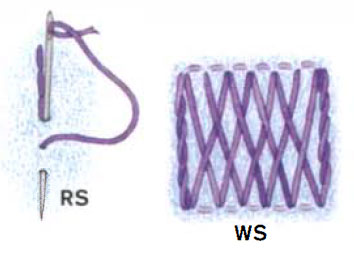
Shadow work is commonly worked from the wrong side of the fabric using a closed herringbone stitch, but you may find some embroidery resources that suggest working the stitch from the right side, which is called a double backstitch. Both versions of the stitch are essentially the same and produce the same results; however, I think the herringbone stitch is easier, and it’s the one I’ve shown in this article.
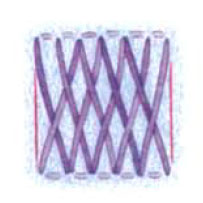
The herringbone stitch is worked from left to right, making a cross stitch on the back of the fabric and a double row of tiny backstitches on the front, where the needle catches the fabric to form the outline of the design (see the drawings below).
With each stitch, the needle enters the hole from the previous stitch, so the back stitches are very close together. Try to keep the stitches as even as possible. You’ll find they get smaller as you perfect the stitch, but tiny stitches aren’t necessarily the goal. I’ve found examples of shadow work that range from very dense stitching, in which the X’s on the back are barely discernible, to looser stitching in which the X is obvious. As you sew, you can check the degree of color that’s “shadowing” through by placing the embroidery over a piece of white fabric.
As a neat, effective way to secure the thread at the start and end of your stitching, I suggest using a combination of a loop knot and a few tiny backstitches. I usually make one loop knot at the start of a stitching row and two at the end, weaving a short thread tail through the cross-stitches in the back before I cut the thread.
Like most embroidery, shadow work is easier to do if you hoop the fabric, and I recommend using a 5-in. or 6-in. plastic hoop, with the fabric hooped just tautly enough to let you easily insert the needle as you move along. Wrap the innerhoop ring with twill tape to hold the fabric securely and avoid making hoop marks on the fabric.
Adapt the design to the process
Because of the nature of the stitch, which must be worked between two parallel points, it’s important to consider the design carefully. Almost any design is a candidate for shadow work, but you may need to adapt it. If the design is too large, for example, break it down into smaller segments so the crossstitches on the back of the fabric will not be too long, in which case they will have a tendency to snag. If the design you want to use seems too large, trace it on tracing paper and divide it into workable sections.
When you choose a design, also consider the stitching sequence. For the square-within-a-square design on the jacket, the simplest sequence is to stitch the small square first, then stitch the large square over it. When you
work the design in this way, however, the herringbone stitch creates an outline on only two edges of the square. To complete the outline, finish each remaining edge with a backstitch, as shown in the drawings below.
To transfer the design to the fabric, place the fabric wrong side up on a flat surface with the design underneath, and trace the design using a No. 2 pencil with a slightly blunt point. A pencil produces a finer line than a washable fabric-marking pen and since the tracing line is hidden in the stitches, is safe to use. Remember, you’ll be tracing on the wrong side of the fabric, and the design will be seen on the right side, so you may need to flip your design over before transferring it to keep it from appearing backward on the fabric.
Sheer fabric is essential
In order to get a shadow effect, the fabric must be transparent. But if the fabric is too sheer, the stitches on the reverse side will be completely visible, instead of creating a nice shaded effect. Lightweight, tightly woven fabrics that are slightly opaque are the most suitable. I prefer crisp fabrics, like cotton organdy, silk organza, and handkerchief linen. But soft fabrics, like batiste, chiffon, voile, or georgette, are appropriate as well. You might even try some sheer wools. If a fabric feels a little too soft, I spray it with a little spray starch to make it crisper. Synthetic fabrics and blends are as suitable for shadow work as natural fabrics.
Traditionally, white or off-white fabrics were used for shadow-work embroidery, but soft pastels are a nice alternative,
and darker colors can be used with matching thread for a tone-on-tone effect. If your fabric needs preshrinking, use the same cleaning method you’ll use to later care for the item.
Test thread colors before you stitch

make your color choices. Intense colors “shadow” through
as clear, soft tones, while darker colors look grayed out.
A variety of threads can be used for shadow work, but cotton floss is the most common choice. Silk thread or cotton floches (a single, twisted strand of embroidery thread) can also be used for slightly more sheen. Always use a single strand of thread, and cut it about 18 in. to 20 in. long for manageable stitching.
Shadow work is effective with white thread on white fabric, but colored threads and fabric add interest to the embroidery. When choosing a thread color, it’s usually better to select a brighter, more intense version rather than a darker version, because darker colors tend to just look gray under the fabric, while brighter colors appear soft. Test the thread colors you’re considering by placing the skeins of floss under the fabric to see how they’ll shadow through.
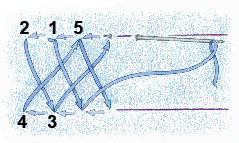
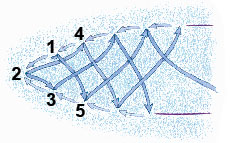
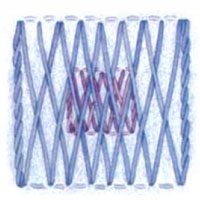
The herringbone stitch is all you need
Shadow-work embroidery is based o n a close herringbone stitch that forms a series of crosses on the wrong side of the fabric and a double row of backstitches on the right side.
1. Working left to right on fabric’s wrong side, take small backstitch at top line of design (down at 1, up at 2), go to bottom line of design and take another backstitch (down at 3, up at 4, down at 5, up at 1). Stitch through row, forming crosses as you go and trying to have needle always emerge in hole from previous stitch.
2. Length of backstitches may need to be adjusted around curves to evenly fill in each shape, with slightly longer stitches on outer curve.

3. To form corner or point, top and bottom rows of stitches share common needle hole at start of stitch sequence (down at 1, up at 2, down at 3, up at 2). Then put needle down at 4, up at 1, down at 5, up at 3, and continue making X ‘s.
The loop knot
This is a neat way to secure the thread at the beginning and end of a row of stitches.
Take small stitch on wrong side of fabric and pull thread through leaving 3-in. to 4 -in. tail. Take second small stitch and form loop. Carefully pull needle through loop and tighten to secure knot. Trim away thread tail.

Stitching a Square Within a Square
This is the cleanest way to complete this design, but keep the outside squares to less than 1 in. to avoid long thread floats on the wrong side.
1. Complete smaller, inside square working stitches from top to bottom.
2. Stitching from RS, as shown at left below, outline two remaining edges of square with row of backstitches, as shown at right below.
3. Complete larger square on top of smaller square in same manner.
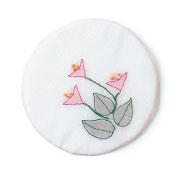 Try it out! Try shadow work on a coaster: Embroider a simple design on a 4-in.·diameter circle of fabric, like cotton batiste (using additional embroidery stitches if you like). Pad with a circle of needlepunch batting, and line with the same fabric. Optionally back it with felt to prevent slippage.
Deborah Yedziniak stitches in Manlius, N. Y, and teaches classes nationwide. E-mail her at [email protected].


Log in or create an account to post a comment.
Sign up Log in