

Q & A: Locating the Waistline
Easy steps to locate the waistline on a pattern.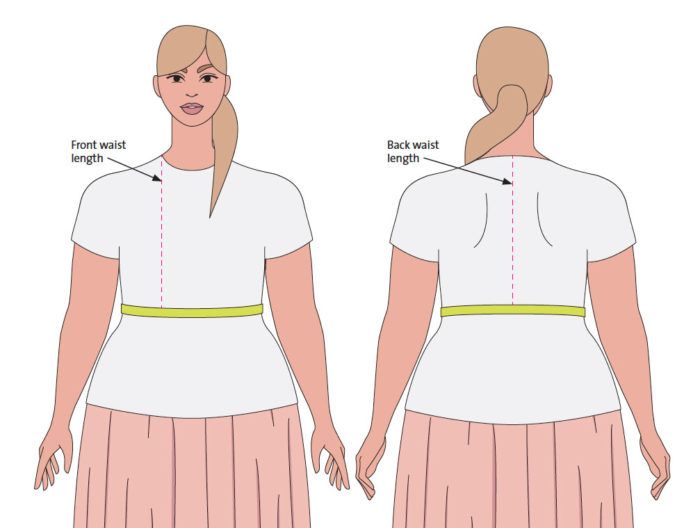
Q: I’m planning to make some fitting adjustments to a pattern, but the waistline is not marked on it. How do I determine where the waistline is on the pattern? Should I draw a straight line across the pattern when I figure out what the correct location is, or a curved line?
—Lynda Park, Evanston, Illinois
A: Threads Contributing Editor Louise Cutting, creator and owner of Cutting Line Designs patterns, takes us through the easy steps to locate the waistline on a pattern: The most effective way to mark the waistline is to measure your body, then transfer those measurements to the pattern. This way, the fit adjustments you make correspond to your figure, rather than to whatever standard upper body length the pattern designer used when drafting the pattern.
1. Mark your own waist. Begin by putting on a close-fitting T-shirt. Tie a length of 1/4-inch-wide elastic around your waist so you have an accurate target for your measurements.
2. Measure the front and back waist lengths. Standing in front of a mirror, place one end of a tape measure at the neckline end of the shoulder seam. Measure down from this point, over the bust, to the elastic at your waist. Record this measurement. In the back, measure from the prominent bone at the center back of your neckline down to the elastic at your waist. You may need a helper to get an accurate measurement. Record the measurement.
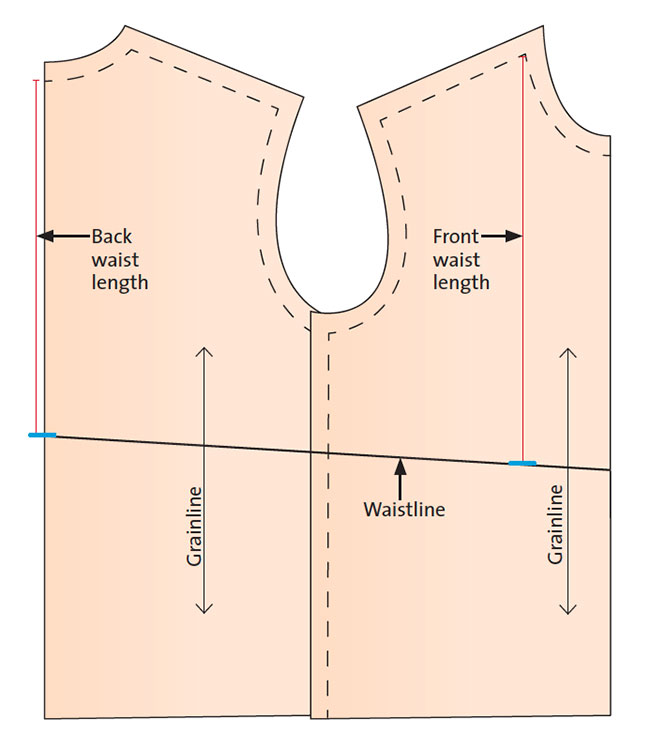
3. Mark the front waist level. Lay the front pattern on a worksurface. Locate the intersection of the shoulder and the neck stitching lines. (You may have to draw these stitching lines if they are not marked on the pattern.) Measure straight down from this intersection, parallel to the grainline, the length you recorded for your front measurement, and make a 1-inch mark.
4. Mark the back waist level. Repeat the previous step for the back, measuring down the center-back line from the neckline stitching line the length you recorded for your back measurement. Make a 1-inch mark.
5. Draw the waistline. Draw stitching lines along the front and back side seams. Overlap the front and back pattern pieces at the side seam edges with the stitching lines aligned. With a straightedge as a guide, draw a line from the waist-level mark at center back through the waist-level mark on the front, continuing the line to center front. Your waistline may be higher in the front or the back, so the line you draw may not be parallel to the hem, but this gives you an accurate indication of where it should be on your pattern.
This article was originally featured in the Q&A department of Threads #209 (June/July 2020).
Illustrations: Steven Fleck
Do you have a question? Send it to us and we’ll find an expert’s answer.
via mail: Threads Q&A, 63 South Main Street, Newtown, CT 06470-5506
via email: ThreadsQ&[email protected]


Log in or create an account to post a comment.
Sign up Log in