

If you’ve ever been to a thrift store, you’ve probably noticed that the world has enough tees in it to clothe us all for the rest of eternity — that is, if you want to run around looking like a sack of potatoes emblazoned with a corporate logo. But take an old T-shirt, apply a little sewing know-how, and you’ve got a great way to expand your wardrobe.
I’ll show you how to transform a tired tee into a sweet tunic to welcome spring. This is a simple project for the moderately experienced sewer; you need to be comfortable with machine sewing, fitting, and making some renegade alterations. The top shown here includes a cute insert with buttons at the front and a keyhole cutout at the back, but you can leave them out. That’s the best thing about restyling: you’re the designer.
Supplies
- Disappearing-ink marker or tailor’s chalk
- Pins
- Ruler or hem gauge
- Scissors
- Sewing machine
- T-shirt, very oversize
- Tape measure
- Thread to match
Measure carefully, and cut up your tee
Break out the trusty tape measure. Then take that ugly tee apart, so you can sew it into something fabulous.
1. Take your measurements. Measure your bust and bicep circumferences as well as the distance between your shoulder points.
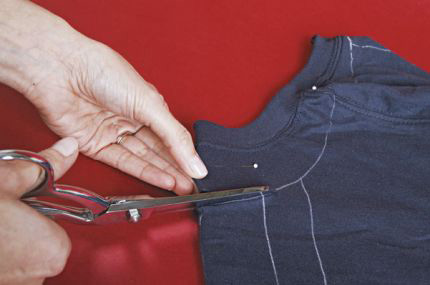
2. Enlarge and cut the neck. Fold the shirt in half along the center front (CF) so one sleeve is stacked on top of the other. Match the neckline, shoulders, and side seams on both layers. Draw the enlarged neckline with chalk, and cut on the line. On the top shown, the neckline was lowered about 2 inches, and made 1 inch wider on each side.
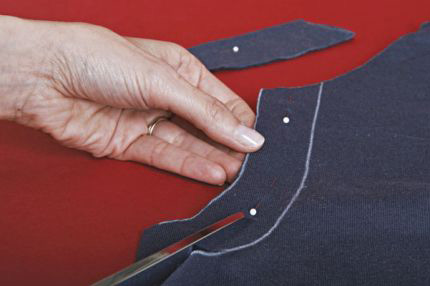
3. Create an insert at the center front. Draw a 4-inch-wide (2-inch-wide when folded) by 5-inch-long insert at the CF neckline. Cut it out, making a tiny notch at CF on the top and bottom. Then set it aside; you’ll need it again soon.
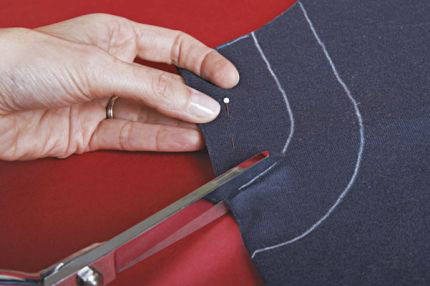
4. Measure and cut the insert opening. Draw a 1- to 2-inch line evenly around the entire insert edge on the shirt. The distance from the insert opening determines the amount of gathering you’ll have. Cut along this line, making a tiny notch at CF on the fold at the bottom of the seam.
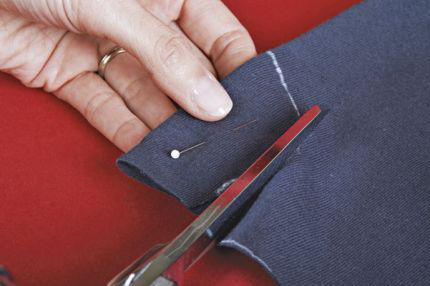
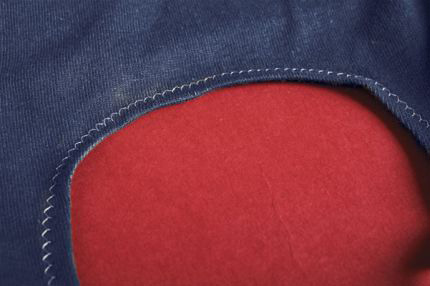
5. Make a keyhole opening in back. On the back of the shirt, mark and cut a 2-inch-wide by 3-inch-long “U” from the neck for the keyhole opening.
Sew it together in a new way
Now that you have all the pieces measured and cut, it’s time to piece them back together.
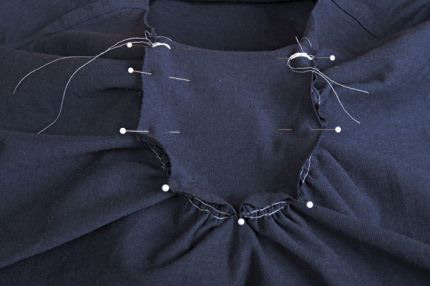
1. Gather the insert opening. Sew two rows of gathering stitches 1/8 inch and 1/4 inch from the edge around the insert opening on the shirt piece. Then pull the gathering threads until the enlarged neck is the right size for the insert.
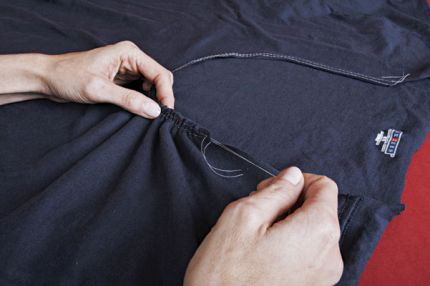
2. Pin and sew the insert. With right sides together, pin the insert to the gathered shirt, matching the notches at CF. Then sew a 1/4-inch seam allowance. Turn the shirt right-side out, and edgestitch the insert close to the seamline.
3. Sew the keyhole opening. To finish the edge of your keyhole opening, turn it under 1/4 inch, and zigzag stitch it.
4. Try on the tunic. First, check the length. To shorten the top, cut and hem. Then check the armhole seam placement, and note the sleeve length.
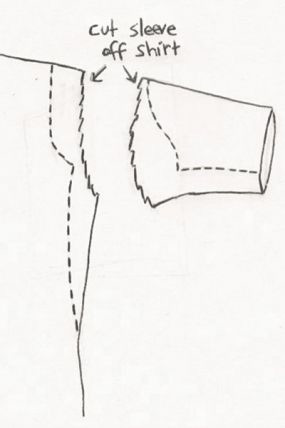
Alter the sleeves
Depending on the tee, this part can be a little tricky. If you’re happy with the positions of the armhole seams (ideally somewhere near your shoulders), you can use Method A. If the seams are way down by your elbows, you might want to do a complete overhaul of the armhole and sleeve (Method B).
|
|
|
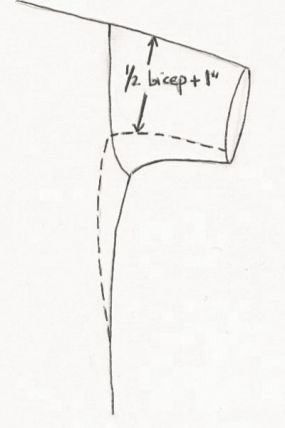
Method A – Refit the sleeve. From the folded center of the sleeve, measure half the bicep circumference plus 1 inch. Mark a new underarm seamline up to the armhole. Then adjust and blend into the side seam.
Method B – Create a new sleeve. Cut the sleeves o ff the shirt. Using a tee that fits and your shoulder width as a guide, draw a new armhole and side seam on the shirt. Then, draw new sleeve shapes on the sleeve pieces. Cut them, and attach the new sleeves.
Tip: Tunic too cute? For an edgier look, try contrasting colors for the insert, neck binding, and cuffs. You could also decorate the insert with embroidery, appliqué, or trips instead of buttons.
Add designer details
Here’s where you can get creative. Use any scraps that catch your fancy for a tunic that reflects our personal style.
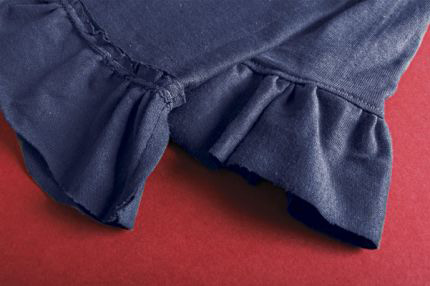
1. Make the cuff ruffles. From your T-shirt scraps, cut two strips to the desired ruffle width plus a 1/2-inch seam allowance. The length should be one and a quarter to one and a half times the full circumference of the sleeve edge. With right sides together, join the short ends of each strip to form a ring; then sew two rows of gathering stitches around the edge. Gather to fit the sleeve, and sew the ruffle to the sleeve. Press the seam allowances toward the sleeve, and topstitch around the sleeve to anchor the seam allowance.
2. Bind the neckline. Find a long, skinny scrap at least 11⁄2 inch wide and long enough to bind the neck. Be sure to leave the tails long enough to tie at the back. Find the center of the strip by folding it in half lengthwise. Pin the strip face down to the CF notch on the wrong side of the T-shirt insert. Continue pinning all the way around the neckline. Then, stitch a 1/4-inch seam allowance around the neckline.

3. Finish the neckline. Now fold the binding over the raw edge of the neckline. Tuck the edge under, and pin, continuing out to the ends of the ties. Edgestitch around the neck from the end of one tie to the end of the opposite tie.

4. Sew buttons onto the insert. Hand-stitch a few buttons to the insert at CF. No one will believe that your tunic came from an oversize T-shirt; in fact, I recommend you carry a “before” photo around as proof.


Log in or create an account to post a comment.
Sign up Log in