
Learn How to Sew a Gorgeous S-Curve Cuff
Rethink seamlines for a romantic sleeve detail
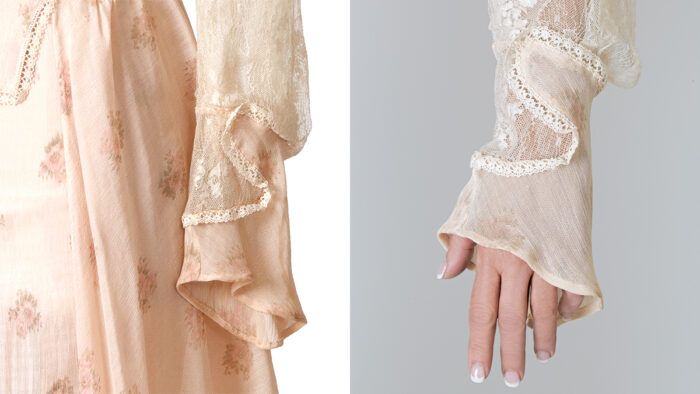
This swirly, lacy s-curve cuff adds feminine drama to a delicate dress from the 1940s. It’s derived from a clever pattern manipulation that can be applied to many standard sleeve patterns, so you can adapt the look for a modern blouse or dress. The cuff is fashioned from two pieces, joined in a sinuous seam. You can copy the shape as shown, or invent your own original shapes.
Our vintage example cuff pairs lace and a delicate printed fabric, but you may prefer to use a single fabric and let the shape, drape, and seamlines make the statement. The sewing isn’t difficult, but it takes care to stitch the opposing curves. I recommend hand-basting first. Follow my lead to transform a plain sleeve into something special.
Draft the pattern

You’ll add an extension to the sleeve pattern, and create the S-shaped seamlines.
1. Begin with a wrist-length sleeve pattern
Draw a new sleeve pattern from the elbow to the hem, omitting seam and hem allowances. Alter the circumference for a semiclose fit. Add 4-1/2 inches beyond the wrist line.
2. Turn the pattern wrong side up
Fold both side edges in toward the center and abut them, with the junction centered on the pattern. Tape the edges together. Turn the pattern right side up.
3. Draw the S-curve seamline
Draw a horizontal line 2 inches above and parallel to the original wrist line and label it AB. From C, at the sleeve’s center line, draw an S-curved line down, crossing the wrist line and terminating at D. Make the line perpendicular to the fold at D for at least 1/4 inch. Mark match points along the curved seamline.
4. Cut the pattern apart
Cut through both layers along the S curve from D to C, and across to A. Cut from B to C to separate the sleeve portion. Separate the pieces and label the larger piece Cuff Pattern 1 and the smaller piece Cuff Pattern 2. On cuff pattern 1, cut from D down the fold to the lower edge, so you can open and flatten the pattern. This will be sewn as a short seam.
5. Add flare to pattern 1
Cut three slashes, as shown, and spread each by 1 inch. Finger-press any small wrinkles flat. Tape the pattern to a fresh sheet of tissue.
6. Redraw the hemline on pattern 1
Reshape it so it dips lower on one half, and curves higher on the other. Label the lower half “back” and the higher half “front.” Make sure both short vertical seamlines are the same length.

Construct the cuff
Finalize the patterns and sew the cuff.
1. Add grainlines and seam allowances
Add a bias grainline to pattern 1, and a grainline parallel to the original foldline to pattern 2. Add 1/4-inch-wide seam allowances on all edges, and a 1/2-inch-wide hem allowance to accommodate your preferred narrow-hem method.

2. Cut pattern 1 from fabric and pattern 2 from lace
Thread-trace the seamlines on the S-curved edges.
3. Sew and finish cuff pattern 1’s short, vertical seam
Then hand-baste the pieces together along their curved seamlines, clipping as you proceed along the seam. Machine-sew the S-curve seam.
4. Narrow-hem the cuff and attach it to the sleeve
Apply a narrow lace trim to the seam by machine, if you wish, to conceal the seam allowances.

Judith Neukam is a Threads contributing editor.


Log in or create an account to post a comment.
Sign up Log in