

This summer, make a fashion statement on the beach. It’s easy to design and create a fun cover-up you’ll love to wear, based on a basic T-shirt pattern.
We started with Simplicity SewStylish 2190 (now out of print but you can often still find it for sale on eBay or Etsy or choose any basic t-shirt pattern), made simple pattern changes to the pattern View C, and added fun and decorative details. Follow these ideas, or mix different elements to make looks unique to your style.
Pom-pom Trimmed Cover-up
Make an elegant, short-sleeve chiffon tunic with playful trim along the sides. We’ll show you how to add length and width to change the pattern, then sew a bias-trim neckline and apply decorative trim along the side seams. Use the View C front and back pattern pieces, omitting the pocket.
Alter the Cover-up Pattern
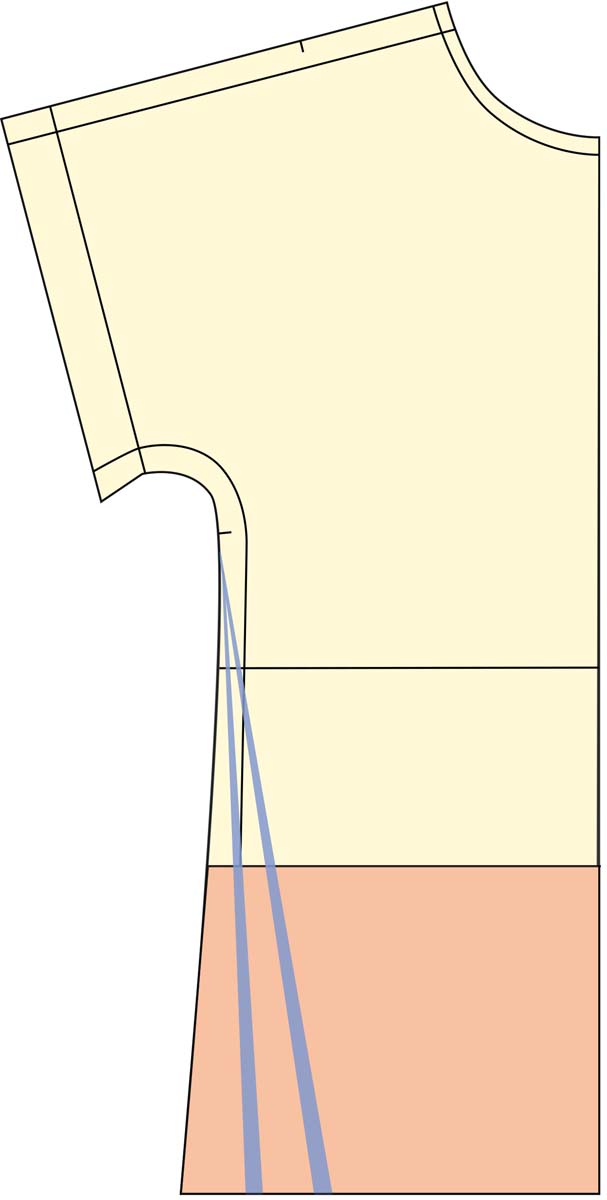 1. Lengthen the T-shirt into a tunic. Measure from your upper shoulder point to the desired tunic length. Extend the pattern to the new length, plus hem allowance. For this style, we added 8 inches at the hem.
2. Add width to the body. On the pattern front, draw two lines from a point in the underarm to the hem. Angle the lines to be a few inches apart at the hem. Cut along the lines, and spread the pattern pieces apart. Determine the total extra width you wish to add to the garment. Each slash represents 1⁄8 of the added width. (Both the front and back have four slashes.) For the design shown, we added a total of 4 inches, 1⁄2 inch in each slash.
3. Lower the front neckline. Use a fashion ruler to draft the curve. Be sure the line crosses the center front at a 90-degree angle for a smooth curve. For the design shown, we lowered the neckline 21⁄2 inches.
4. Make a new back pattern. Apply the length and width alteration to the back pattern piece; don’t adjust the back neckline.
5. Cut out the garment pieces. Cut a garment front and back. Cut a bias strip, 2 inches wide and long enough to encircle the neck with about 4 inches to spare.
Edge the Neckline With a Bias Trim
1. Sew and finish one shoulder seam. Leave the other shoulder seam open.

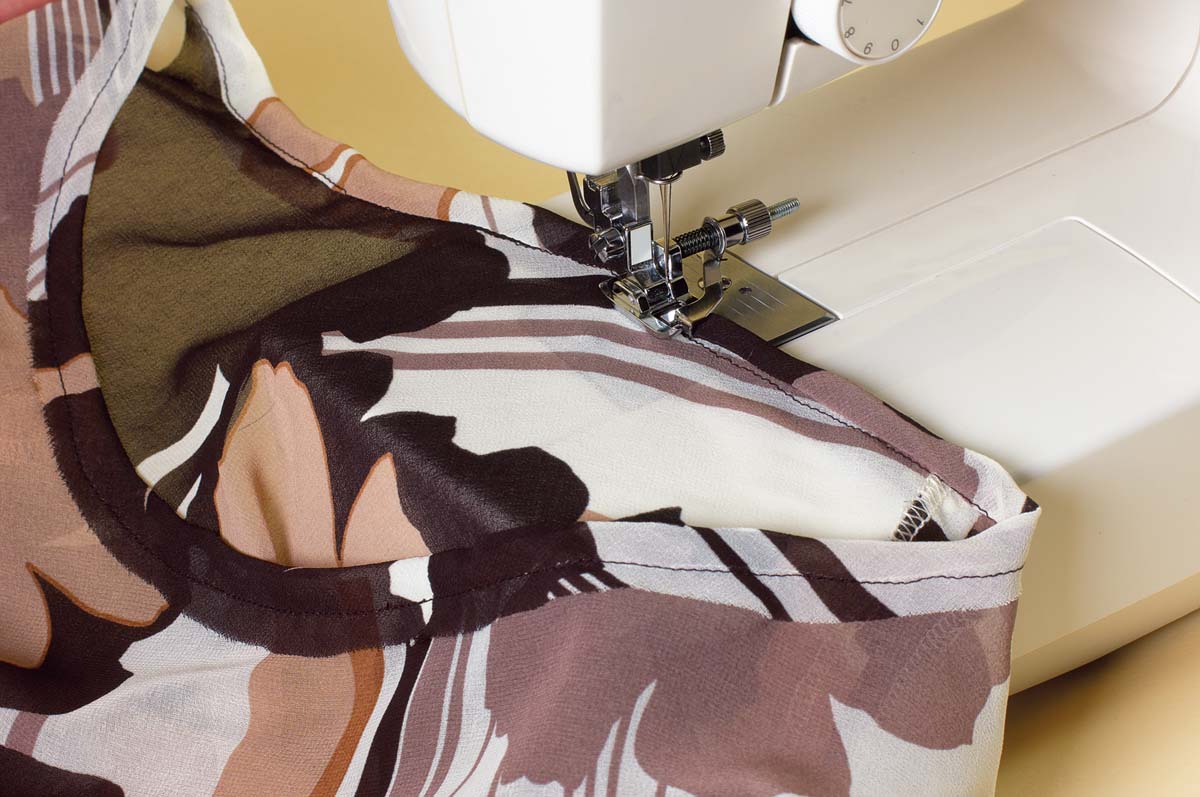
2. Sew the bias strip to the neckline. Place the garment wrong side up. Lay the bias strip wrong side up on the garment. Align the raw edges. Sew the trim around the neck, starting at an open shoulder edge and using a 3⁄8-inch seam allowance. Pull the trim slightly while sewing around the neckline curves. Press the trim toward the seam allowance. Sew the shoulder seam closed. Trim the excess bias strip. Finish the shoulder seams.
3. Wrap and pin the trim over the seam allowance to the garment’s right side. Stitch in the ditch or edge-stitch, leaving the raw edge exposed.
Add Trim, and Finish the Tunic

1. Finish the garment’s side seam allowances. In the example garment, the seam allowances are serged. Do not sew the side seams closed.
2. Sandwich the trim between the garment’s front and back. Use narrow, water-soluble tape to affix the pom-pom trim to the garment’s right side along an underarm/side seam. Position the trim’s tape within the seam allowance, so that the pom-poms extend beyond the seamline toward the garment. Approximately 3 yards of trim is needed.
3. Sew the side seams. Stitch so that the trim tape is hidden in the seam allowance and the pom-poms are exposed.

4. Finish the hems. The sample tunic has narrow, rolled edges at the bottom hem and on the sleeves.
Grecian-Style Knit Tank

Swap the T-shirt look with a sleeveless cover-up featuring fashionably deep armholes. Finish it off with statement-making shoulder loops.
Alter the Pattern
1. Follow “Alter the Pattern” steps 1 and 3 for the pom-pom-trimmed cover-up to add length and lower the neckline. For this design, we added 14 inches to the length and lowered the neckline 3 inches.
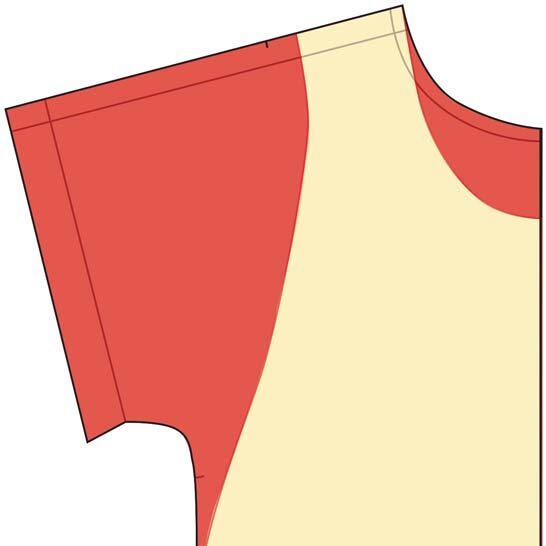
2. Draft a strap and armhole. Mark the strap width 3 inches from the neck edge on the shoulder seam. Mark the pattern waistline on the side seam. Use a fashion ruler as a guide to draw a curved armhole between the marks. Make sure the line meets the shoulder at a 90-degree angle.
Sew the Tank
1. Sew the side seams, with right sides together. Do not sew the shoulder seams. Use a 4-mm-wide double needle to topstitch the garment’s raw edges. Fold under 3⁄8 inch on the armholes and neckline; and 1 inch for the hem.

2. Cut strips for the strap-top loops. Cut a fabric strip 23⁄4 inches by 33⁄4 inches. Fold the fabric strip lengthwise with right sides together. Sew the long edge, leaving 3⁄8 inch unsewn at each end.

3. Turn the strip right side out. Form it into a loop by placing one short edge within the other. Fold the seam allowances in and hand-stitch the opening closed.

4. Slide the fabric loops onto the garment’s front straps. Push them down a few inches. Pin and sew the shoulder seam, with right sides together. Then slide the loops up to cover the seam. Hand-tack the loops in place.

Slide the loops onto the straps. |

Sew the shoulder seam closed.
|
Have you made a cover-up? If so, be sure to share pictures in our Readers Closet gallery or tag us on Instagram with #memadethreads.


Log in or create an account to post a comment.
Sign up Log in