
How to Create a Furled Cuff
A shaped edge adds an organic twist
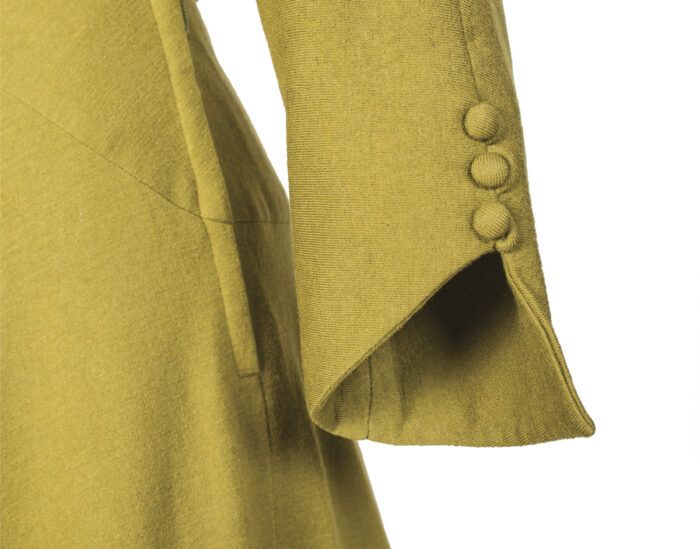
This mid-century wool jersey dress uses engineered seaming details to give interest to a simple silhouette. The designer, Marion McCoy (1912–1960), manipulated the fabric with merging darts and innovative seaming to sculpt a form-fitting, meticulously crafted day dress with a furled cuff.
For this design, she also created a shaped hem on the dolman sleeves. The visual effect is of a sleeve that wraps around the forearm, but the method is more straightforward: A simple change along the hem edge of a two-piece dolman sleeve pattern yields a shape that combines geometry with an organic line. You can modify any sleeve pattern that has an under- and overarm seam for the same style.
Adapt a two-piece sleeve pattern
Convert a sleeve pattern that has an under- and overarm seam by shaping the hemline and adding a deep facing. Begin by removing the original hem allowances from the front and back sleeve patterns.
1 Add a cut-on back hem facing. Make it 5-1⁄2 inches deep, and shape it to reflect the sleeve back’s lower portion.
2 Shape the front hemline. On the overarm seamline, make a mark 2-1⁄2 inches above the original hemline. Draw a diagonal line from this point to the hemline at the underarm seamline. Add a 3⁄8-inch-wide hem allowance along this new hemline.
3 Create a front hem facing. Make a mark 5-1⁄2 inches above the new hem seamline on the underarm seamline. Trace the lower portion of the new sleeve front pattern from this level to the hemline.
4 Cut the fabric. Using the new sleeve front and back patterns, cut the sleeves and front facing.
 |
Construct the sleeve
Assemble the sleeves with their hem facings for a clean finish. Start by making self-fabric bias tubes for button loops, and covering six small buttons with fabric.
Start your 14-day FREE trial to access this story.
Start your FREE trial today and get instant access to this article plus access to all Threads Insider content.
Start Your Free TrialAlready an Insider? Log in


Log in or become a member to post a comment.
Sign up Log in